Calcium Reactor (CO2 control via pH)
Reading time: ~15 minutes · Execution time: ~30 minutes (excluding hardware) + several days of tuning · Audience: reef aquarists with medium-high calcium/alkalinity consumption who have or want to install a CaCO₃ reactor
🔵 Advanced Guide — not part of the 01-08 onboarding path. Tackle this only if you have already configured sensors, plugs, and basic automations (ATO, temperature), and actually need a calcium reactor.
1. What you are about to do
A calcium reactor (CaRX) is a small cylinder where tank water is circulated through a layer of calcium carbonate (CaCO₃) while CO₂ is injected. The CO₂ lowers the pH inside the reactor, dissolving the carbonate, and the water that comes out carries calcium (Ca²⁺) + carbonates (HCO₃⁻) into the tank — the two main ingredients for the growth of SPS/LPS coral skeletons.
The problem: you need to maintain the pH inside the reactor within a narrow band (typically 6.3-6.7) to dissolve the media without overdoing it. Too much CO₂ = pH too low, too much dissolved media, shocked tank. Too little = pH doesn't drop, no dissolution, useless reactor.
JoyReef automates exactly this: it reads the pH at the reactor's outlet with a dedicated probe and opens/closes a solenoid valve on the CO₂ tube to keep the pH where you want it.
In this guide, you will configure:
- The pH probe monitoring the reactor (calibrated!)
- The CO₂ solenoid valve connected to a smart plug
- The target pH (e.g., 6.5) and the hysteresis band (e.g., ±0.05)
- Safety features (minimum pH cut-off + command cooldown)
⚠️ A calcium reactor is not a "set and forget" automation. Unlike ATO, it requires weekly monitoring of tank parameters (Ca, KH, Mg, tank pH) for several weeks until you find the equilibrium point. Initial settings are just a starting point.
2. What you need
Reactor Hardware
Things you must have or get before touching the portal:
- ✅ A calcium reactor installed and hydraulically functional: water inlet, water outlet, media filling (CaCO₃ granules or coral skeleton chips), adjusted effluent drip rate
- ✅ A CO₂ cylinder with a pressure regulator/manometer and bubble counter
- ✅ A 12V or 220V CO₂ solenoid valve connected between the regulator and bubble counter (this is what JoyReef turns on/off)
- ✅ A BNC pH probe dedicated to the reactor (NOT the tank's pH probe — they are two different values measuring different things)
- ✅ A probe chamber inserted on the reactor's outlet tube (or inside the reactor itself depending on the model)
JoyReef Portal
- ✅ A primary tank already set up (see guide 04)
- ✅ The reactor pH probe connected to a dedicated JoyReef pH device (see guide 18), properly calibrated (this is the most important thing — see sec. 5)
- ✅ A Tasmota smart plug configured and assigned to the tank (see guide 05), with the CO₂ solenoid valve connected. Typically name the plug something like "Reactor CO₂" or "CO₂ Solenoid"
💡 The CO₂ solenoid valve is normally closed (NC). This means: when NOT powered, it blocks the gas. JoyReef turns on the plug to open the CO₂ flow, turns it off to close it. This is the expected default behavior. If you have a NO (normally open, rare) valve, the logic is reversed — but generally, you won't encounter this.
⚠️ pH Probe Calibration: essential. An uncalibrated probe can be off by as much as 0.5-1 pH, and on a calcium reactor, this means shock or an inert reactor. Calibration is done with two buffers (pH 7.0 and pH 4.0) on the pH device page (Devices → open the pH probe → Calibration). See guide 18 for the step-by-step procedure.
3. How the control works
Two minutes of key concepts before touching the page.
The control loop
JoyReef runs a simple loop on the controller:
every N seconds:
    read the pH from the reactor probe

    if pH > (target + hysteresis/2):           → reactor "slow" (low CO2)
        open the CO2 solenoid valve

    if pH < (target - hysteresis/2):           → reactor "fast" (too much CO2)
        close the CO2 solenoid valve

    if pH <= cut-off:                        → EMERGENCY
        forcibly close CO2, alarm

    if pH is within the band:
        do nothing, leave it be
Target and Hysteresis (in practice)
- Target: the pH at which you want to maintain the reactor. Typical: 6.5 (range 6.2-6.8 depending on media and tank consumption).
- Hysteresis: the "tolerance band" around the target. Example: target = 6.5, hysteresis = 0.1 → the band is 6.45-6.55. CO₂ opens when pH > 6.55, closes when pH < 6.45.
The narrower the hysteresis, the more reactive the control but more ON/OFF cycles (wear on the valve, the smart plug). The wider it is, the "softer" the control but the pH oscillates more.
Recommended starting values: target 6.50, hysteresis 0.10.
Minimum pH Cut-off (vital safety)
The cut-off is an absolute safety threshold. If the pH drops below this value (for any reason — faulty probe reading low, valve stuck open, calibration error), JoyReef forces the CO₂ to OFF and logs an alarm.
Recommended value: 6.00. Do not go below 5.9 even if you are temporarily "okay with the reactor being like that."
This is your safety net against the most frequent incident: a probe reading falsely high and making the system think "more CO₂ is needed" → valve always open → real pH drops below 5.5 → stressed corals, stressed bacteria, KH drops rapidly.
Command Cooldown
Minimum time (in seconds) between an open command and the subsequent close command (or vice versa). Prevents the valve from "bouncing" on micro-fluctuations of pH.
Recommended value: 60 (= 1 minute). Once commands are given, they remain stable for at least one minute.
4. Step 1 — Open the Calcium Reactor page
From the JoyReef portal:
- Open portal.joy-reef.com and log in
- In the left menu, click on "Calcium Reactor" (it may be in Config → Calcium Reactor depending on your version)
- Or go directly to
portal.joy-reef.com/calcium-reactor
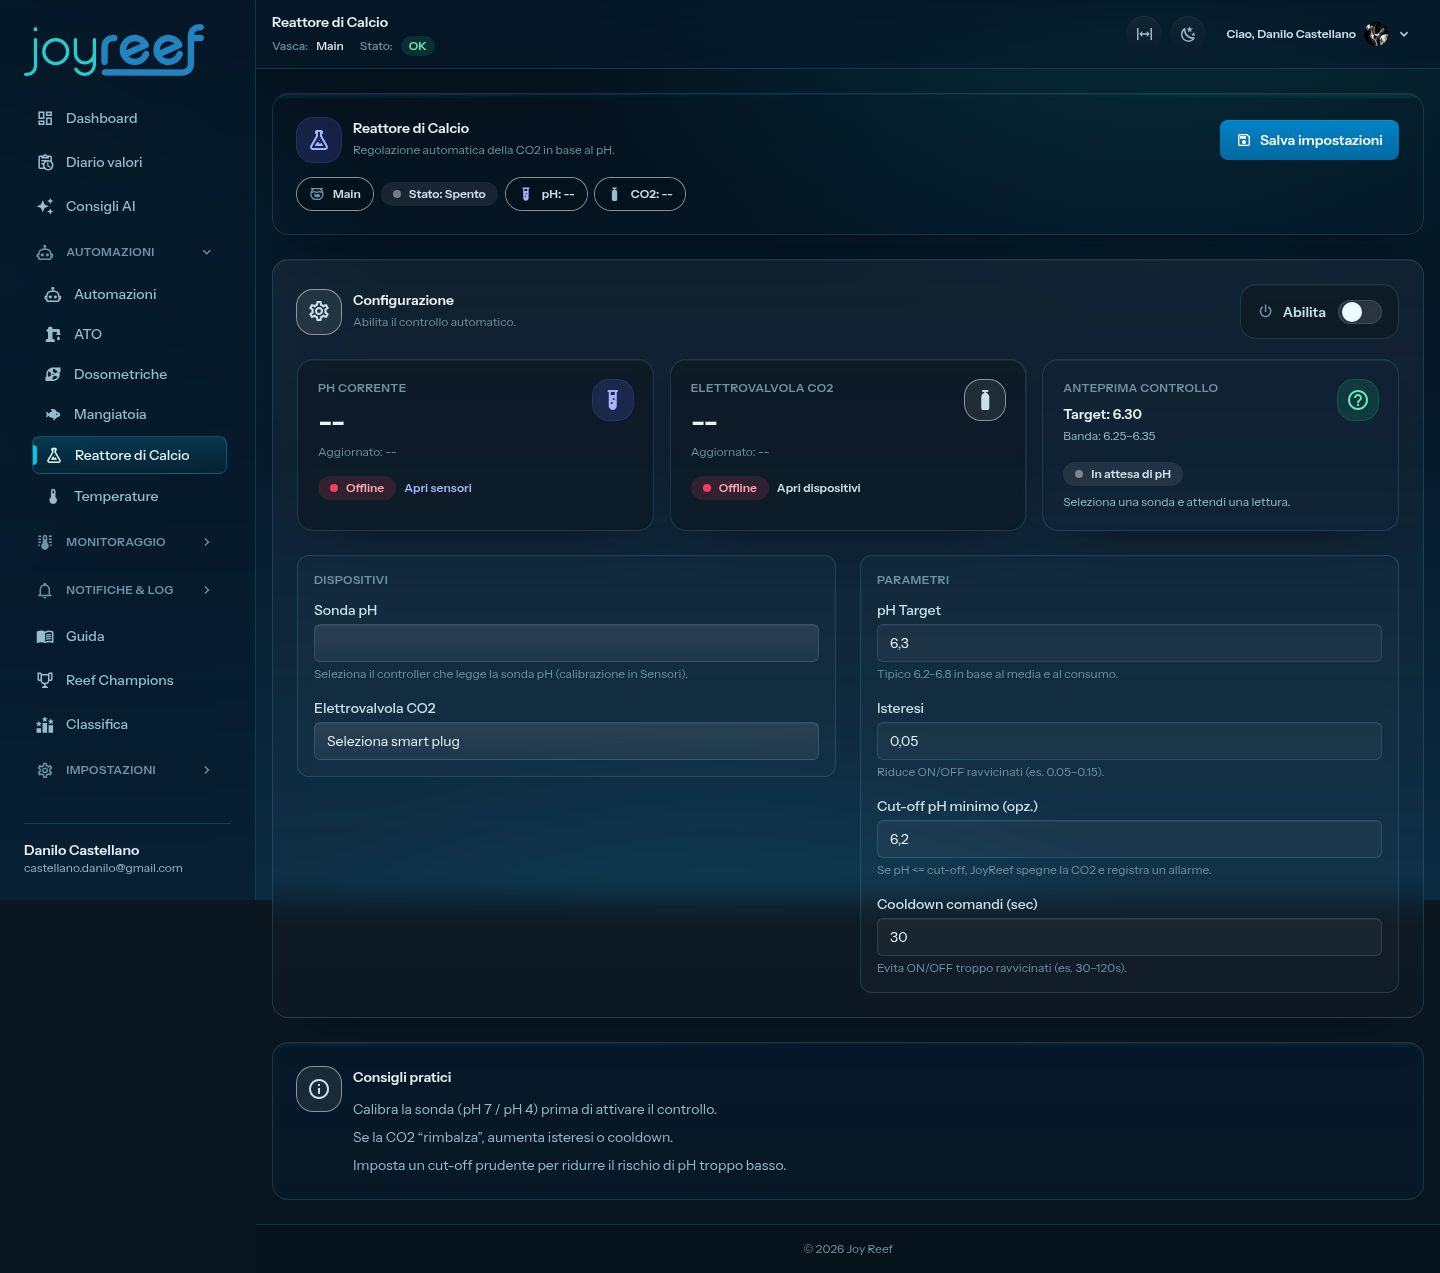
The "Calcium Reactor" page opens with several boxes:
- Header with status (Active/Off) and "Save Settings" button
- Live monitor: current pH + CO₂ solenoid status
- Configuration ("Enable" toggle)
- Devices (probe + plug)
- Parameters (target + hysteresis)
- Safety (cut-off + cooldown)
- Control Preview (shows what the system would do with current parameters)
- Practical Tips
If an orange banner "Tank not selected" appears → primary tank missing (guide 04).
If an orange banner "Incomplete configuration" appears → probe or plug missing, but it's normal at first access. We will fill them in the next steps.
5. Step 2 — Calibrate the pH probe (crucial, first of all)
Do not skip this step. An uncalibrated probe makes the system useless or dangerous.
What you need
- Two calibration buffers: pH 7.00 and pH 4.00 (single-use sachets or liquids in bottles, negligible cost, last months)
- RO/osmotic water to rinse the probe between buffers
- A clean small cup for each buffer (avoid cross-contamination)
Procedure
- Go to Devices and open the reactor's pH device (it's the one dedicated to the reactor probe, not the tank's one)
- Go to the Calibration section (direct URL
portal.joy-reef.com/ph/{id}) and start the 2-point wizard: - Neutral point (pH 7.0): rinse the probe, immerse it in the pH 7 buffer, wait 30-60 sec for it to stabilize, click "Calibrate pH 7.0" - Acid point (pH 4.0): rinse, immerse in pH 4 buffer, wait, click "Calibrate pH 4.0" - The device calculates offset/slope and saves the calibration
💡 For the full details (assembly, ATC, pH device troubleshooting) see guide 18.
After calibration, rinse the probe with RO water, reinsert it into its chamber in the reactor, and wait 10-15 minutes before considering its readings stable.
💡 Calibrate every 3 months. pH probes "drift" over time (especially in salt water). A quarterly recalibration ensures reliable readings.
⚠️ Do not reuse buffers. Once a buffer is opened, its accuracy decays rapidly. Fresh buffer for each calibration.
💡 Automatic temperature compensation (ATC). The pH device corrects the reading based on the tank temperature, which it receives automatically from the portal — you just need the pH device assigned to the same tank as the controller measuring the temperature. You don't have to wire any temperature probe to the pH device (see guide 18).
Returning to the Calcium Reactor page, the probe should now read sensible values (usually 6.3-7.0 in an already functioning reactor, 8.0+ if the reactor is off or there is little CO₂).
6. Step 3 — Configure probe and solenoid valve
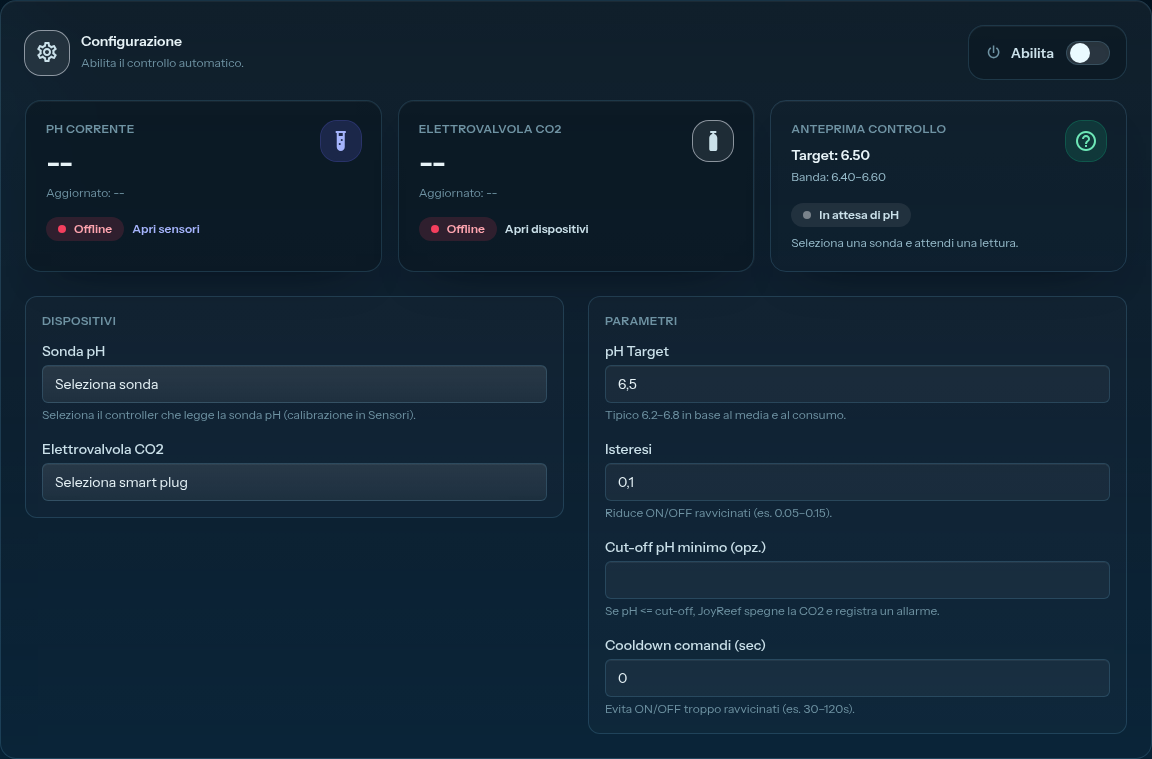
In the "Devices" section, you find 2 menus.
pH Probe
In the "pH Probe" menu, select the reactor's pH device. The menu shows the pH devices of your tank: choose the one dedicated to the reactor (recognizable by the name you gave it, e.g., "Reactor pH").
💡 Each pH probe is now a dedicated device of its own (guide 18): here you select the right device directly. No more ambiguity like "multiple probes on the same controller" — if you also have a tank pH or a titration pH, they are separate devices with distinct names.
CO₂ Solenoid Valve
In the "CO2 Solenoid Valve" menu, select the smart plug to which you connected the solenoid valve. If you named it well in guide 05 (e.g., "Reactor CO₂"), you'll recognize it immediately.
7. Step 4 — Set target and hysteresis
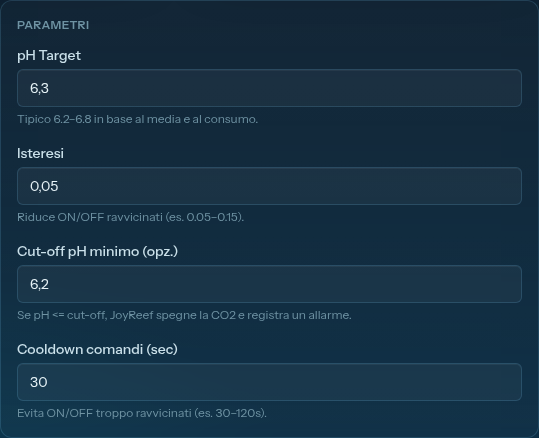
In the "Parameters" section, you find 2 fields.
pH Target
The pH you want to maintain at the reactor outlet.
Recommended starting point: 6.50
| Type of media | Recommended target |
|---|---|
| Medium-fine Aragonite (granules ~2-5mm) | 6.50 (range 6.4-6.6) |
| Coarse Aragonite (granules ~5-10mm) | 6.40 (more "aggressive" to attack large granules) |
| Coral skeleton chunks (large pieces) | 6.30 |
💡 Start conservatively (6.6-6.7) and gradually lower it over time while monitoring Ca/KH in the tank. It is much easier to increase media consumption than to recover from a KH crash due to too much CO₂.
Hysteresis
The tolerance band around the target.
Recommended starting point: 0.10
So with target 6.50 and hysteresis 0.10: - CO₂ OPENS when pH > 6.55 - CO₂ CLOSES when pH < 6.45 - Between 6.45 and 6.55, the system does not intervene
If you see frequent ON/OFF cycles (dozens per day), increase to 0.15. If you see wide pH fluctuations (>0.2 above or below target), reduce to 0.05 — but watch out for valve wear.
8. Step 5 — Set safety features
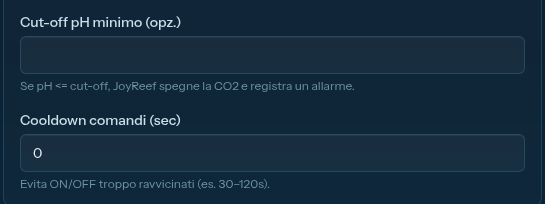
In the "Safety" section, you find 2 fields. They are optional from a software constraint level but DO NOT skip them.
Minimum pH Cut-off
The pH below which the system forces CO₂ to OFF and generates an alarm.
Recommended starting point: 6.00
⚠️ Do not set values too low (e.g., 5.5) "to be safe": if the probe reads incorrectly, the cut-off won't trigger in time and damage will already be done.
6.00is a sensible compromise between false positives (useless cut-off blocking the reactor) and real protection.
Command Cooldown (seconds)
Minimum time between two consecutive state changes.
Recommended starting point: 60 (= 1 minute)
If you want a "softer" system (less reactive but more stable for the valve), go up to 120 or 180.
9. Step 6 — Activate, save, verify preview
Step 1: activate and save
- Click the "Enable" toggle in the Configuration section → it turns green
- At the top right, click "Save Settings"
- Green confirmation banner "Settings saved"
Step 2: verify the Control Preview
Below the parameters, you find a "Control Preview" section showing:
- Target: the set value (e.g.,
6.50) - Band: the non-action window (e.g.,
6.45–6.55) - Current Decision: what the system would do RIGHT NOW with the current reading
Possible decisions you might see:
- ✅ "No action (inside band)" → all ok, pH inside the band
- 🟢 "Open CO2" → pH too high, the system will open the valve at the next cycle
- 🟡 "Close CO2" → pH too low (but above cut-off), valve will close
- 🔴 "Safety: CO2 OFF" → pH below cut-off, emergency
- ⚪ "Waiting for pH" → the probe is not sending data yet, check connection
Step 3: verify the live monitor
At the top of the page, the live boxes now appear:
- Current pH (e.g.,
6.62with last update timestamp) - CO2 Solenoid Valve (ON/OFF status with timestamp)
- "Live" or "Offline" pill at the top for each
If you see the two values updating in real-time (timestamps advancing every 10-30 sec), the system is connected and operational. ✅
🖼️ Image to insert here (Active reactor page): screenshot of the page after saving, with green "Active" pill, live monitor with pH = 6.62 + CO2 OFF, decision preview "No action."
10. Verification over time (tuning phase, lasts days)
Unlike ATO/temperature, a calcium reactor requires iterative tuning for 2-4 weeks until you find the equilibrium point for YOUR tank. What changes over time:
What to monitor each week
| Tank Parameter | Target Range (reef) | What to do if out of range |
|---|---|---|
| Calcium (Ca) | 400-450 mg/L | <380: increase reactor flow OR lower pH target. >460: reduce reactor flow OR raise pH target |
| Alkalinity (KH) | 7-9 dKH (usually 8) | Same logic as Ca: the reactor raises Ca and KH together |
| Magnesium (Mg) | 1300-1450 mg/L | DOES NOT come from the reactor. If low, dose Mg separately |
| Tank pH | 7.9-8.3 (daily cycle) | If always <7.8 with reactor on, the system is "injecting" too much CO₂ into the tank: raise reactor pH target by 0.05-0.1 |
How to calibrate effluent flow (bubbles per minute)
The reactor has two independent "knobs":
- Recirculation pump (internal to the reactor): maintains movement and dissolution, usually left fixed
- Bubble counter (on the CO₂ tube): regulates how many bubbles per minute enter the reactor. More bubbles = lower pH → JoyReef will open the valve less often → lower output
Typical starting point: 30-60 bubbles/minute for a 200L tank reactor. Adjust based on consumption.
💡 One bubble/second (60 bpm) is "medium-high" consumption for a 300-400L tank with significant SPS population. Smaller or LPS-only tanks need much less (15-30 bpm).
Symptom → Action (quick guide)
| Symptom | Probable Cause | Action |
|---|---|---|
| Ca/KH drop despite active reactor | Reactor "inert" or pH target too high | Lower pH target (e.g., from 6.6 to 6.5) or increase bubbles |
| Ca/KH rise too much (>500 / >10) | Reactor too aggressive | Raise pH target or reduce bubbles |
| Tank pH drops below 7.7 at night | Reactor CO₂ reaching the tank | Raise reactor pH target by 0.05-0.1 (less CO₂ dissolved in effluent) |
| Preview always says "Open CO2" for days | Bubbles too few to reach target | Increase bubbles (turn the bubble counter knob) |
| Preview always says "Close CO2" | Too many bubbles | Reduce bubbles |
| pH oscillates by ±0.3 every minute | Cooldown too low | Increase to 120-180s |
11. If something goes wrong
"Waiting for pH" on Preview
The probe is not sending readings.
- BNC probe not connected → check the connector on the pH device
- Probe in buffer/air (not in water) → reposition in reactor chamber
- Faulty or old probe (>2 years) → replace. pH probes have a finite life.
- pH device offline → go to Devices, check status (see also the troubleshooting in guide 18)
"Jump blind" or clearly wrong pH readings
- Old calibration → recalibrate (sec. 5)
- Probe exposed to bubbles/vibration → reposition in calmer area of reactor
- BNC cable grounding → verify cable doesn't pass near pumps/power supplies (electrical noise)
- End-of-life probe → recalibrate; if values are clearly off (e.g., reads 8.5 in pH 4), toss it
Solenoid valve doesn't open/close
- Smart plug offline → go to Devices, command the plug manually. If it doesn't respond, plug problem.
- Wrong smart plug selected → return to reactor page, double-check selection
- Faulty solenoid valve → test manually by disconnecting from CO₂ and applying 220V with a direct cable. If it doesn't click, it's dead.
- Cooldown active → if you just changed state 10 sec ago and cooldown is 60s, it's normal to wait
"Safety: CO2 OFF" even if everything seems ok
- Cut-off too high relative to operating pH. If your reactor works at 6.30 and cut-off is 6.50, it always triggers. Lower cut-off (cautiously)
- Probe reading falsely low → recalibrate. If it persists, faulty probe
- RO water entered reactor (e.g., after a water change) → pH can drop transiently, normal for cut-off to trigger until equilibrium returns
KH/Ca don't rise despite active reactor
- Too few bubbles → increase
- Exhausted media → a reactor consumes its media in 6-12 months depending on consumption. Open, check, refill.
- Undersized reactor for SPS load → you need a second reactor or switch to Balling
- Blocked recirculation pump → without recirculation, water doesn't pass through media. Clean it.
Corals seem stressed after activation
You are likely injecting too much CO₂ into the tank: tank pH dropped too much, skimmer becomes less efficient, corals suffer.
- Measure tank pH for 24h (log every hour). If it goes below 7.7 at night, reactor is too aggressive
- Raise reactor pH target by 0.1 (e.g., from 6.4 to 6.5)
- Slightly reduce bubbles
- Consider installing a small CO₂ scrubber on the skimmer's air intake to clean the air entering the tank
12. Next step
If you have a calcium reactor, you will probably also use dosing pumps to supplement trace elements and magnesium (the reactor doesn't provide them). When we are ready, there is a dedicated guide:
➡️ Guide — Dosing Pumps (coming soon)
Alternatively, if your supplementation method is based on automatic KH titration (periodic KH measurement with reagent + pH probe), there is a dedicated page:
➡️ Guide — Automatic KH Titration (coming soon)
💡 Patience: a calcium reactor is probably the "slowest" system to tune in all of JoyReef. Expect 2-4 weeks of adjustments before having a stable equilibrium. Keep a small written log (even on paper) of: date, Ca, KH, Mg, average tank pH, changes made. You'll need it to understand trends.