Configure Tasmota smart plugs
Reading time: ~15 minutes · Execution time: ~15 minutes per plug · Audience: anyone who completed guide 04 and wants to automate their tank
🟢 Fundamental Guide — mandatory onboarding path. Without it, the system will not start.
🗺️ Your JoyReef Path:
- Shopping list
- Controller assembly
- Firmware + WiFi
- Tank and sensor configuration
- Tasmota smart plugs ← YOU ARE HERE
- Automations (ATO, etc.)
1. What you are about to do
A Tasmota smart plug is an adapter that plugs in between your home socket and the device (heater, top-off pump, skimmer, etc.). Once configured, the JoyReef controller can turn it on and off via WiFi, automatically based on sensors.
In this guide, you will configure a Nous A1T plug (or pre-flashed Tasmota equivalent) to talk to your JoyReef portal. Configuration is done only once for each plug.
The process is:
- The plug connects to your home WiFi (just like you did with the controller)
- You go to its web administration page (every Tasmota plug has one)
- You generate a pre-packaged configuration command from the JoyReef portal
- You paste it into the plug's Tasmota console
- The plug announces itself to the portal, and you associate it with the tank
Nothing conceptually different from what you did with the controller: same logic, different tools.
💡 How many plugs do you need? One for each device you want to automate: typically 1 for heater + 1 for top-off pump + 1 for skimmer (= 3 minimum). See shopping list section 4 for details.
2. What you need
For each plug you want to configure:
- ✅ A Nous A1T plug (or Athom EU Plug, see shopping list) factory pre-flashed with Tasmota. "Normal" smart plugs (TP-Link, Meross, Tuya, Shelly...) do not work with JoyReef
- ✅ A 2.4 GHz WiFi available at home (plugs also have the ESP8266 chip, same constraint as the controller — if you have problems, review the 5 GHz note in guide 03)
- ✅ A smartphone or PC to connect to the plug's network the first time and access its administration page
- ✅ A computer (can be the same one) with a browser to access the JoyReef portal and generate the configuration command
- ✅ Your JoyReef account already active with at least one tank created (see guide 04)
💡 No app needed to find the IP: at the end of the first WiFi configuration, the Tasmota plug directly shows the IP address it obtained from your router. Just write it down. If you accidentally lose it, you can always look for it in the router's administration page ("connected devices" or "DHCP" section) or with an app like Fing.
3. Step 1 — Connect the plug to your home WiFi
When fresh from the factory, each Tasmota plug creates its own temporary WiFi network (exactly like the controller did with joyreef-XXXXXX). You must connect to that network, tell it what your home WiFi is, and write down the IP it obtains.
Step 1: power the plug
Plug the Tasmota plug into any home outlet. Do not plug in the device yet (heater, pump, etc.) — for now, we are just configuring.
You will see a red or blue LED lit or flashing on the plug: it means it's in setup mode, waiting for a connection.
Step 2: connect your phone to the plug's network
From your phone (recommended for convenience):
- Go to WiFi settings
- Look for a network named
tasmota-XXXXXX-NNNNwhereXXXXXXare 6 characters of letters and numbers (e.g.,tasmota-A1B2C3-4321) - ✏️ IMPORTANT: write down the 6 characters
XXXXXX(in the example above:A1B2C3). This is the unique identifier of the plug; you will need it shortly to configure it in the portal. If you have multiple plugs, also note what you will use it for (e.g.,A1B2C3 → heater) - Connect to the network — usually no password is required
💡 Again, the phone might warn "Internet not available." Confirm "Stay connected" (Android) or "Keep connection" (iOS).
💡 Disable mobile data on your phone for the duration of the configuration, as you did with the controller (see guide 03 section 5). Re-enable them immediately after.
Step 3: configure your home WiFi
The phone should automatically open the Tasmota configuration page (captive portal). If it doesn't open by itself, open the browser and go to http://192.168.4.1.
On the setup page:
- Click on "Scan for wifi networks" (or "Cerca reti")
- Select your 2.4 GHz home WiFi network from the list
- Enter your WiFi password
- Leave the "Hostname" field as it is (default)
- Click "Save"
🖼️ Image to insert here (Tasmota WiFi setup): screenshot of the Tasmota setup page with the "AP1 SSId" field filled in (e.g., "HomeWiFi") and "AP1 Password" showing dots.
Step 4: write down the plug's IP
After clicking "Save," the plug reboots itself and connects to your home WiFi. Immediately after, a confirmation screen is shown with all connection data:
Module: Nous A1T
Hostname: tasmota-XXXXXX-NNNN
SSID: HomeWiFi
IP Address: 192.168.1.42    ← write this number down!
Write down the IP address (in the example 192.168.1.42): you will need it for the next step. It will be unique to your network — every router assigns different IPs.
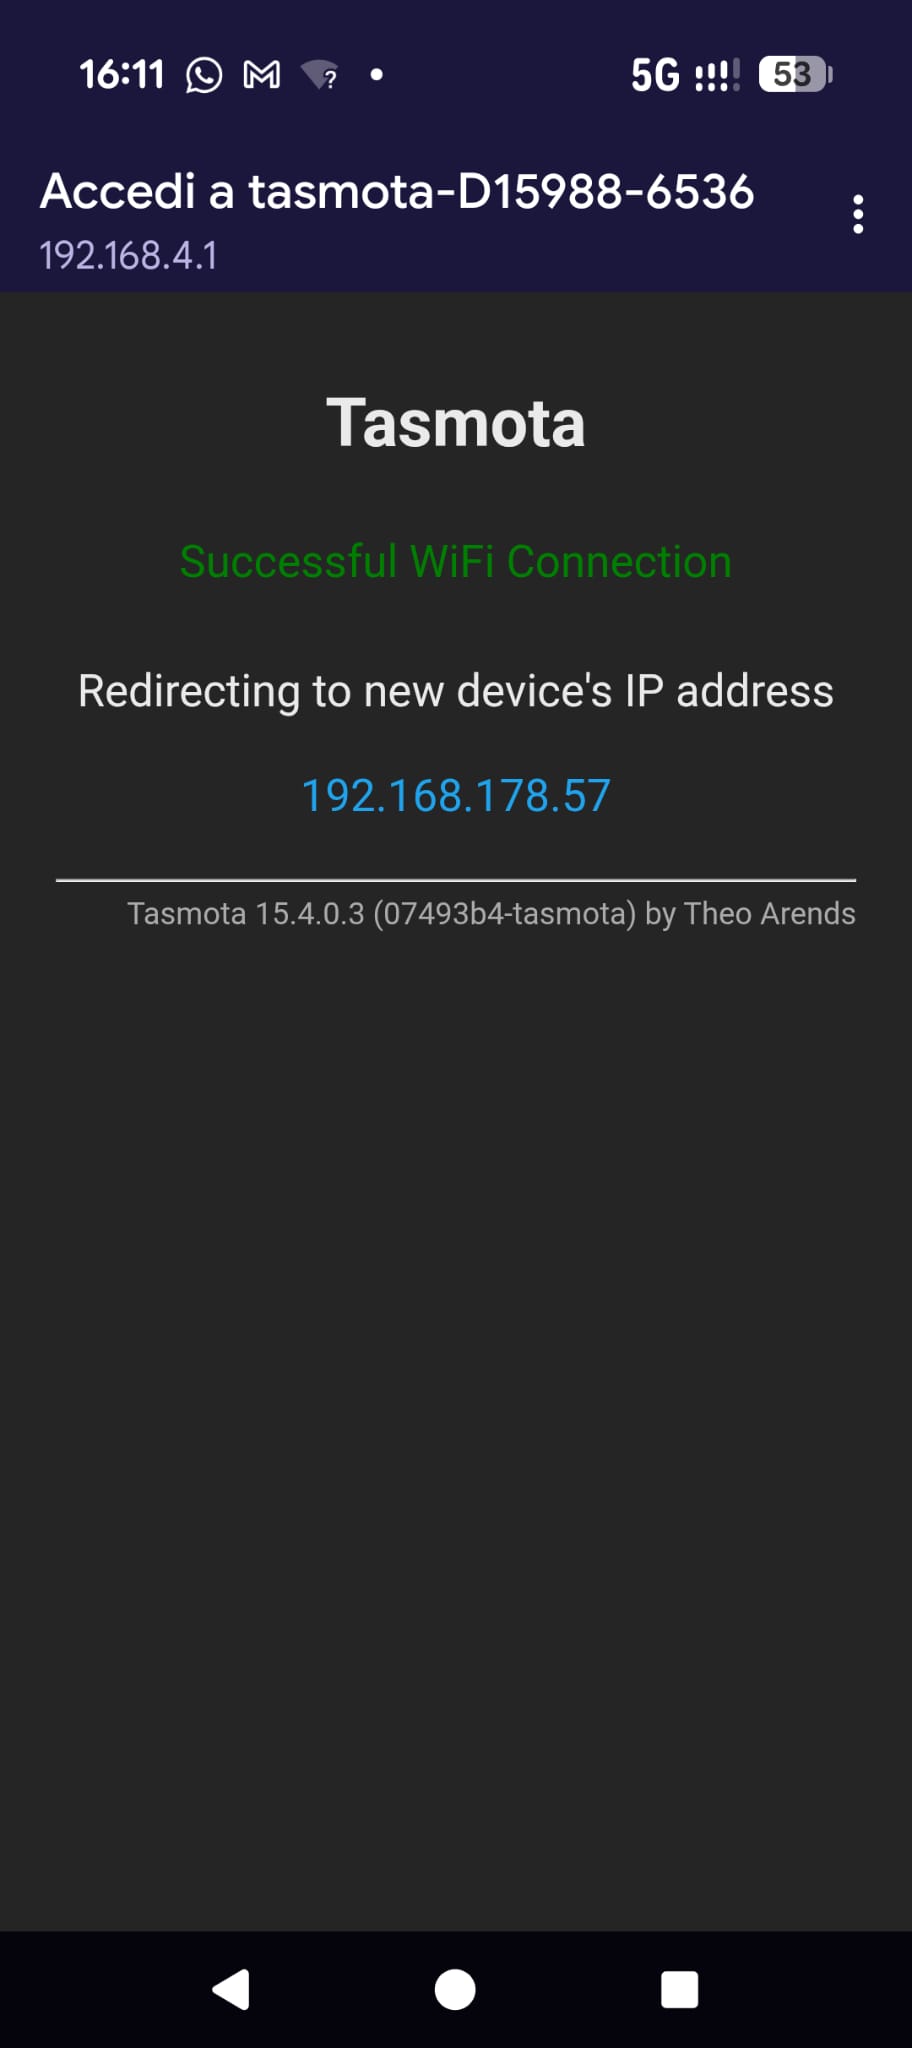
💡 Lost the IP? You can always retrieve it from the router's administration page ("connected devices" or "DHCP" section) by looking for a name starting with
tasmota-.
Step 5: reconnect your phone to your home WiFi
At this point, the tasmota-XXXXXX-NNNN network no longer exists (it turned off). Reconnect your phone to your home WiFi for the next steps. You can also re-enable mobile data.
4. Step 2 — Generate the configuration command from the portal
Now you must tell the Tasmota plug:
- "Talk to the JoyReef MQTT server"
- "When you connect, announce yourself with this unique identifier so I can recognize you"
All these instructions are in a single long command, in Tasmota jargon called a "Backlog", which you will paste into the plug's console in the next step. The great part is that the JoyReef portal prepares it for you already ready and personalized for your plug: you tell it what the plug is (the 6 ID characters you noted), and it takes care of the rest.
The portal page is organized as a 3-step wizard that accompanies you to the end: in this section 4, you do the first two (identify the plug and obtain the Backlog), and in sections 5-6, you paste the command and verify.
Step 1: open the "Add smart plug" page on the portal
On the JoyReef portal (from PC, in a browser tab):
- Open portal.joy-reef.com and log in if you haven't already
- From the left menu, click on Config → Devices
- Once on the devices page, click the "Add smart plug" button in the top right (or go directly to
portal.joy-reef.com/devices/add-plug)
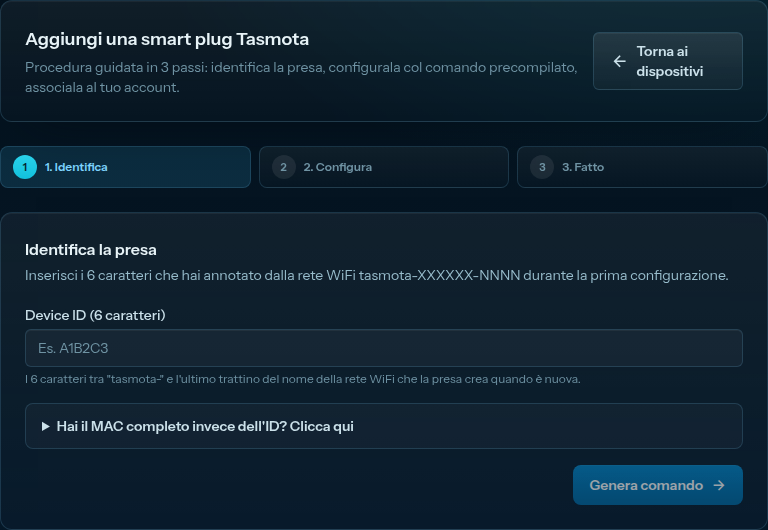
The "Add Tasmota smart plug" page opens. At the top, you will see a bar with the three steps: 1. Identify · 2. Configure · 3. Done. You are at step 1.
Step 2: identify the plug (wizard step 1)
Remember the 6 characters XXXXXX you noted from the tasmota-XXXXXX-NNNN network in the previous step? Here they are needed.
On the screen you see:
- A "Device ID" field ← here you must put the 6 characters
- A collapsible row "Have a MAC address too?" ← leave it closed, you don't need it
Proceed as follows:
- Enter the 6 characters of the ID into the "Device ID" field (e.g., if the network was
tasmota-A1B2C3-4321, writeA1B2C3here). Uppercase or lowercase doesn't matter. - Click the "Generate" button in the bottom right
The page proceeds to wizard step 2: "Configure the plug."
💡 Forgot to note the ID from the WiFi network? No problem: go to the plug's IP in the browser (e.g.,
http://192.168.1.42if you remember it, otherwise search for it in the router), on the Tasmota main page at the top you find the plug's Hostname, which is preciselytasmota-XXXXXX-NNNN. Take the 6 characters.
Step 3: choose the plug type and copy the Backlog (wizard step 2)
You are in step 2 of the wizard. At the top you see a question: "What type of plug are you adding?" with two options:
- 🔹 Generic Tasmota plug ← your choice in 99% of cases: you bought a Tasmota plug and are configuring it now
- 🔹 JoyReef preconfigured plug ← only if you purchased it from us already ready for use (not currently available for public sale)
Leave "Generic Tasmota plug" selected (it's the default choice).
Under the toggle, the following appear:
- A short numbered list of what you will do in the next steps (open IP → console → paste → wait for reboot)
- A dark box with the generated Backlog in monospace font
- A "Copy" button in the top right of the box
Proceed:
- Click "Copy"
- You will see a brief green confirmation banner "Copied!" at the top
- At this point, the command is on your computer's clipboard, ready to be pasted into the Tasmota console
Do not close this portal page! Shortly you will have to click the "Verify" button at the bottom, after you have pasted the command into the plug (see section 6).
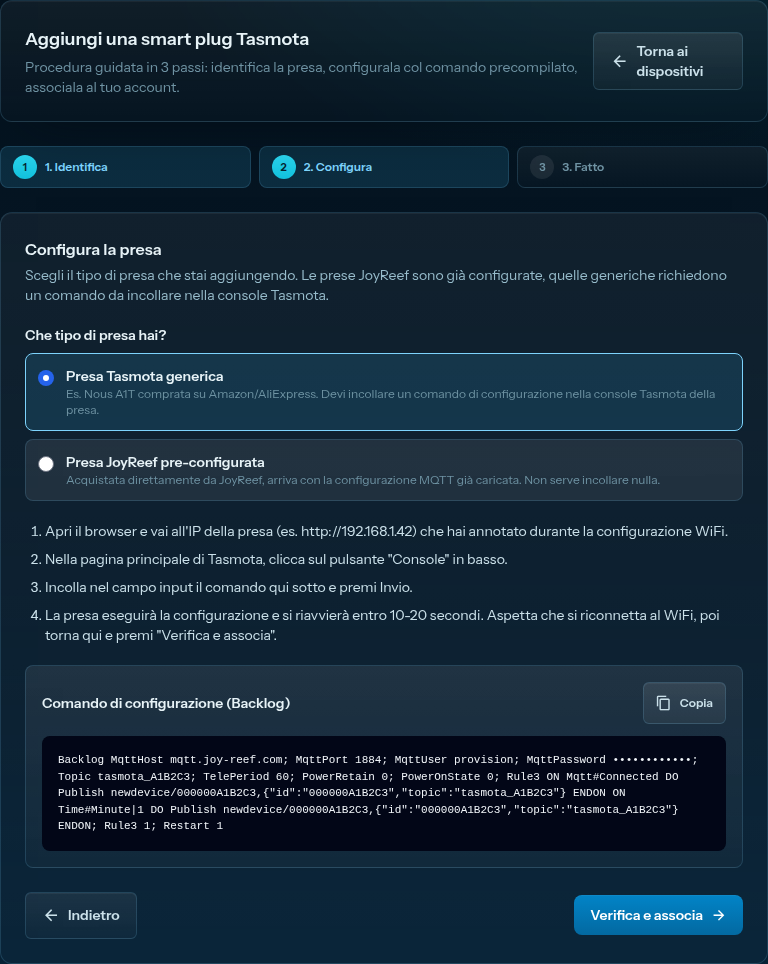
💡 What does that Backlog command do? It's a sequence of many Tasmota instructions grouped into a single line, separated by
;. In practice, it tells the plug: "set the MQTT server, port, credentials, topic, how often to send status data, how to behave after a power outage, and finally announce yourself to the portal." All this in one go, instead of having to configure it in 7-8 different forms.💡 Can you go back? Yes: at the bottom left of step 2 there is a "← Back" button that takes you back to step 1 if you entered the wrong ID. The Backlog is regenerated on the fly, without any side effects on the server side: the actual MQTT credentials are only created when you click "Verify" later.
5. Step 3 — Paste the Backlog into the Tasmota console
Now you have the command on your clipboard. You need to open the plug's administration page and paste it into its console.
Step 1: open the plug's page in the browser
On the PC (the same one you copied the Backlog from), open a new browser tab and go to the plug's IP address you noted in section 3 (e.g., http://192.168.1.42).
The main Tasmota page opens. At the top you see:
Tasmota
Module Nous A1T
Hostname tasmota-XXXXXX-NNNN
Below you find a large ON/OFF button (to manually turn the plug on/off, this is "Toggle1") and a menu with various items.
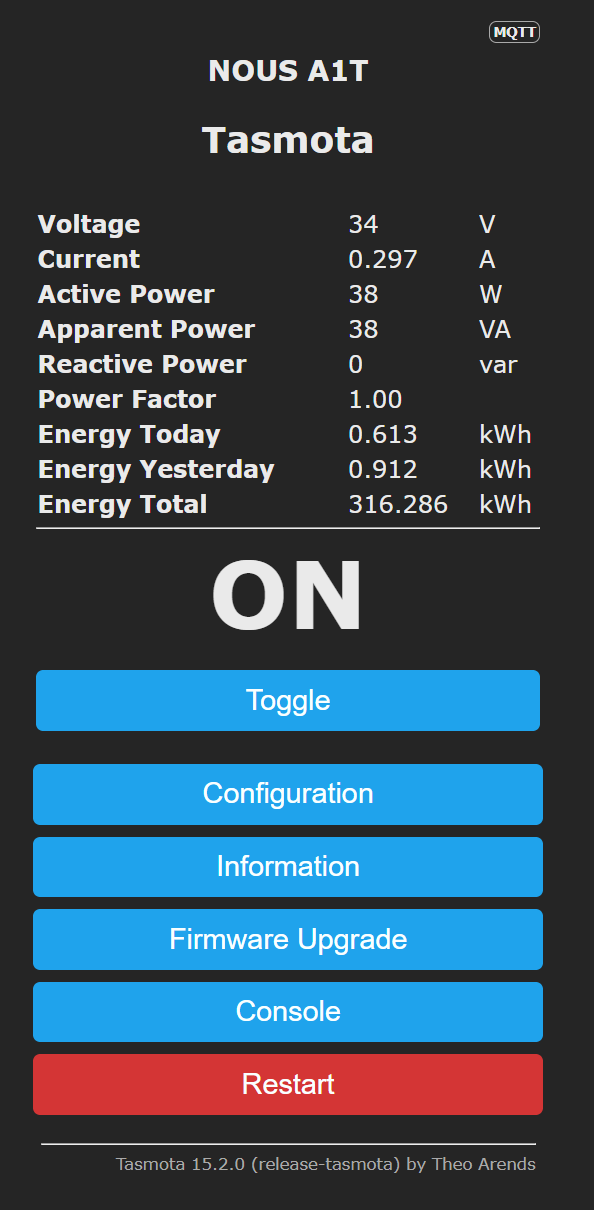
⚠️ Never update the plug's firmware. Among the items in this menu, Tasmota also offers an update of itself ("Firmware Upgrade"): ignore it, now and in the future. The version the plug ships with already talks to the portal and updating it gains you nothing, while an update interrupted halfway through leaves the plug without a valid firmware to boot from: the LED stays off, no configuration network shows up any more, and no reset sequence brings it back. That plug is scrap. This applies to plugs only: the firmware of JoyReef devices (controller, pH, doser) is updated from the portal instead, which is a different matter entirely.
Step 2: open the Console
In the menu under the ON/OFF button, click on "Consoles", then on "Console" (singular).
A black page opens that looks like a terminal: there are log lines (timestamp + messages) scrolling from top to bottom, and at the bottom an input line where you can type commands.
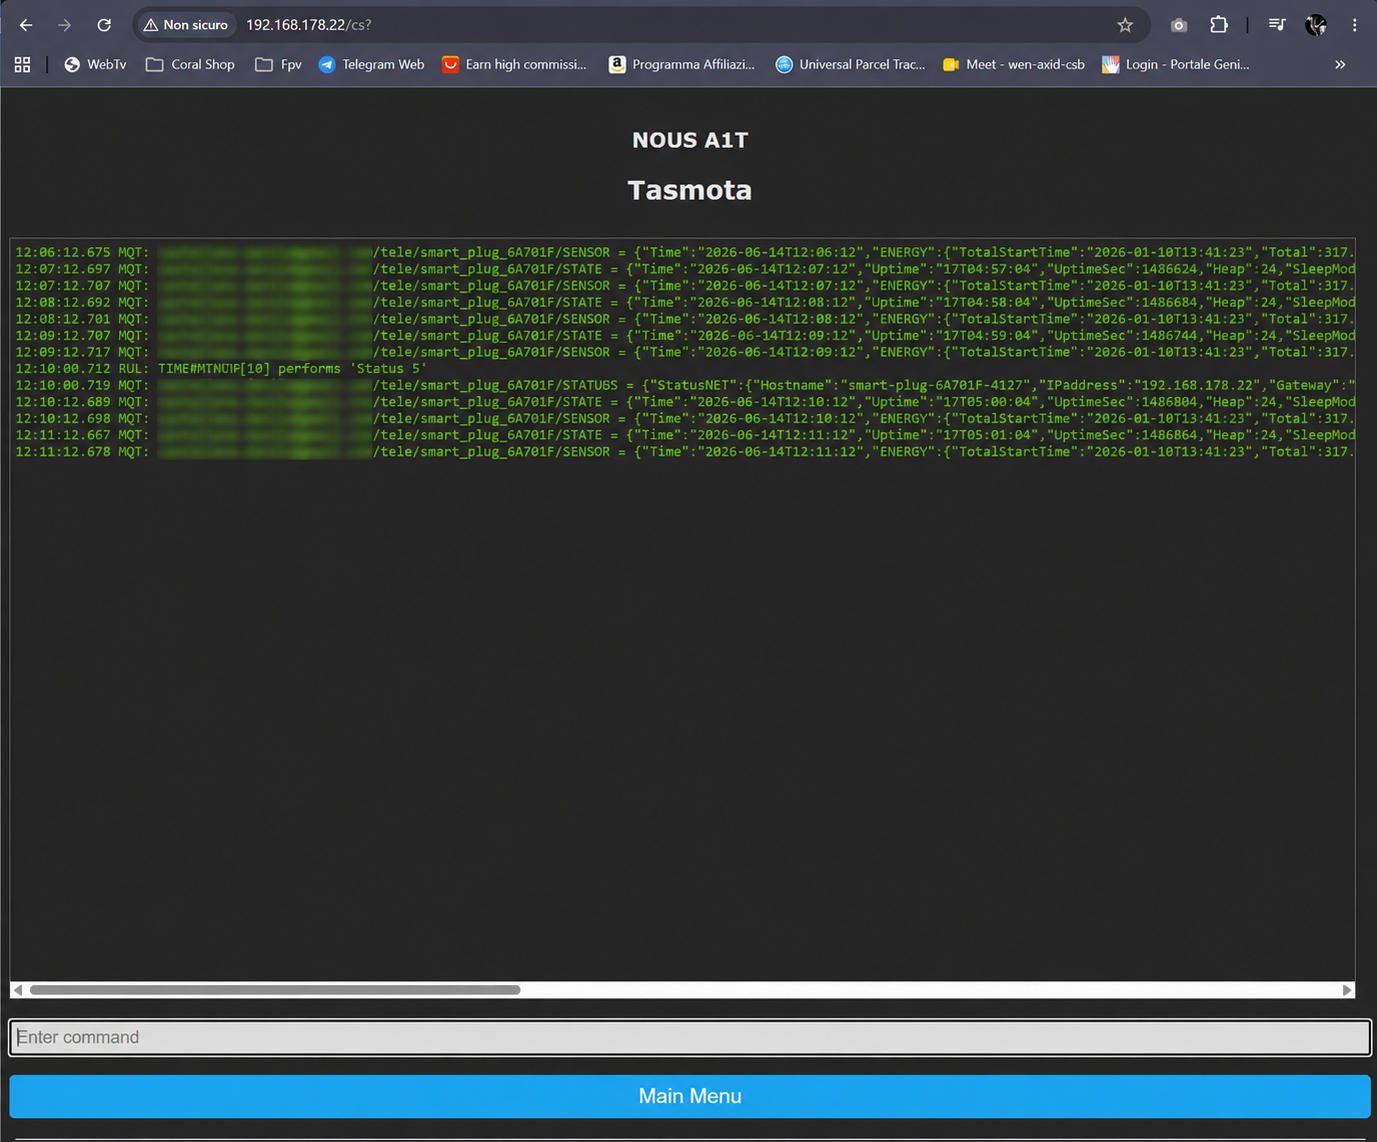
Step 3: paste the Backlog and press Enter
- Click inside the input line at the bottom of the console
- Paste (Ctrl+V on Windows/Linux, Cmd+V on Mac) the command you copied from the portal
- You will see the very long line starting with
Backlog MqttHost ...appear - Press Enter
Immediately after, several new lines scroll through the console (Tasmota confirms every single instruction of the Backlog: MQT: Host set, MQT: Port set, Topic set, etc.).
A few seconds later you will see a line like:
CMD: Restart 1
And the console freezes or shows "Connection lost": this is normal, the plug is rebooting to apply the new MQTT settings. Wait about 15-20 seconds.
🖼️ Image to insert here (Console after pasting Backlog): screenshot of the console immediately after pressing Enter, with the sequence of lines
MQT: Host set,MQT: Port set, etc.
Step 4: verify that the plug has reconnected
After the reboot, refresh the page of the console (F5 or browser "Refresh" button). If the plug's IP has changed (rare but can happen), the browser will fail to load it: in that case, retrieve the new IP from the router and reopen the console.
In the console, you should now see lines like:
MQT: Attempting connection...
MQT: Connected
RUL: MQTT#CONNECTED performs "Publish newdevice/..."
That MQT: Connected is confirmation that the plug has contacted the JoyReef MQTT server with the new credentials. The Publish newdevice/... line is the announcement to the portal: it's saying "Hey, I'm here!".
💡 Don't see
MQT: Connected? The plug might not have rebooted, or the credentials didn't go through. Go to the "If something goes wrong" section further down before continuing.
6. Step 4 — Verify from the portal and complete association
Go back to the portal tab you left open (section 4 step 3). You are still on step 2 of the wizard.
Step 1: click "Verify"
At the bottom of the page, on the right, is the "Verify" button:
- Click "Verify"
- The button becomes a spinner (a circle that spins)
- The portal queries the MQTT server: "Have you heard a new plug with ID
XXXXXXannounce itself in the last 10 minutes?"
If everything went well, after 1-2 seconds the page proceeds to wizard step 3: a large green screen with a ✅ icon and the title "Plug successfully associated!".
🖼️ Image to insert here (Wizard step 3 - Success): screenshot of the green success screen with the assigned device ID (e.g.,
#42) and the plug's MQTT topic visible in the two boxes.
On the success screen you see:
- Device ID (e.g.,
#42): the internal ID the portal assigned to this plug - Topic (e.g.,
tasmota_A1B2C3): the MQTT topic with which the plug talks to the portal - Two buttons: "Add another" (to start over from step 1 with another plug) and "Open device" (to go to the configuration page of the plug just created)
Step 2: click "Open device"
Click "Open device". You land on the edit device page (/devices/{id}/edit), where you will see all the plug's information: online status, last seen time, firmware, etc.
At this point, the plug already exists in the portal and is online. However, it still has a generic name (like tasmota_A1B2C3) and is not assigned to any tank. Let's fix this in the next step.
💡 "Plug not seen" error? If instead of proceeding to step 3 you see an orange error banner, go to the "If something goes wrong" section further down.
7. Step 5 — Name the plug and assign it to the tank
You are on the device edit page. Scroll down to the bottom: you will find a section with two fields:
- Name (e.g., currently:
tasmota_A1B2C3) - Tank (dropdown menu with all your tanks)
Step 1: assign a meaningful name
Change the Name to something that tells you what it will control. Examples:
HeaterATO PumpSkimmerNight light
The name is what you will see everywhere (dashboard, automations, events): the clearer it is, the fewer mistakes you'll make later. Avoid leaving the technical name (tasmota_A1B2C3).
Step 2: assign the tank
In the Tank dropdown menu, select the tank this plug belongs to. If you have only one tank, just choose it.
⚠️ If you don't assign the tank, the plug will NOT be controllable by automations (it will remain visible only in the "Devices" section, without being selectable in rules). You can always change the assignment later.
Step 3: save
At the bottom of the section is a "Save" (or "Update") button. Click it. You'll see a brief "Saved" confirmation banner.

You're done. The plug is configured, online, has a meaningful name, and belongs to a tank. Automations will find it in their menus.
Step 4 (optional): connect the physical device
Now that the plug is configured and functioning, you can plug in the device (heater, pump, etc.) you want to control. From this moment, every time the portal (or you manually) turns the plug on/off, you turn the connected device on/off as well.
⚠️ Verify immediately that it works: from the plug's edit page, look for the ON/OFF toggle (or use the physical button on the plug). Turn it on and off once. The connected device must respond immediately. If it doesn't, it's a power problem (not MQTT): review the connection.
8. Have more than one plug?
Repeat the entire procedure (from section 3 to section 7) for each plug. Each plug is independent: they don't need to "know" each other.
Practical suggestions to avoid confusion:
- Configure one plug at a time, all the way. Don't start the second until the first is completed and named.
- Note down immediately what each plug will be for (e.g., on a piece of paper:
A1B2C3 → heater,D4E5F6 → ATO pump). The 6 ID characters are different for each plug and easily lost. - Physically label the plugs: a sticky label on the back with the name ("heater," "ATO pump") will save your life the day you need to replace one.
💡 Multi-channel Tasmota power strips (4 plugs in one): for now, the portal supports one plug for each device. Managing multi-channel strips (e.g., Athom 4-Plug) is in the works and will arrive in a future version of this guide.
9. If something goes wrong
The most common situations that can occur during configuration, and how to get out of them.
"Plug not seen" when I click Verify
You clicked "Verify" on the portal and an orange banner appears: "The plug has not yet announced itself to the portal. Wait a few seconds and try again".
Possible causes, in order of probability:
- The plug has not yet rebooted after pasting the Backlog → wait 30 seconds and retry "Verify"
- The plug is still in the MQTT reconnection phase → go back to the Tasmota console and verify that there is the
MQT: Connectedline. If it's not there, wait. If it never arrives, go to point 3. - The Backlog was not pasted correctly → recopy it from the portal (you can go back to the wizard, it's still open) and repaste it into the console
- The ID entered in the portal does not match the plug's ID → go back to step 1 of the wizard by clicking "Back" and recheck the 6 characters
In the Tasmota console I see MQT: Failed to connect
The plug is trying to contact the MQTT server but fails. Typically it's a credentials or network problem:
- Error code
rc 5= credentials rejected by the server. This means the Backlog was pasted poorly, or you are using a Backlog generated for another account. Regenerate it from the portal and repaste it. - Error code
rc 4= username/password empty. Same action: regenerate and repaste. - Timeout without error code = the plug cannot reach the server. Verify that your home WiFi has internet and that the router is not blocking outgoing MQTT ports (port
1883or1884depending on the installation).
I lost the plug's IP
Open your router's administration page (usually http://192.168.1.1 or http://192.168.0.1, see the label on the back of the router) and look for the "Connected devices" or "DHCP client list" section. Look for a name starting with tasmota-: you'll find the current IP next to it.
Alternatively, you can use the Fing app (free, iOS/Android): scan the local network and show all connected devices with their hostnames.
I regenerated the Backlog by mistake
No problem: the Backlog is calculated client-side (in your browser) every time. No credentials are created until you click "Verify". You can click "Back" and "Generate" as many times as you want without doing damage.
I clicked "Verify" multiple times and created duplicate devices
Go to the Config → Devices page, identify the duplicate device (typically the highest ID is the most recent), and delete it from its edit page. The physical plug will remain associated with the last entry created.
The Tasmota plug froze or reset
This can happen if you sent wrong commands in the console (e.g., a manual Publish with incorrect syntax). In these cases:
Reset 2in the console → clears all MQTT/Backlog settings but keeps the WiFi. The plug returns to "fresh from the factory" state. Repeat from section 4 onwards.Reset 5in the console → full factory reset. WiFi is also lost; you will have to redo the procedure from section 3.
💡 If the console no longer responds (browser won't even connect to the IP), unplug the plug from the power for 10 seconds and reinsert it. Often this is enough.
10. Next step
Do you have at least one plug configured, online, and assigned to a tank? Perfect: now we can start making it work automatically.
The first automation I recommend setting up is Automatic Top-Off (ATO): the portal keeps an eye on the water level and, when it drops, turns on the top-off pump for a few seconds.
➡️ Go to guide 06 — Automatic Top-Off (ATO)
💡 If you also configured plugs for the heater and water change, you can tackle them immediately after the ATO: guides 07 (Temperature) and 08 (Water change) follow the same logic.