Automatic Water Change (AWC)
Reading time: ~15 minutes · Execution time: ~30 minutes (excluding hardware setup) · Audience: anyone who has completed guide 07 and wants to automate weekly water changes
🟡 Important Guide — a feature that almost everyone will want to activate. Without it, the system works but is much less effective.
🗺️ Your JoyReef Path:
- Shopping list
- Controller assembly
- Firmware + WiFi
- Tank and sensor configuration
- Tasmota smart plugs
- Automatic Top-Off (ATO)
- Temperature control
- Automatic water change ← YOU ARE HERE
- Advanced automations
1. What you are about to do
The automatic water change is probably the most "high-risk" automation and simultaneously the only one that saves you hours of real manual work: once configured, every week (or every N days) the JoyReef portal performs a partial change for you, without you having to move a single bucket.
In a healthy reef tank, partial changes of 10-15% are done every 1-2 weeks to replenish trace elements, lower nitrates, and maintain stable salinity. Manually, this means: preparing salt water, siphoning off the old, pouring in the new, repeating every time. With an automatic water change:
- A drain pump empties the sump to a predefined "low" level ("low" float sensor)
- A fill pump draws new water from a previously prepared reservoir and pours it into the sump until it reaches the "high" level ("high" sensor)
- Done. The tank has just completed a water change.
In this guide, you will configure:
- The two level sensors (low = when to stop draining, high = when to stop filling)
- The two smart plugs (drain + fill)
- The safety timeouts to avoid floods
- The weekly schedule (e.g., every Monday at 03:00)
- The advanced automations (optional)
⚠️ This is the automation that can cause the worst damage. A stuck smart plug, a failed sensor, a disconnected tube: and you find yourself with 50 liters of water on the floor or, worse, an empty tank. Configure carefully, ALWAYS test before letting it run in your absence, and consider this the first automation to invest in double/triple safety sensors.
2. What you need
The hardware investment is significant. Before starting, make sure you have:
Pumps
- ✅ A drain pump: AC or DC pump ~500-1500 L/h, positioned in the sump with the tube leading to a drain (sink, floor drain, empty tanks). Typical: a second-hand return pump, or a small Eheim Compact 1000.
- ✅ A fill pump: can be identical to the drain, positioned in the reservoir of prepared new water with the tube leading into the sump.
Smart plugs
- ✅ Two Tasmota smart plugs configured and assigned to the tank (see guide 05). One for drain, one for fill. They must be two separate plugs: the system turns them on/off independently.
- 💡 Recommended: name the plugs unequivocally, e.g., "Water Change - Drain" and "Water Change - Fill". You will see these names in the page menus and in the automations.
Level sensors
- ✅ Two float sensors, positioned in the sump at the two desired heights:
- "Change Low" = minimum safe level for return pumps (if the water drops below, the return pump sucks air and breaks!). Usually 8-10 cm above the bottom of the sump.
- "Change High" = normal operating level of the sump. Usually 1-2 cm below the standard operating level.
💡 The distance between the two sensors determines the volume of the change. Example: if the sump is 50×30 cm wide = 1500 cm² of useful section, a distance of 10 cm between the two sensors = 15 liters of change. For a 200L net tank = 7.5% change. Measure your sump section and calibrate the distance to obtain the desired volume.
Ready salt water
- ✅ A reservoir of already mixed salt water ready for use, with the fill pump inside and the tube positioned in the sump. Capacity: at least the volume of one change. Typically 20-30L for tanks up to 200L net.
- ⚠️ The reservoir must be filled manually before the change. JoyReef does not know how to prepare salt water: topping up RO water + salt + circulation + reaching stable salinity are operations you perform.
Tubes and fittings
- Flexible tubes of appropriate section for the pumps (12/16 mm for small pumps, 20/25 mm for large pumps)
- "L" or "T" fittings to direct the flow well
- Possibly secure the tubes with cable ties or suction cups to prevent them from disconnecting under pressure
3. How the water change cycle works
The sequence
The water change is a sequence orchestrated by the controller. In order:
1. USER/SCHEDULE presses "Start"
2. CONTROLLER turns on DRAIN plug    → drain pump ON
3. water in sump DROPS
4. when the LOW SENSOR signals "uncovered" (water dropped enough):
     CONTROLLER turns off DRAIN plug   → drain pump OFF
5. CONTROLLER turns on FILL plug     → fill pump ON
6. water in sump RISES (with new salt water)
7. when the HIGH SENSOR signals "covered" (water back to operating level):
     CONTROLLER turns off FILL plug    → fill pump OFF
8. cycle COMPLETED
The system is a state machine. There is never a moment when drain and fill are on together (otherwise you would just circulate water in circles).
Safety timeouts
The main risk of this system is a pump that does not stop: the sensor does not trigger (due to failure, mechanical blockage, biofilm), the pump continues to run, and:
- If it's the drain: it empties your tank
- If it's the fill: it floods your sump (overflow!) and then the floor
For this reason, each pump has a timeout in seconds: the maximum time it can remain on in a single cycle. If it exceeds it, the system stops everything and goes into fault, waiting for your intervention.
Example: drain timeout = 300 seconds. If the drain pump has been on for 5 minutes and the low sensor hasn't triggered yet, something is wrong → stop + notify.
Scheduled vs Manual
The change can be started in two ways:
- Manual: you click "Start Now" from the portal. Useful for the first test and for extraordinary changes.
- Scheduled: the controller performs the change automatically on fixed days and times (e.g., every Monday at 03:00). If the schedule is active, the system executes even if the portal is offline: the schedule lives on the physical controller.
💡 When to schedule? Typically at night (03:00-04:00) when: the room is quiet, there is less disturbance for the corals, you have time to notice problems in the morning, and the system can complete before the aquarium's "daily rhythms" (light, doses).
4. Step 1 — Open the Water Change page
From the JoyReef portal:
- Open portal.joy-reef.com and log in
- In the left menu, click on "Water Change" (water/exchange icon)
- Or go directly to
portal.joy-reef.com/water-change
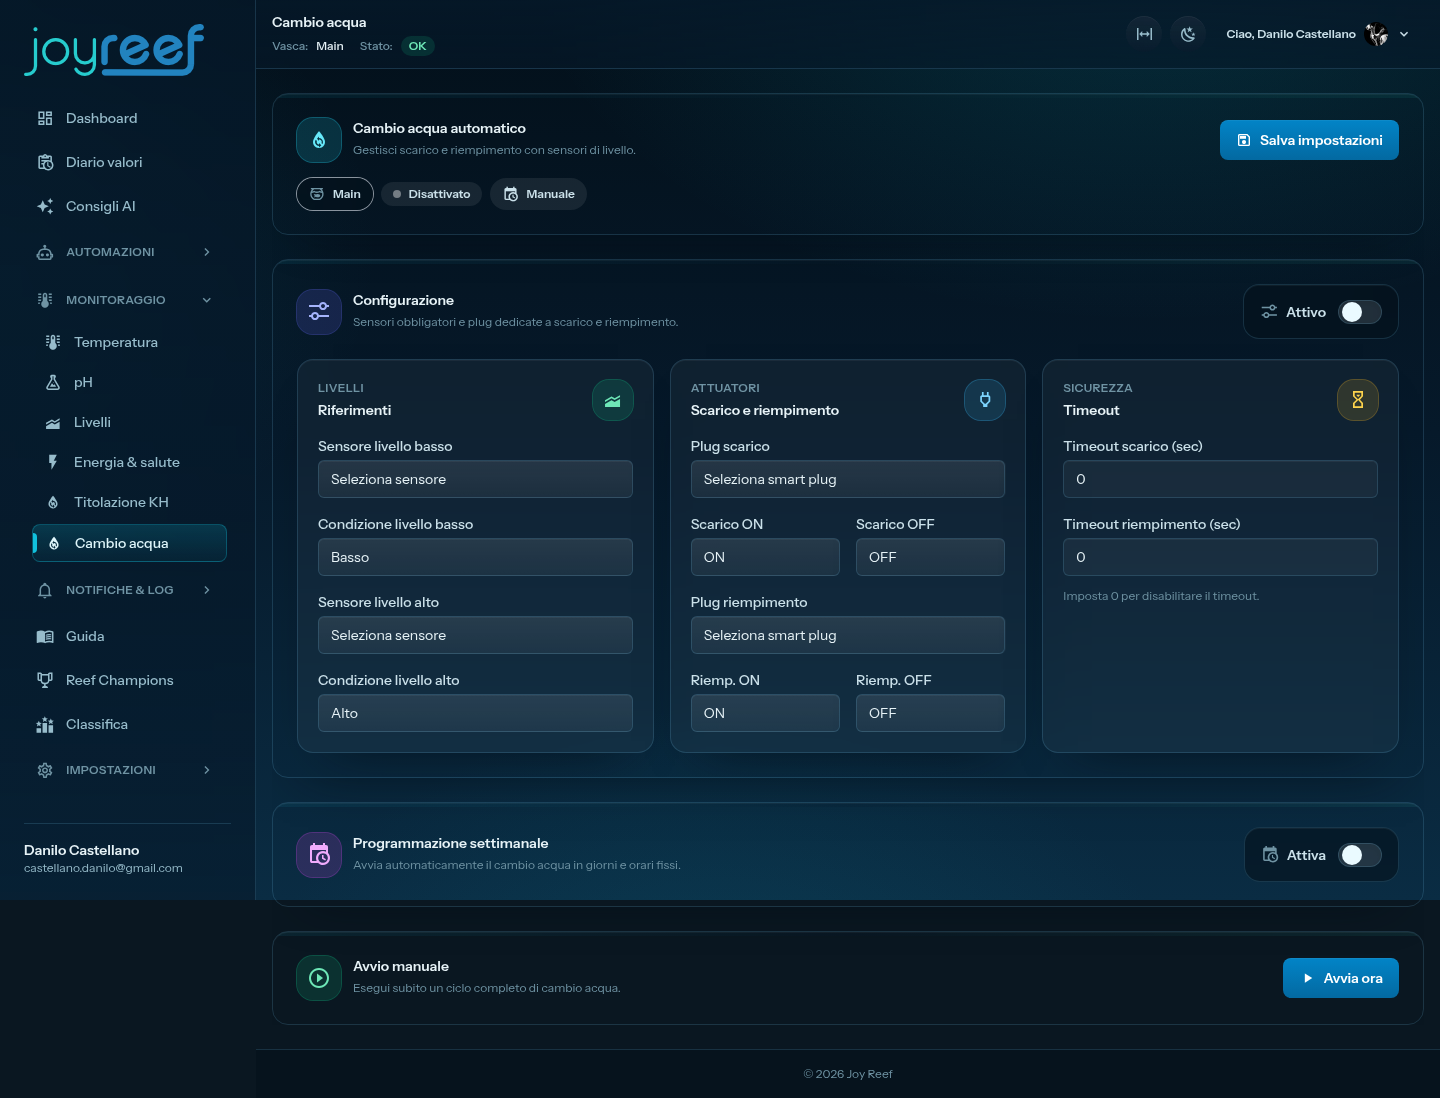
The "Automatic Water Change" page opens. You see a header with two status pills at the top: Deactivated + Manual (these are the defaults).
Below you find the configuration cards:
- Configuration (containing Levels + Actuators + Safety)
- Weekly Schedule
- Manual Start
- Advanced Automations
If an orange banner "Tank not selected" appears → primary tank missing (guide 04).
5. Step 2 — Configure level sensors
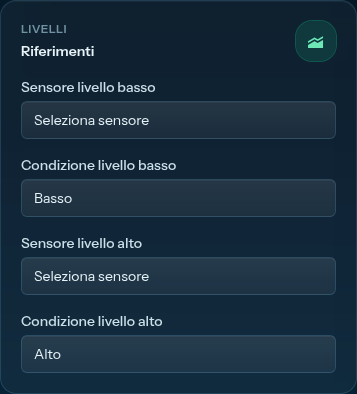
In the "Configuration" card, you find a "Levels" sub-section with 4 fields.
Low level sensor
The float switch positioned at the minimum safe height. When it is uncovered (= water dropped to it), the system stops the drain pump.
In the "Low Level Sensor" menu, select the sensor you assigned to the Water Change - Low Level role (see guide 04 for role assignment).
Low level condition
Same logic as guide 06 (ATO):
- "Low" = the sensor signals "LOW" when it is uncovered by water (during draining)
- "High" = the sensor signals "HIGH" when it is uncovered
It depends on the float model. Typically "Low," but test by moving it by hand and seeing what changes on the Sensors page.
High level sensor
The float switch positioned at the operating height. When it is covered (= water risen to it), the system stops the fill pump.
In the "High Level Sensor" menu, select the sensor you assigned to the Water Change - High Level role.
High level condition
Typically "High": the sensor signals "HIGH" when it is immersed by the rising water.
⚠️ Do you have only one sensor or none? Automatic water change requires both sensors. Without them, you cannot safely activate the system: skip this guide and configure the sensors first (see guide 04, sensors section).
6. Step 3 — Configure drain and fill pumps
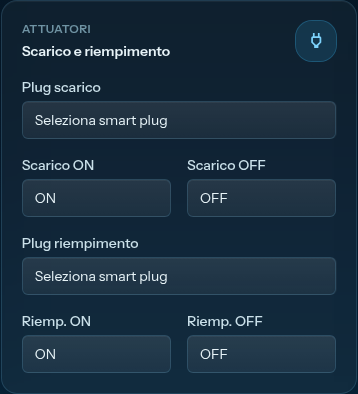
In the "Actuators" sub-section, you find two groups of fields.
Drain pump
- Drain Plug: select the smart plug for the drain pump (e.g., "Water Change - Drain")
- Drain ON: leave
ON(default) - Drain OFF: leave
OFF(default)
Fill pump
- Fill Plug: select the smart plug for the fill pump (e.g., "Water Change - Fill")
- Fill ON: leave
ON(default) - Fill OFF: leave
OFF(default)
⚠️ Do not use the same smart plug for drain and fill. The system controls them independently: if they are the same, turning on one also turns on the other → disaster.
7. Step 4 — Set safety timeouts
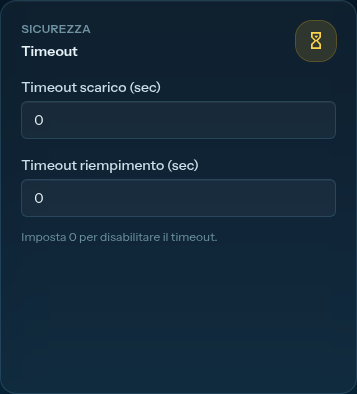
In the "Safety" sub-section, you find two fields.
Drain timeout (seconds)
Maximum time the drain pump can remain on. If the low sensor doesn't trigger within this time, fault.
How to calculate it:
- Measure once by hand how long your drain pump takes to drain the change volume. Example: to drain 15L with an 800 L/h pump takes about 70 seconds.
- Double the value and round up: 150 seconds in this example.
Doubling is the margin: if one day the pump is less efficient (clogged filter, biofilm), it still has time to complete the cycle before the fault.
Typical values:
| Drain pump | 10L Change | 20L Change |
|---|---|---|
| 500 L/h | 150 sec |
300 sec |
| 800 L/h | 100 sec |
200 sec |
| 1500 L/h | 60 sec |
120 sec |
Fill timeout (seconds)
Same logic for the fill pump. Important: if the fill pump is smaller than the drain (it happens), the fill time can be significantly longer than the drain. Measure and calculate separately.
Tip
hint on the page: set 0 to disable the timeout. Strongly discouraged, it is your most important safety net. Always leave sensible values.
8. Step 5 — Activate the system and save
At the top of the page you find:
- "Active" toggle (above the configuration section, on the right) → click it, it must turn green
- "Save Settings" button (top right next to the title) → click it
A green banner appears: "Water change settings saved and sent to controllers."
From this moment the system is configured. But it's not doing anything yet: the water change only starts when you start it (manual) or on scheduled days/times.
Verify the real-time monitor
Immediately below the status pills, a "Cycle Monitoring" section now appears with 4 boxes:
- Drain Pump: current status (OFF / IN ACTION)
- Fill Pump: current status (OFF / IN ACTION)
- Tank Sensors: physical status of the two float switches (ok / uncovered / covered)
- Last Data: timestamp of the last MQTT message from the controller
At rest you should see: pumps OFF + sensors in "operating" state (low covered, high covered if the sump is at operating level).
🖼️ Image to insert here (Active water change + monitor): screenshot of the page after saving, with green "Active" pill, real-time monitor visible with 4 boxes, pumps off.
9. Step 6 — Perform the FIRST manual test (without salt water!)
Never launch the first water change in "production" mode with real salt water. Test first with RO water in the fill reservoir (so if you make a mistake you end up with fresh water in the sump, recoverable with a second normal change).
Test setup
- Fill the fill reservoir with clean RO water (or even tap water if you have a safety volume)
- Position the drain pump so that it drains into an empty tank (not in the sink: you want to see how much water comes out)
- Visually verify that both pumps are connected to the right smart plugs (labels!)
- Ensure the level in the sump is normal (high sensor covered)
Starting the test
Go to the "Manual Start" card at the bottom of the page and click "Start Now".
A confirmation banner appears: "Manual start of water change sent." From this moment observe the "Cycle Monitoring" section at the top:
- "Drain Pump" becomes IN ACTION (green)
- The level in the sump starts to drop visibly
- After N seconds (60-180 depending on the pump), the low sensor is uncovered
- "Drain Pump" returns to OFF, "Fill Pump" becomes IN ACTION
- The level in the sump rises (with water from the fill reservoir)
- When the high sensor is covered again, "Fill Pump" returns to OFF
- Cycle completed.
What to check during the test
- ✅ Does the volume drained into the tank match the expected volume? (= sump section × distance between sensors)
- ✅ Is the volume added ~equal to the volume drained? (verify that the level in the sump returned exactly where it was before)
- ✅ Did the pumps stop before the timeout? If they went into timeout fault, the pump is too weak or the low sensor did not trigger — resolve before redoing
- ✅ No leaks in the tubes, no water around
If everything is ok, the system is working. ✅
If it goes into fault
The system stops everything and shows an error banner. Do not click "Start" again until you have understood what happened. Go to the "If something goes wrong" section below.
10. Step 7 — Schedule the weekly change
Once the manual test has worked (redo it 2-3 times if you want to be sure), you can schedule the change automatically.
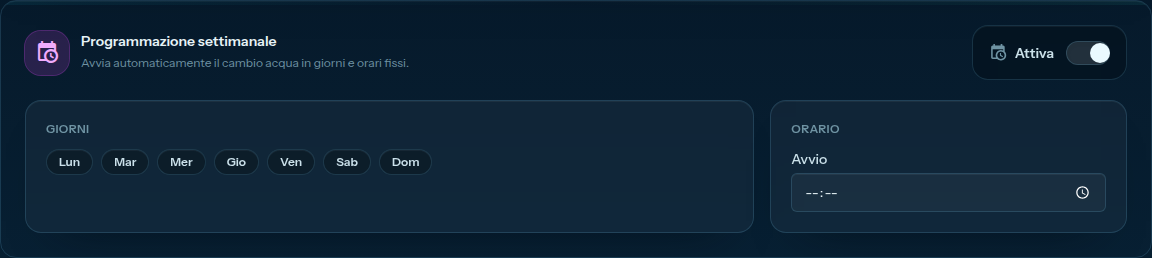
In the "Weekly Schedule" card:
Step 1: activate the schedule
Click the "Activate" toggle on the schedule card. It turns green.
Step 2: choose the days
Under "Days" you see the 7 days of the week (Mon, Tue, ..., Sun) as clickable buttons. Select them to indicate on which days to perform the change:
- 1 time a week: select 1 day (e.g., only Monday)
- 2 times a week: select 2 days (e.g., Monday + Thursday)
- Every day: select all 7 (not recommended: too much stress for the tank)
💡 Recommended frequency for a reef tank: 1 water change per week of 10-15% (1 day selected). For tanks with high load (many fish, SPS dominant) you can go up to 2 times/week.
Step 3: choose the time
In the "Start Time" field choose the time in 24h format (e.g., 03:00).
Recommended:
- 03:00-04:00 = deep night, quiet tank, you have time to notice problems in the morning
- NOT during sunrise/sunset of the lights (circadian cycles)
- NOT before long periods of absence (e.g., avoid the night before a vacation)
Step 4: save again
Click "Save Settings" at the top. Green confirmation banner.
From this moment the pill at the top changes from "Manual" to "Scheduled," and the system will perform the change on the indicated days/times.
11. Step 8 (optional) — Create advanced automations
In the "Advanced Automations" card, you find a "Create Automations" button.
What it does: it generates routines in the Automations page that handle:
- Email notifications before/after each change (know when it starts)
- Email notifications in case of timeout fault (know immediately if something goes wrong)
- Timeline events for each phase (drain start/stop, fill start/stop, completion)
- Stop of other automations during the change (e.g., temporarily turning off skimmer and dosing pumps)
Recommended for water change: potential damages are significant, notifications are worth the small effort to create them. Click "Create Automations" and then go to Automations to customize (e.g., enter your email address for notifications).
12. If something goes wrong
"Drain Timeout" during the test
The drain pump went over the time limit without the low sensor triggering.
Causes:
- Pump too weak for the volume → increase the timeout (or change the pump)
- Clogged/kinked tube → check physically
- Low sensor does not trigger → go to Sensors, verify that the float actually moves when the water drops. If it doesn't trigger, it's a mechanical problem (encrusted salt, biofilm, blockage)
- Low sensor too low → the physical level of the sump never drops enough to uncover it. Reposition the sensor higher.
"Fill Timeout" during the test
The fill pump went over the time limit without the high sensor triggering. Causes analogous to the drain:
- Fill reservoir empty → the pump runs dry, does not move water
- Pump weaker than expected → raise the timeout
- High sensor does not cover → check that the float is free to move
- Fill tube does not reach the sump → water is going somewhere else!
The change never starts from the schedule
- Schedule deactivated → the "Activate" toggle of the schedule card must be green
- No day selected → at least one must be highlighted
- Wrong time → verify the 24h format (e.g.,
15:30for 3:30 PM) - Main "Active" toggle off → the schedule doesn't work if water change is globally deactivated
- Controller offline → the schedule lives on the controller. If it's been offline for hours, the change won't start
The sump is emptying but the pumps are off
Emergency: there is a parasitic siphon. Probably the drain tube is positioned such that it continues to siphon even with the pump off.
Immediate action:
- Physically disconnect the tube from the drain (or lift the end above the water level in the sump)
- Turn off the drain smart plug from the portal or manually
- Reposition the tube with an anti-siphon (1mm hole on the tube, above the water level in the sump) or change the path
The sump overflows!
Emergency: the fill didn't stop.
Immediate action:
- Physically disconnect the power from the fill smart plug (cable from the wall)
- Dry the floor before it does damage
- Investigate: high sensor doesn't trigger? Pump siphoning after shutdown? Smart plug stuck on ON?
⚠️ To avoid overflow: position the fill tube so that it cannot siphon even if the pump remains on by mistake. Typically: tube end ABOVE the water level in the sump, not below. If the fill stays on "indefinitely," at most you empty the fill reservoir, you don't flood.
The drained volume is different from what I expected
Recalculate the useful section of the sump (the part effectively "free" of water, not occupied by rocks/skimmer/refugium). If the real volume is less than calculated, the distance between the sensors must be increased (or accepted).
Alternatively, reposition the sensors further apart if you want larger changes, closer together if you want smaller changes.
The low sensor triggers too early (sump level drops little)
The low sensor is positioned too high. Move it lower (always maintaining a 5-8 cm margin above the bottom to prevent the return pump from sucking air).
13. Next step
You have the automatic water change configured, tested dry, and (ideally) scheduled. For the first week keep an eye on what happens:
- Prepare salt water in the reservoir in advance (24-48h of circulation + reaching stable salinity)
- Verify the level of the fill reservoir before each scheduled change — JoyReef doesn't know if it's empty
- Check the event timeline the morning after a change: there should be the sequence drain start/stop, fill start/stop, completion
- Measure salinity + nitrates before and after for the first 2-3 changes, until you are sure the system works as expected
The next (and last) step of the path is to understand automations in general: creating custom rules beyond the pre-packaged ones (ATO/Temperature/Water Change), combining sensors in new ways, building tailored workflows for your tank.
➡️ Guide 09 — Advanced Automations
💡 Extra safety: buffer reservoirs. If you want to sleep truly soundly, consider a drain collection reservoir (so if the drain doesn't stop you don't fill the neighbor's sink) and a fill reservoir sized exactly for ONE change (so if the fill doesn't stop, at most you empty the reservoir, no overflow).