Dosing Pumps (6 channels)
Reading time: ~15 minutes · Execution time: ~10 minutes per channel (calibration + setup) · Audience: reef aquarists who supplement trace elements, Balling, Kalkwasser, or other programmed liquid solutions
🔵 Advanced Guide — not part of the 01-08 onboarding path. Tackle this if you have a JoyReef dosing pump (or compatible controller flashed with Doser firmware) installed and want to automate the supplementation of liquid solutions.
1. What you are about to do
A peristaltic dosing pump is a small device with N pumps (typically 6 channels in the JoyReef system) that dispense very precise volumes of liquid into the tank, automatically, in doses programmed over time. They are the standard tool for:
- Balling Method (3 separate solutions: Ca, KH, NaCl) for calcium/alkalinity replenishment in tanks with medium consumption
- Kalkwasser (calcium hydroxide) dissolved in RO water, dosed into the ATO line or directly into the sump
- Trace elements (iodine, iron, potassium, etc.) in small daily doses
- Bacteria (e.g., Microbacter7, ZeoBak) periodically
- Carbon source (vodka, vinegar, NoPox) for nitrate/phosphate reduction
- Amino acids or liquid coral foods
The JoyReef dosing pump has 6 independent channels: each channel has its own pump, tube, and solution container. The user configures each channel separately.
In this guide, you will configure:
- The 6 channels: names, container capacities, current levels
- The calibration of each pump (actual ml/60s of your specific pump)
- Manual doses for testing and spot dosing
- Automatic programming: ml/day + number of doses + time window + days of the week
⚠️ Dosing pumps can cause damage if misconfigured: 10ml of Kalkwasser is beneficial, 100ml can cause a pH crash. Always calibrate the pumps before programming real doses, and start with conservative quantities.
2. What you need
Doser Hardware
- ✅ A JoyReef dosing pump (or controller flashed with Doser firmware) connected to WiFi and online on the portal (same configuration process as the main controller, see guides 02-03)
- ✅ Food-grade silicone tubing or peristaltic tubing of the correct size for the pumps (usually 3×5 mm or 4×6 mm)
- ✅ 6 solution containers (or fewer if you don't use all channels). Typical: 1-5L dark plastic bottles (light degrades many solutions). Containers should have a weighted or rigid intake tube to stay at the bottom.
JoyReef Portal
- ✅ A primary tank already set up (guide 04)
- ✅ The dosing pump visible in Devices and assigned to the correct tank (if it isn't, go to Config → Devices, open the dosing pump, and assign the tank)
- ✅ The solutions to be dosed already prepared (e.g., ready-to-use Balling solutions, dissolved Kalkwasser, etc.). JoyReef does not prepare them for you.
Balling Solutions (example for those starting from scratch)
If you want to use the dosing pump for the Balling method, you need 3 solutions:
| Solution | Contains | Effect in Tank |
|---|---|---|
| Balling A | Calcium Chloride (CaCl₂) | Increases calcium |
| Balling B | Sodium Bicarbonate (NaHCO₃) | Increases alkalinity/KH |
| Balling C | Sodium Chloride (NaCl) — pure salt | Balances excess ions |
Standard proportions and concentrations can be found in online calculators (search for "Balling light calculator"). You'll need 3 channels of the dosing pump (one per solution), and sometimes a 4th for Mg.
3. How the dosing pump works
Peristaltic Pumps
A peristaltic pump is a small motor with a rotor that squeezes a tube in sequence, "squeezing" the liquid forward. Advantages:
- Precision: the same revolution = the same volume (within pump error)
- No contact between mechanical parts and liquid (= zero contamination, possibility of pumping aggressive solutions)
- Self-priming: even if the tube is empty at the start, the pump fills it on its own after a few seconds
Limitation: the flow rate varies slightly over time (tube wear). This is why you need to recalibrate every 2-3 months.
Calibration (ml/60s)
部の単位 for dosing pump precision is milliliters dispensed in 60 seconds. Example: your pump, with a fixed run, dispenses 22 ml in 60 seconds → calibration = 22 ml/60s.
JoyReef uses this value to calculate how long to keep the pump on to dose the desired amount. Example: you want to dose 11 ml → JoyReef turns on the pump for 30 seconds (= 60s × 11/22).
Without calibration, the system does not know how much liquid is coming out. You must calibrate each channel individually (pumps are never 100% identical).
Automatic Programming
Once calibrated and with the daily amount decided (e.g., 30 ml/day of Balling A), JoyReef automatically distributes that volume into N doses spread between the "first dose" and "last dose" times.
Example: 30 ml/day, 6 doses, 08:00-20:00 window → JoyReef performs 6 doses of 5 ml each approximately every 2 hours between 08:00 and 20:00.
Why distribute: dosing 30 ml all at once makes parameters rise too quickly (shock); distributing in small doses keeps levels stable throughout the day.
Container Monitoring
For each channel, JoyReef tracks how much liquid remains in the container. When you configure it, you set the total capacity (e.g., 2000 ml) and the current level (e.g., 1800 ml after a refill). Each dose performed is automatically subtracted.
When the level drops below a threshold (default 10%), the portal shows a "Low" alert.
💡 There is no physical level sensor: the system "keeps count." You must manually update the level after each refill by clicking "Mark Full" or "Set Level."
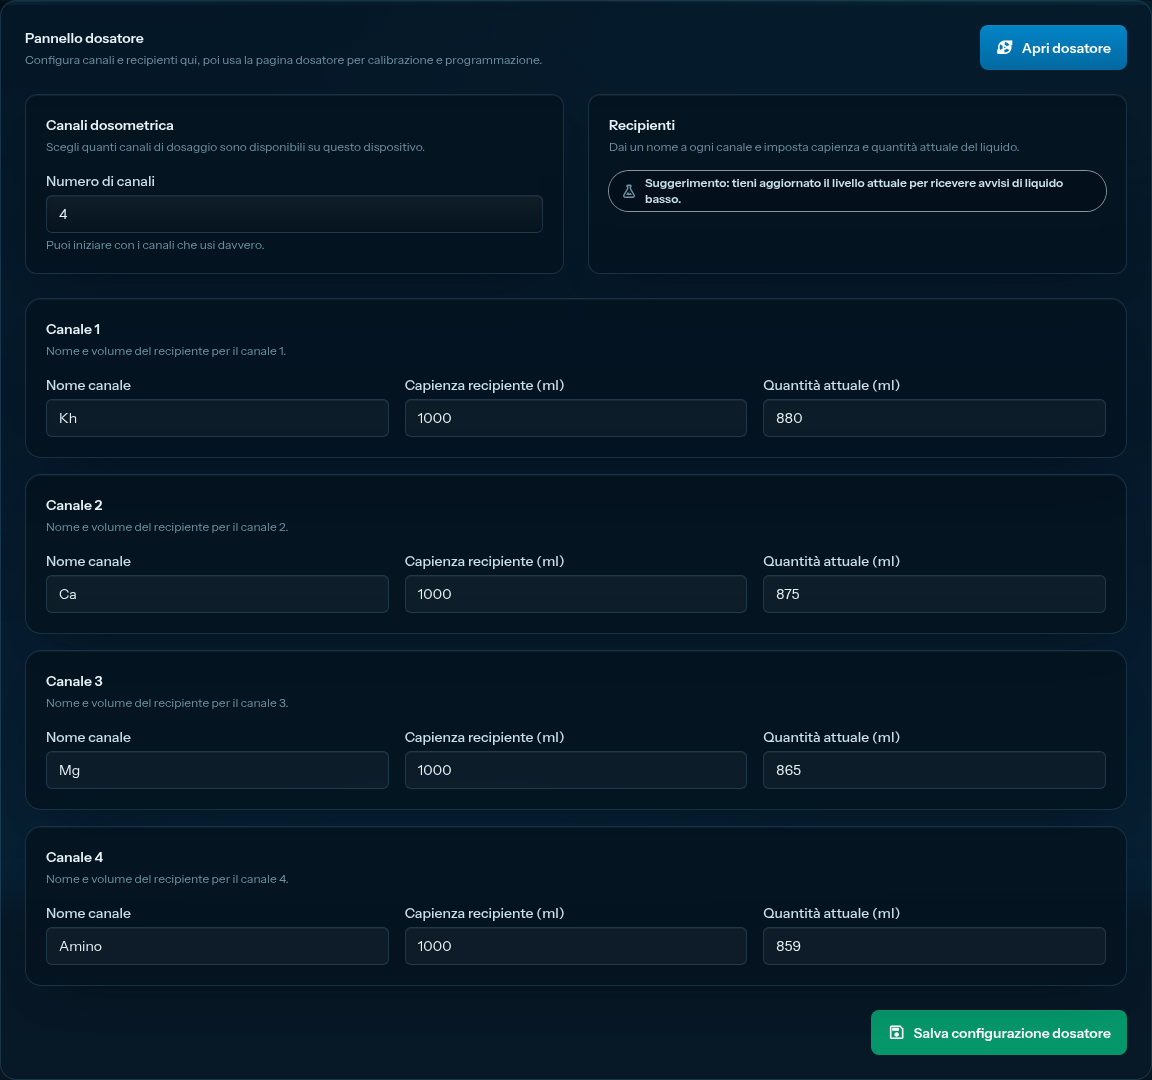
4. Step 1 — Configure the dosing device (channels and containers)
Before using the actual dosing page, you must declare to the portal how many channels you will use and the container capacity.
Open the device edit page
- Go to Config → Devices from the left menu
- Find your dosing pump in the list (it will have a name like "Doser - Main Tank")
- Click on it → the device edit page opens
- Scroll down to the "Doser" section
You will see two sub-sections:
"Channels" Section
For each pump (1-6) there is an "enabled" checkbox. Check only the pumps you actually use. If you use only Balling (3 solutions), check only pumps 1, 2, 3. Unchecked pumps will not appear in the rest of the portal.
"Containers" Section
For each enabled pump, you find 3 fields:
- Name (e.g., "Balling A", "Kalkwasser", "Iodine")
- Capacity (ml): the total volume of the container when full (e.g.,
2000for a 2L bottle) - Current Quantity (ml): how much liquid is there NOW (e.g.,
1800if the bottle is almost full)
When finished, click "Save Configuration". Green confirmation banner.
5. Step 2 — Open the dosing pump page
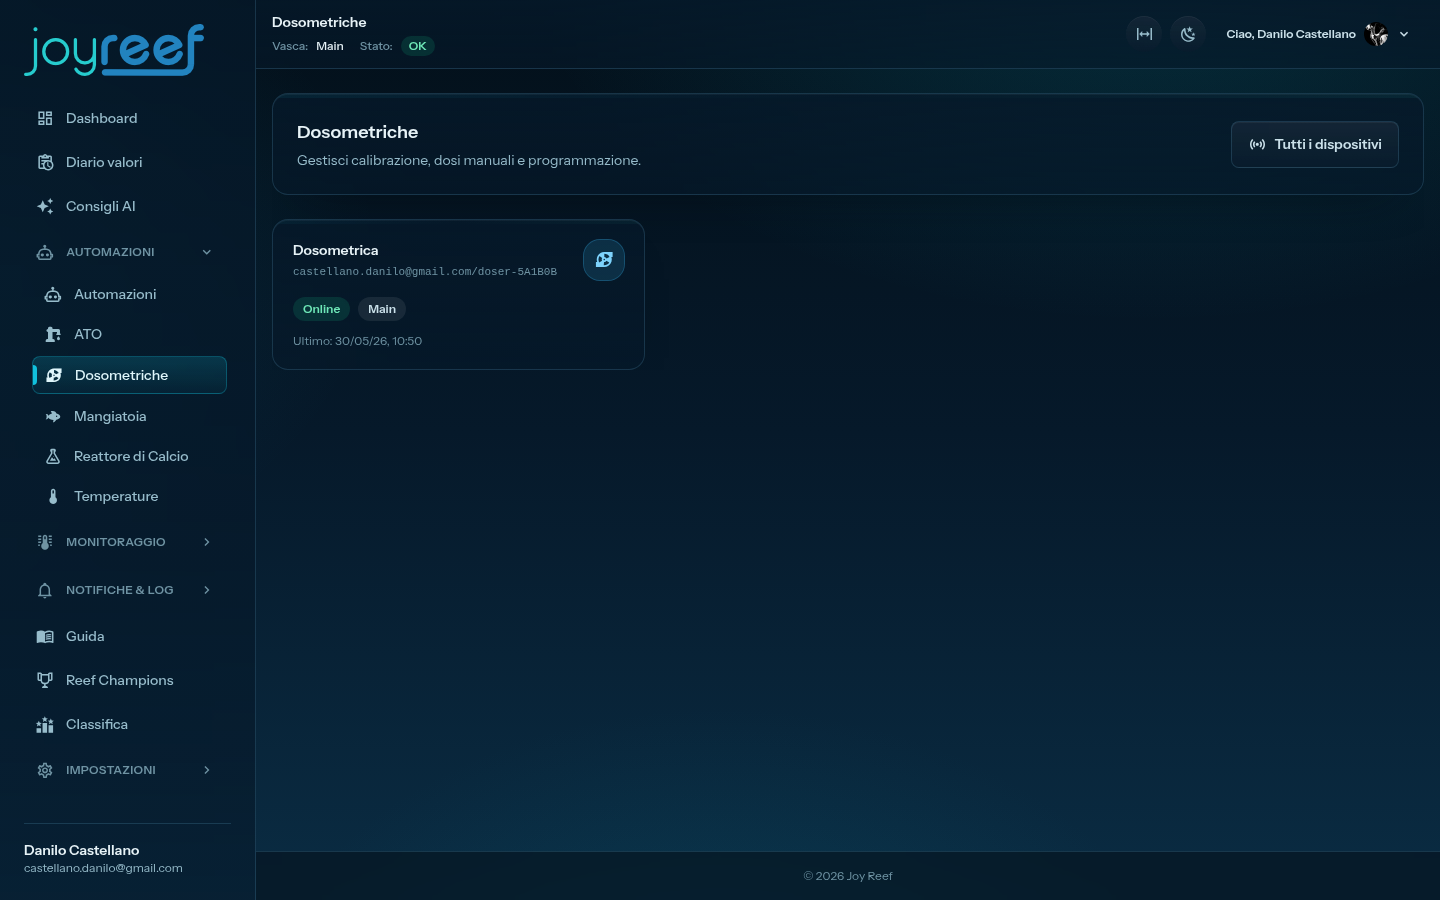
- In the left menu, click "Dosing Pumps" (pump icon)
- You see the list of dosing pumps on the account, with Online/Offline status and assigned tank
- Click on the dosing pump → the "Doser: [name]" page opens
On the page, you see a header with MQTT status/online/last update, and a large "Pump" section with a "Channel" selector.
You will work on ONE CHANNEL AT A TIME: choose pump 1 from the selector, configure it completely (calibration + container + manual test dose + schedule), then move to pump 2, and so on.
6. Step 3 — Calibrate each pump (essential)
Do not skip calibration. An uncalibrated pump uses the default value (~25 ml/60s), which can deviate by 30-40% from the actual flow rate of your specific pump.
What you need for calibration
- A precise measuring cup or graduated cylinder (5-50 ml)
- A small empty cup to discharge the pump into
- RO water or the solution itself for calibration (dry is less accurate)
💡 Tip: calibrate with the same solution you will be dosing. Viscous solutions (Kalkwasser, some trace elements) have a slightly different flow rate compared to water.
Procedure
In the "Calibration" section of the page:
- Insert the pump tube into the small empty cup (or directly into the measuring cup)
- Prepare the solution in the container as you will use it (not dry)
- Click "Start 60s"
- The pump starts. Wait ~70 seconds (the system includes a small margin)
- The pump stops on its own
- Precisely measure the ml collected in the measuring cup
- Enter the measured value in the "Measured ml (60s)" field
- Click "Save Calibration"
The value is sent to the device. The section now shows updated "Current: XX ml/60s".
When to repeat
- The first time after installing the pump
- Every 2-3 months (the peristaltic tube wears out)
- After replacing the peristaltic tube
- After a long period of non-use (months)
- If tank parameters change inexplicably (could be pump drift)
7. Step 4 — Configure current container level
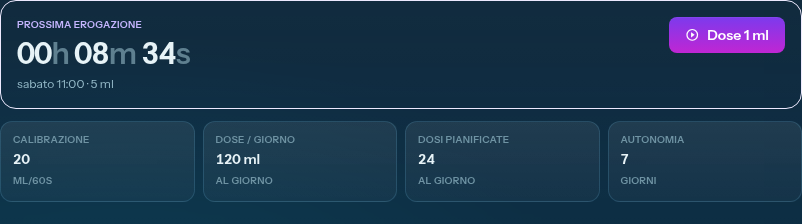
In the "Container" section, you see:
- A colored bar with the estimated level (green if ok, amber if below threshold)
- The value "XX% · YYY / ZZZ ml" (e.g., "85% · 1700 / 2000 ml")
After doing the first calibration (which consumed some liquid), or after each refill, update the current level:
- If you just topped up to the maximum: click "Mark Full" → the system sets current = capacity
- If you have a specific level: click "Set Level", enter the current ml, "Save Level"
💡 Refill convenience: every time you top up the container, open the dosing pump page, go to the correct channel, click "Mark Full". 30 seconds a week saves you from the "why did the dose stop?" mystery.
8. Step 5 — Perform a manual test dose
Before scheduling, perform a manual dose to verify end-to-end.
In the "Manual Dose" section:
- Enter a small, safe amount in the "ml to dose" field (e.g.,
2or5) - Click "Dose Now"
- You see a banner: "Command sent. Waiting for confirmation from the doser…"
- After a few seconds (= time proportional to ml, based on calibration), the pump physically starts
- You see the liquid rise in the tube and reach the tank
- Green banner: "Confirmed: pump X dose Y ml (Z s)"
If you see this sequence, the pump works end-to-end. ✅
⚠️ If it's the first time you use that channel, perform a longer "priming dose" (e.g., 10-20 ml) to fill the tube from the container to the tank. The tube is filled once and for all; subsequent doses will all be effective.
⚠️ Test with safe solutions: for the FIRST test, consider leaving the tube in the cup, not in the tank, until you are sure it works as expected.
If it doesn't work
- Banner "Command sent, but the doser did not confirm" → the doser is offline or slow. Check the status in the "Devices" section
- "Pump busy" → there is already a dose in progress (manual or scheduled), wait for it to finish
- "Invalid quantity to dose" → negative number, zero, or too large
- The pump does not physically move → check motor cable, fuse, "If something goes wrong" section
9. Step 6 — Program automatic doses
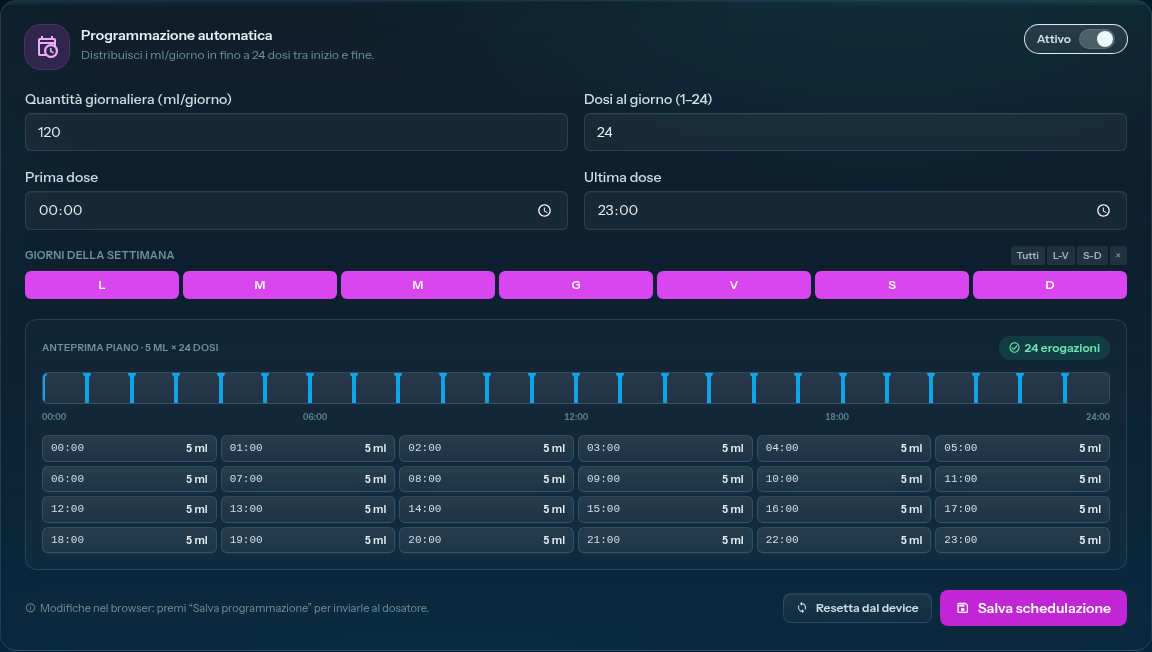
"Automatic Programming" section.
Step 1: activate
をクリック the "Active" toggle of the section → it turns green.
Step 2: set the daily quantity
In the "Daily Quantity (ml/day)" field, enter how many ml of solution you want to dose each day (e.g., 30 for Balling A in a 200L tank with medium consumption).
💡 How to calculate the daily quantity? For Balling: use an online Balling calculator entering the actual net volume of the tank, current and target KH/Ca, and it will give you ml/day of each solution. For trace elements: follow the manufacturer's instructions (usually X ml/100L/day).
Step 3: set the number of doses
In the "Doses per Day (1–24)" field, choose how many doses to spread the total into:
- 1 dose = everything at once once a day (not recommended for quantities > 5 ml)
- 6 doses = every 2-4 hours in a 12h window (recommended for Balling, trace elements)
- 24 doses = once an hour, very fine distribution (useful for very small doses like iodine)
Below you see the automatic calculation: "Per dose: X ml".
Step 4: set the time window
- First dose: the time of the first dose of the day (e.g.,
08:00) - Last dose: the time of the last dose of the day (e.g.,
20:00)
JoyReef calculates the intermediate times automatically, distributing them uniformly.
💡 When to dose? For Balling: during daylight hours (e.g., 08-20), so plants/corals immediately consume what has been dosed. For Kalkwasser in the ATO line: at night (when tank pH is lowest, Kalk raises it). For trace elements: indifferent.
Step 5: choose the days
Under "Days" there are 7 buttons (Mon-Sun). Select the days to perform the doses:
- All 7: for continuous doses (Balling, daily trace elements)
- 3-4 days: for periodic doses (bacteria 3 times/week, carbon source every 2 days)
- 1 day: for weekly doses (e.g., weekly iodine)
Step 6: save
Click "Save Schedule". Waiting banner, then confirmation "Schedule saved and confirmed by the device."
Verify the "Dose plan"
In the "Pump" → "Scheduled Doses" section, you should now see the list of scheduled doses for the next day. Check that the times make sense.
10. You have more than one channel to configure
Repeat sections 6 through 9 for each channel you use. Each pump is independent: each has its own calibration, container, and doses.
Practical tip:
- Physically label each pump (e.g., "Balling A", "Balling B", "Iodine" stickers) on the physical dosing pump, corresponding to the portal channel
- Label the tubes too: it should be obvious that the tube coming out of pump 1 is "Balling A". When you need to replace a tube, you'll want to avoid mistakes.
- Document the pairings in a small diagram (sheet of paper) — who → what → dose. You'll be grateful in 6 months when you need to recalibrate.
11. If something goes wrong
"The doser did not confirm" after Dose Now
- Doser offline → check the status at the top of the page (must be Online + MQTT connected). If it's offline, check power and WiFi.
- Doser "feels" the command but doesn't respond → restart the device (unplug for 10 sec). If it persists, there's a firmware problem (ask for support).
The pump rotates but no liquid comes out
- Empty tube (first time) → perform a long priming (10-20 ml) to fill the tube
- Clogged tube (crystallized salt at the end of the tube, classic) → remove and rinse with lukewarm water
- Worn peristaltic tube (end of life) → replace, it's a consumable part
- Empty container → without JoyReef noticing (e.g., leaks, solvent evaporation): check visually
Dosed volume doesn't match expected (e.g., doses 5 ml, 3 ml come out)
- Old or wrong calibration → recalibrate (sec. 6)
- Solution changed viscosity (e.g., slightly crystallized) → recalibrate with current solution
- Peristaltic tube squeezed unevenly → replace tube, recalibrate
I see scheduled doses but nothing starts
- "Active" toggle of programming off → reactivate it, save
- Current day not selected → check that the current day of the week is highlighted
- Daily quantity = 0 → obviously doses nothing
- Doser offline → verify connectivity
- Calibration = 0 or missing → without calibration the system doesn't know how long to keep the pump on, won't dose
Container "Low" or "empty" but it's full
The level is only "estimated". After each refill you must update it manually (sec. 7) or click "Mark Full". The container status won't self-correct.
Pump always "busy"
A previous dose has not finished (or was not confirmed). Wait a few minutes. If it persists beyond 5 minutes, restart the doser.
I want to stop a dose in progress
Temporarily turn off the doser (power) or deactivate the channel from Edit Device. There is no granular "stop dose" in the current UI.
12. Next step
You have your pumps configured, calibrated, and maybe your first cocktail of solutions dosed daily. For the next few weeks:
- Monitor parameters (Ca, KH, Mg, trace elements if you measure) to verify that the chosen dosage is correct
- Adjust the daily quantity if you see parameters rising too much or not enough
- Regular refill: as soon as a container empties, prepare the next one. Never stay with an empty container during a week of absence.
If your dosing pump has 3 free channels, consider automatic KH titration (automatically measure KH using a sample pump, a reagent pump, and a drain pump, plus a pH probe): it's the next guide.
➡️ Guide — Automatic KH Titration (coming soon)
💡 Tip for refill: always prepare 2 containers for the solution you use most (e.g., Balling A): one in use, one ready reserve. When the first empties, just swap the tube, mark full in the portal, and you have time to prepare a new one without rush.