pH Device: dedicated probe, setup and calibration
Reading time: ~12 minutes · Execution time: ~30 minutes (excluding hardware) + 5 minutes of calibration · Audience: anyone who wants to monitor the tank's pH, or who needs to feed a Calcium Reactor (guide 10) or KH Titration (guide 12) with a reliable pH reading
🔵 Advanced guide — not part of the 01-08 onboarding path. Tackle it only if you have already configured tank and sensors (guide 04) and you actually need a pH reading (tank monitoring, calcium reactor, or KH titration).
1. What you are about to do
Unlike in the past, in JoyReef the pH probe is no longer connected to the controller. pH is now a dedicated device: a small standalone board (type ph, name ph-XXXXXX) with its own ESP board, its own ADS1115 module, and its own probe. It behaves like any other JoyReef device: you flash it, connect it to WiFi, it appears on the portal as "pH Probe", and you assign it to a tank.
Why this change? Three concrete reasons:
- One probe = one device. If you have multiple pH probes (e.g., tank + calcium reactor + KH titration chamber) you create one pH device for each, each with its own board. No more ambiguity like "multiple probes on a single controller": each probe has its own name and its own page.
- Automatic temperature compensation (ATC). The pH device corrects the reading based on the tank temperature, received automatically from the portal. This is a new feature: it didn't exist before.
- Simple calibration. The 2-point calibration is done directly on the pH device page in the portal, with a guided wizard.
⚠️ The main controller no longer reads pH. If you previously used the pH probe connected to the controller via ADS1115, that function has been removed from the controller firmware (clean break). To get pH again you must set up a dedicated pH device as explained here.
In this guide:
- You'll assemble the pH device (board + ADS1115 + probe)
- You'll flash it and connect it to WiFi
- You'll assign it to a tank (for ATC)
- You'll calibrate it (2 points: pH 7.0 and pH 4.0)
- You'll use it as the pH source for the calcium reactor / KH titration
⚠️ If you also run an EC (salinity) device, never power them together. The EC probe measures by passing a current through the water, and that current creates a voltage gradient around its electrodes. The pH probe measures a few millivolts referenced to that same water: if the two circuits share power or ground (same powered USB hub, same multi-port power supply), the pH reading suffers. Use two separate USB power supplies, each in its own outlet — this is why EC and pH are two distinct devices and not a single board. It also helps to keep the two probes apart (about 20 cm, not side by side), since the disturbance falls off quickly with distance. See guide 20.
2. What you need (hardware)
You'll find all the components in the shopping list (guide 01, advanced setup). For one pH device you need:
- ✅ An ESP8266 board: a NodeMCU v3 / Wemos D1 mini (~€3-5) works perfectly. (Only the ESP8266 is supported at the moment.)
- ✅ An ADS1115 module — the ADC that reads the probe's analog signal (the ESP board alone cannot read precise analog signals). It connects with 2 wires (I2C).
- ✅ A BNC pH probe (e.g., DFRobot SEN0161-V2)
- ✅ Two calibration buffers: pH 7.00 and pH 4.00 (single-use sachets or small bottles)
- ✅ RO/osmotic water to rinse the probe between buffers
💡 One board per probe. If you have multiple pH probes, repeat this guide once for each: every pH device is standalone (board + ADS1115 + probe).
3. Assembly
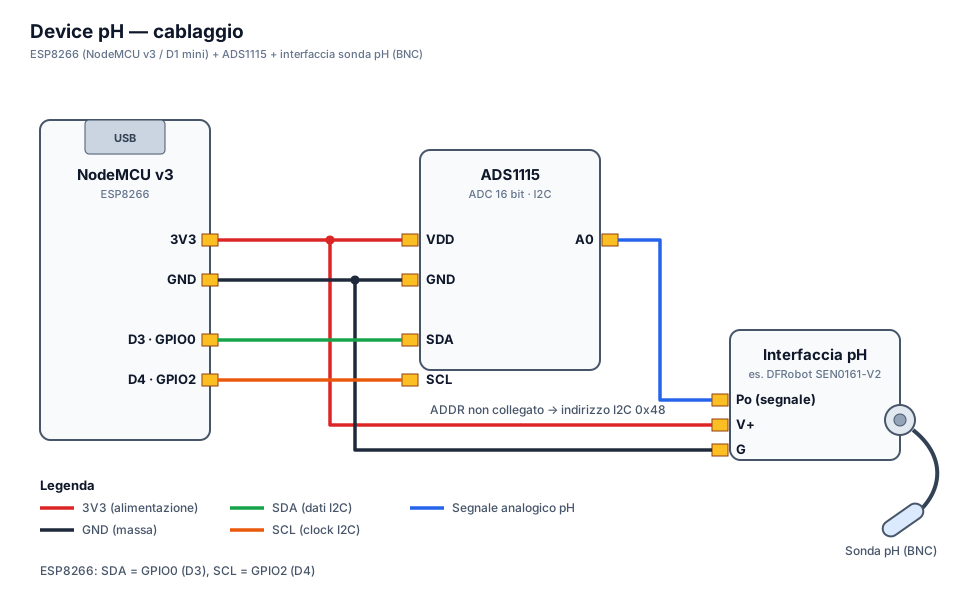
The connection is simple: the pH probe goes into the ADS1115, and the ADS1115 talks to the ESP board via I2C (2 data wires + power).
pH probe → ADS1115
The pH probe module (the DFRobot board with the BNC connector) has 3 wires: power (+, V), ground (-, G), and analog signal (A, Po). Connect the signal to an input on the ADS1115 (typically A0), and power/ground to VDD/GND.
ADS1115 → ESP board (I2C, 2 wires)
| ADS1115 | ESP board | Notes |
|---|---|---|
VDD |
3V3 |
power |
GND |
GND |
ground |
SDA |
D3 (GPIO0) |
I2C data |
SCL |
D4 (GPIO2) |
I2C clock |
On the ESP8266 board (NodeMCU / D1 mini), look for the markings D3 and D4: those are what's silkscreened on the board. GPIO0 and GPIO2 are the chip's internal numbering and do not appear on the silkscreen. They are the same pins the controller uses.
⛔ Do not use the
SDandSCpins (norSD0…SD3,CMD,CLK). The names look likeSDAandSCL, but they are something else entirely: they are the bus to the flash memory chip soldered on the module, the one the ESP reads its own firmware from. Wiring the ADS1115 there means the module is never detected and the board may hang. It is the most common mistake on this build.🔘 Factory reset button (optional). It goes on
D0(GPIO16), wired to3V3— not on GPIO2, which here is the ADS1115's I2C clock. Held for 8 seconds it erases WiFi and configuration.
⚠️ The pH probe is fragile and must always be kept moist. Don't leave it in the air for long: when it's not in the tank, keep it in its cap with a little storage solution (or, failing that, tank water — never RO water, which "washes" the membrane).
4. Firmware flash + WiFi
The pH device is flashed and connected to WiFi exactly like the other JoyReef devices.
- Firmware flash: - Via USB (first installation of a blank board): follow guide 16, choosing the pH device firmware. - Via OTA (if the device is already flashed and online): follow guide 17.
- WiFi connection: on first boot the device creates a configuration network (captive portal). Connect with your phone and enter your home network credentials — it's the same procedure as the controller, described in guide 03.
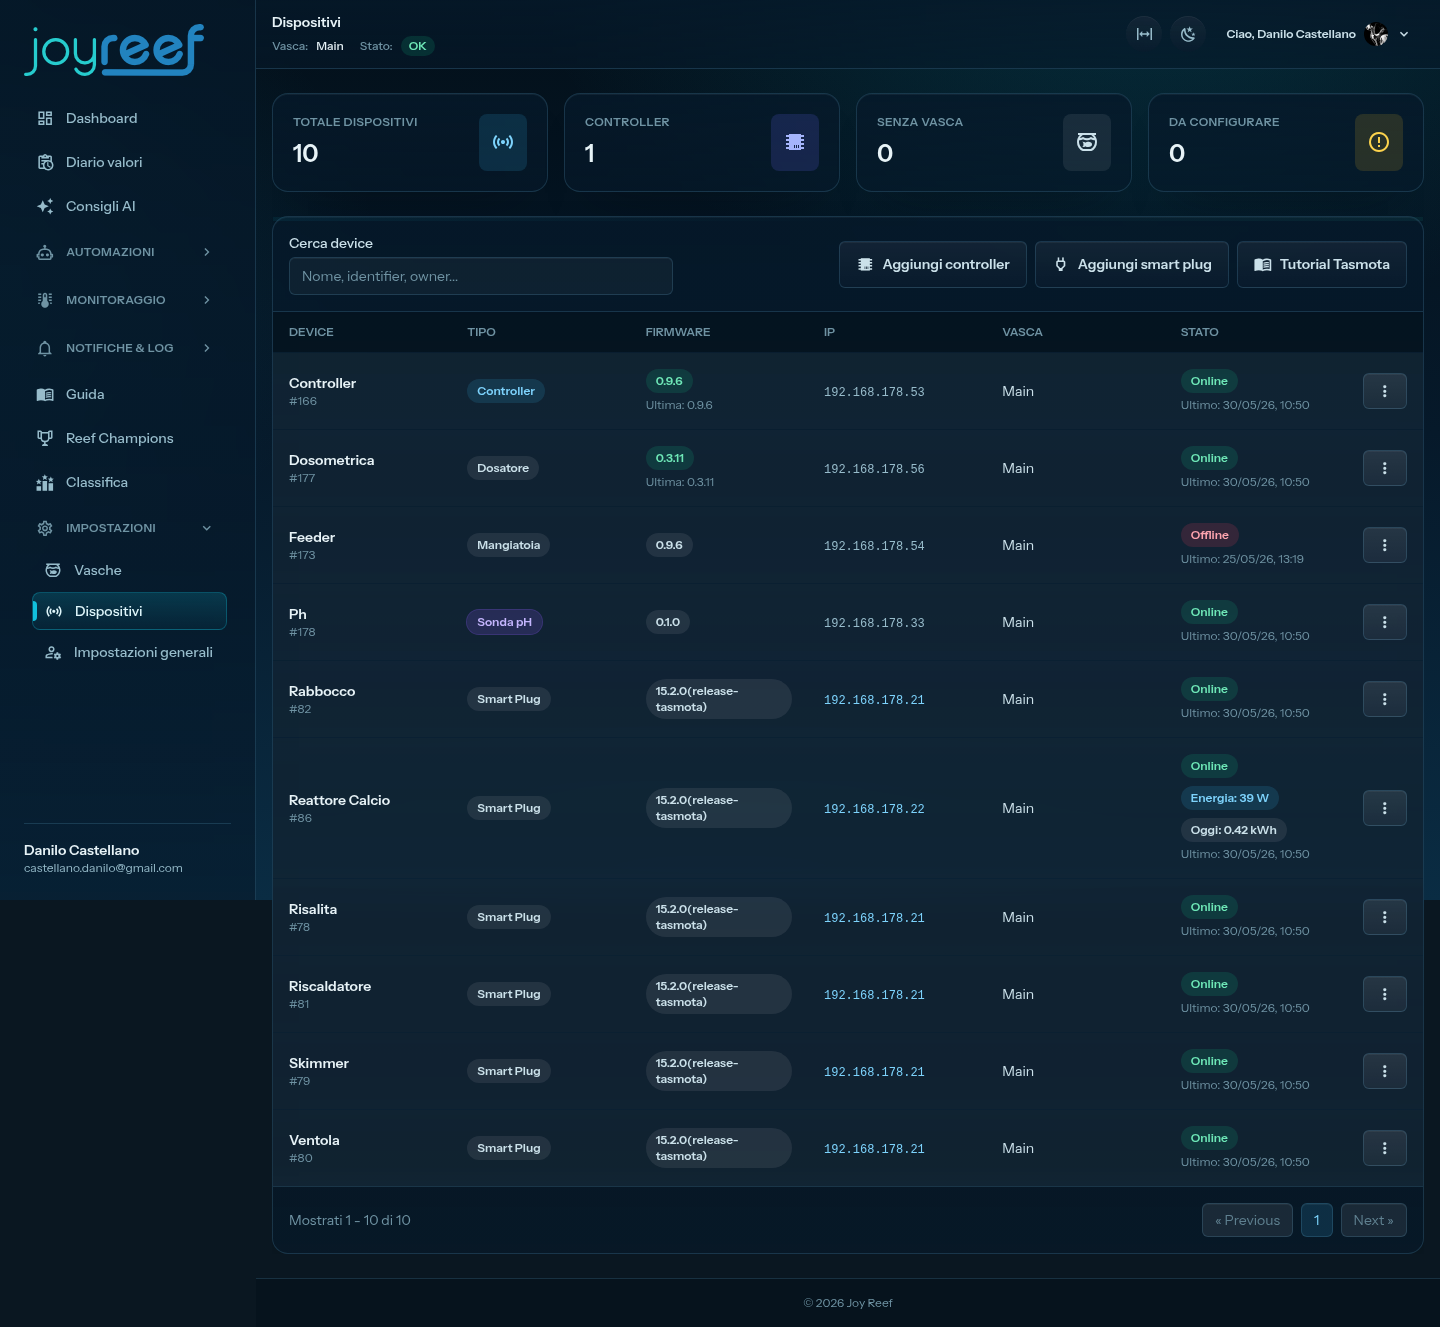
After a few seconds, the device appears on the portal under Config → Devices with the type "pH Probe" and the name ph-XXXXXX.
5. Assign the pH device to a tank (for ATC)
Open the device in Config → Devices → your pH Probe and assign it to a tank from the Tank field, just like you do with the controller. You can also rename it with something meaningful (e.g., "Tank pH", "Reactor pH", "KH titration pH").
Assign it to the same tank as the controller measuring the temperature: this is needed for ATC.
💡 What is ATC (automatic temperature compensation). The pH reading slightly depends on the water temperature. The pH device receives the tank temperature automatically from the portal and corrects the reading accordingly — you don't have to wire any temperature probe to the pH device. You just need the pH device and the controller with the DS18B20 probe to be on the same tank. If the temperature hasn't arrived for more than ~10 minutes, the device uses a 25 °C fallback until the data is available again.
6. Calibration (2 points, on the pH device page)
Do not skip this step. An uncalibrated probe can be off by 0.5-1 pH, making everything else useless (or dangerous, for a reactor).
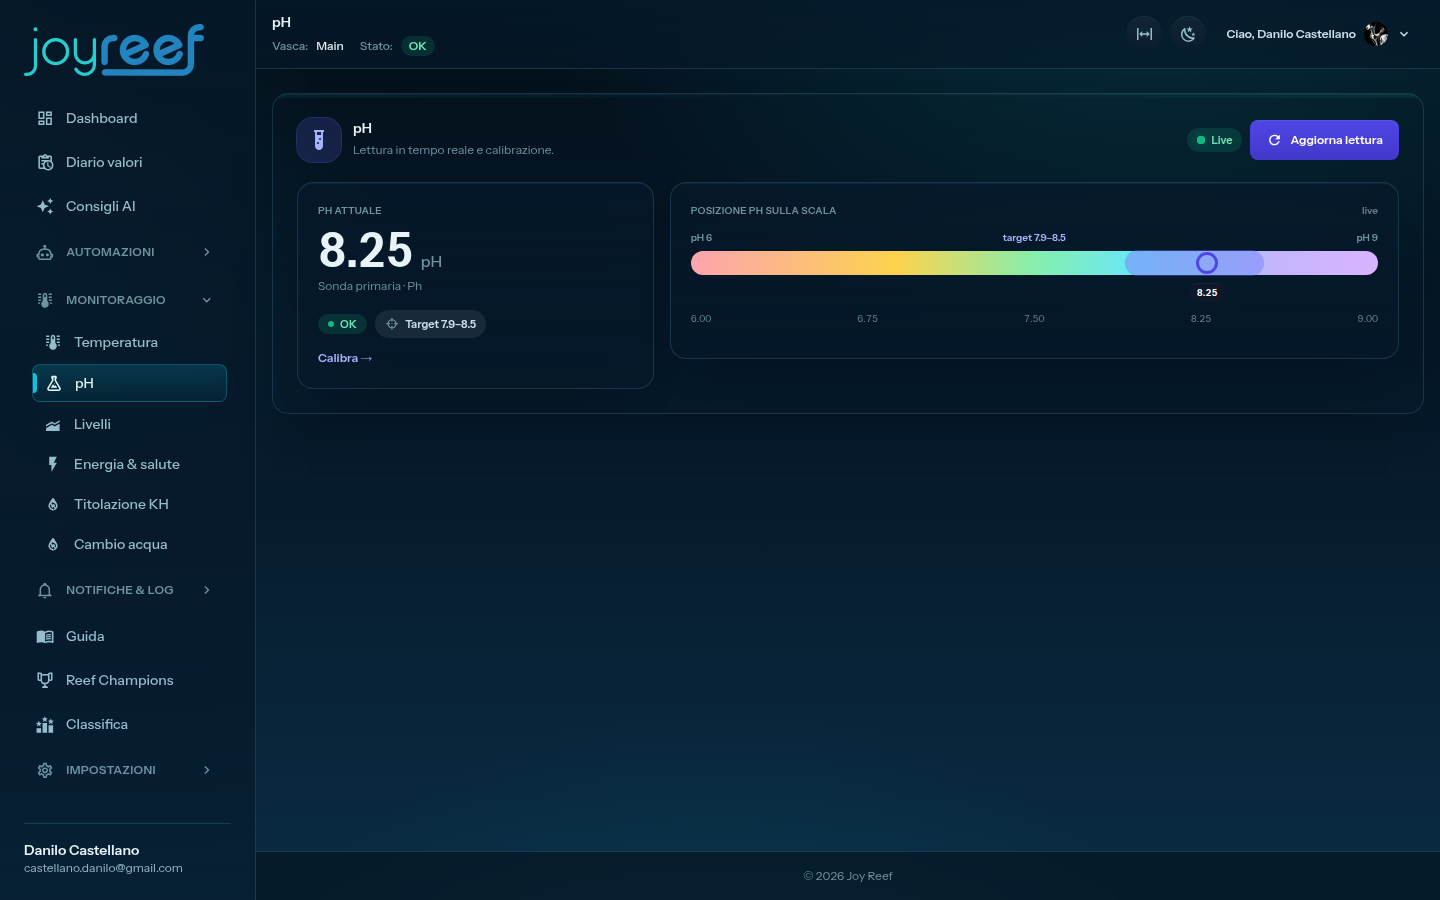
Calibration is done on the pH device page: from Config → Devices open your pH Probe, then go to the Calibration section (direct URL portal.joy-reef.com/ph/{id}).
What you need
- The two buffers: pH 7.00 and pH 4.00
- RO water to rinse
- A clean small cup for each buffer (avoid cross-contamination)
Procedure (2-point wizard)
- Open the pH device's Calibration section and start the wizard.
- Neutral point (pH 7.0): rinse the probe with RO water, immerse it in the pH 7.0 buffer, wait 30-60 seconds for the reading to stabilize, then click "Calibrate pH 7.0".
- Acid point (pH 4.0): rinse again, immerse in the pH 4.0 buffer, wait for it to stabilize, click "Calibrate pH 4.0".
- The device calculates offset and slope and saves the calibration.
After calibration, rinse the probe with RO water and reinsert it into the tank (or into the reactor/titration chamber). Wait 10-15 minutes before considering the readings stable.
🖼️ Image to insert here (pH calibration wizard): screenshot of the pH device's Calibration section during the pH 7.0 point, with the current reading and the "Calibrate pH 7.0" button.
💡 Recalibrate every 2-3 months. pH probes "drift" over time, especially in salt water. Regular recalibration guarantees reliable readings.
⚠️ Do not reuse buffers. Once poured and used, a buffer loses accuracy rapidly. Fresh buffer for every calibration.
7. Using pH
Once calibrated, the pH device is ready. The reading appears on the dashboard among the metrics of the tank you assigned it to.
If you need pH for a chemical integration, the pH device is the source you'll select on the respective pages:
- ➡️ Calcium reactor (guide 10) — in the "pH Probe" menu on the reactor page you select the reactor's pH device.
- ➡️ Automatic KH titration (guide 12) — in the "pH Probe" menu on the titration page you select the titration chamber's pH device.
💡 With a separate pH device for each need (tank / reactor / titration), on the pages above you just select the right one by the name you gave it in sec. 5 — no more confusion about "which probe on which controller".
8. If something goes wrong
| Symptom | Probable cause | What to do |
|---|---|---|
| pH missing / "Waiting for pH" | Device offline or probe not in water | Check that the device is online in Devices; make sure the probe is immersed |
| pH device offline | WiFi/MQTT down | Check the power and the WiFi connection (repeat the captive portal of guide 03 if you changed network) |
| ADS1115 not detected | Wrong I2C pins or wiring | Check that SDA is on D3 and SCL on D4 — not on the SD/SC pins, which are the flash memory bus. Also check the ADS1115's VDD/GND. Note: the ADS1115 is probed only at power-on, so wire first and power up afterwards |
| "Jumpy" or clearly wrong pH readings | Old calibration or electrical noise | Recalibrate (sec. 6); keep the BNC cable away from pumps/power supplies |
| Reads ~7 even in the 4/10 buffers | Probe exposed to air, disconnected, or dry membrane | Rehydrate the probe; check the BNC connector on the module |
| pH "stuck" even when temperature changes | Temperature not arriving → ATC on 25 °C fallback | Assign the pH device to the same tank as the controller with the temperature probe (sec. 5) |
| Probe no longer calibrates (slope out of range) | Probe at end of life | pH probes last ~1-2 years: if it reads clearly off values in pH 4.0, replace it |
JoyReef Guide · v1.0 · Questions? Write to us at supporto@joy-reef.com