Automatic KH Titration
Reading time: ~15 minutes · Execution time: ~30 minutes setup + 1-2h calibration and tuning · Audience: anyone who already has a dosing pump configured (see guide 11) and wants to automate KH measurement
🔵 Advanced Guide — not part of the 01-08 onboarding path. Requires a dosing pump with at least 3 free channels + a dedicated pH probe.
1. What you are about to do
KH (carbonate hardness, measured in dKH or "German degrees of carbonate hardness") is one of the most important parameters in a reef tank: it measures the water's ability to "buffer" pH and is the primary indicator of your corals' consumption.
KH is traditionally measured with a drop test kit: you take a water sample, add acid reagent drop by drop until an indicator changes color, and count the drops. A simple procedure, but:
- It must be done at least once a week (ideally more often for those fine-tuning parameters)
- It requires manual precision (drops are never exactly the same)
- Color change perception is subjective
- It doesn't leave a spontaneous historical record
The automatic KH titrator performs exactly the same process but with a machine precise to the hundredth of an ml, activatable on-demand or scheduled every night, with a permanent history in the portal.
In this guide, you will configure:
- The assignment of 3 dosing pump channels to the roles Sample / Reagent / Drain
- The dedicated pH probe for the titration chamber
- (Optional) A smart plug for a stirrer to mix the sample + reagent
- Measurement parameters (sample volume, reagent steps, target endpoint pH, safety features)
- Factor calibration (= "how many dKH equal 1 ml of reagent?")
- (Optional) Scheduled daily execution (e.g., every night at 03:00)
⚠️ Non-trivial initial cost: titrator = dosing pump (at least 3 free channels) + dedicated pH probe + chamber + HCl reagent. If you already have the dosing pump from guide 11, this is a natural extension. If you don't have it yet, configure it first.
2. What you need
Hardware
- ✅ A JoyReef dosing pump configured and online (guide 11) with at least 3 free channels (not already used for Balling/trace elements)
- ✅ A pH probe dedicated to the titration chamber, NOT the reactor probe nor the tank probe: it's a third probe. Connected to a dedicated pH device (see guide 18) and calibrated
- ✅ A titration chamber: small container (50-100 ml) where the reaction occurs, with:
- Inlet for the sample (tank water)
- Inlet for the reagent (HCl)
- Outlet for the drain
- Hole for the pH probe
- (Optional) a small magnetic stirrer or a recirculation pump
- ✅ Diluted HCl reagent in known concentration (typically 0.1 M, purchasable online or at specialized reef stores)
- ✅ Three dedicated peristaltic tubes for the 3 pumps (sample/reagent/drain)
Smart plug (optional)
- ✅ A smart plug for the chamber stirrer (if you have one). If the stirrer is included in the chamber and works mechanically with a constant-on recirculation pump, it's not needed.
Software / Preliminary Configuration
- ✅ A primary tank already set up (guide 04)
- ✅ A reliable KH drop test kit (Salifert, Red Sea, Hanna, etc.) for initial factor calibration — essential
⚠️ HCl reagent is corrosive. Keep the bottle away from children/animals, wear gloves when handling it, and do not drop it on metals. When the reagent runs out, the system will continue to "run empty" until the max_reagent_ml safety triggers → keep an eye on the bottle level.
3. How automatic titration works
The Chemical Principle (in 30 seconds)
KH measures how much acid is needed to bring the water to a "neutral acid" pH (pH ~4.5). Higher KH = more buffering power = more reagent required to drop to that pH.
Procedure:
- Take a fixed volume of tank water (e.g., 50 ml) — called the "sample"
- Add HCl acid in small steps (e.g., 0.1 ml at a time)
- Measure the pH after each step, waiting for it to stabilize
- Continue until the pH drops below the target (e.g., 4.5)
- The total ml of acid used is proportional to the KH
Formula:
dKH = total_reagent_ml_used × factor (dKH/ml)
The factor depends on your specific reagent concentration and sample volume. It is derived once (calibration) and remains valid as long as you don't change reagent or sample volume.
What the machine does in practice (sequence)
AT START of measurement:
  1. SAMPLE pump:  pumps SAMPLE_ML ml of tank water into the chamber
  2. MIXER ON:     turns on the stirrer (if configured)
  3. settle SETTLE_SECONDS sec

TITRATION LOOP:
  4. REAGENT pump: pumps STEP_ML ml of HCl
  5. settle SETTLE_SECONDS sec
  6. READS pH from the probe
  7. while pH > target_ph (loop step 4):
     if pH > target_ph + 0.7:    uses normal steps (STEP_ML)
     if pH ≤ target_ph + 0.7:    switches to fine steps (FINE_STEP_ML, more precise, near the target)
     when pH ≤ target_ph:        measurement complete, exit
  8. safety check:
     - if total reagent > MAX_REAGENT_ML → FAULT
     - if total duration > MAX_DURATION_SECONDS → FAULT

AT END of measurement:
  9. CALCULATE: dKH = total_reagent_ml × factor
  10. MIXER OFF
  11. DRAIN pump: empties the chamber
  12. RINSE LOOP × RINSE_CYCLES:
      a. SAMPLE pump: RINSE_ML ml of tank water (to clean reagent residues)
      b. DRAIN pump: empties
  13. SAVE result + send to portal
Normal and Fine Steps
The step_ml (e.g., 0.1 ml) is the volume added in each "normal" iteration — fast but risks "overshooting" the target.
The fine_step_ml (default 0.05 ml) activates when approaching the target (pH ≤ target+0.7): slower but more precise.
Result: measurement precise to ±0.05 dKH in 5-15 minutes.
4. Step 1 — Calibrate the dedicated pH probe
First of all. Uncalibrated pH probe = incorrect KH measurement.
Same procedure as sec. 6 of guide 18: open the titration chamber's pH device in Devices, go to the Calibration section (portal.joy-reef.com/ph/{id}) and calibrate with pH 7.0 and pH 4.0 buffers.
💡 The probe used for titration is a separate pH device from the one for the calcium reactor and the one for the tank: give it a clear name (e.g., "KH titration pH") to avoid confusion during calibration and recalibration.
💡 Recalibrate every 2-3 months: this probe is particularly important as it determines KH precision. It gets dirty/fouled easily due to reagent residues: clean with RO water during every maintenance session.
5. Step 2 — Open the KH Titration page
From the JoyReef portal:
- Open portal.joy-reef.com and log in
- In the left menu, click on "KH Titration" (it may be in Config → KH Titration)
- Or go directly to
portal.joy-reef.com/kh-titration
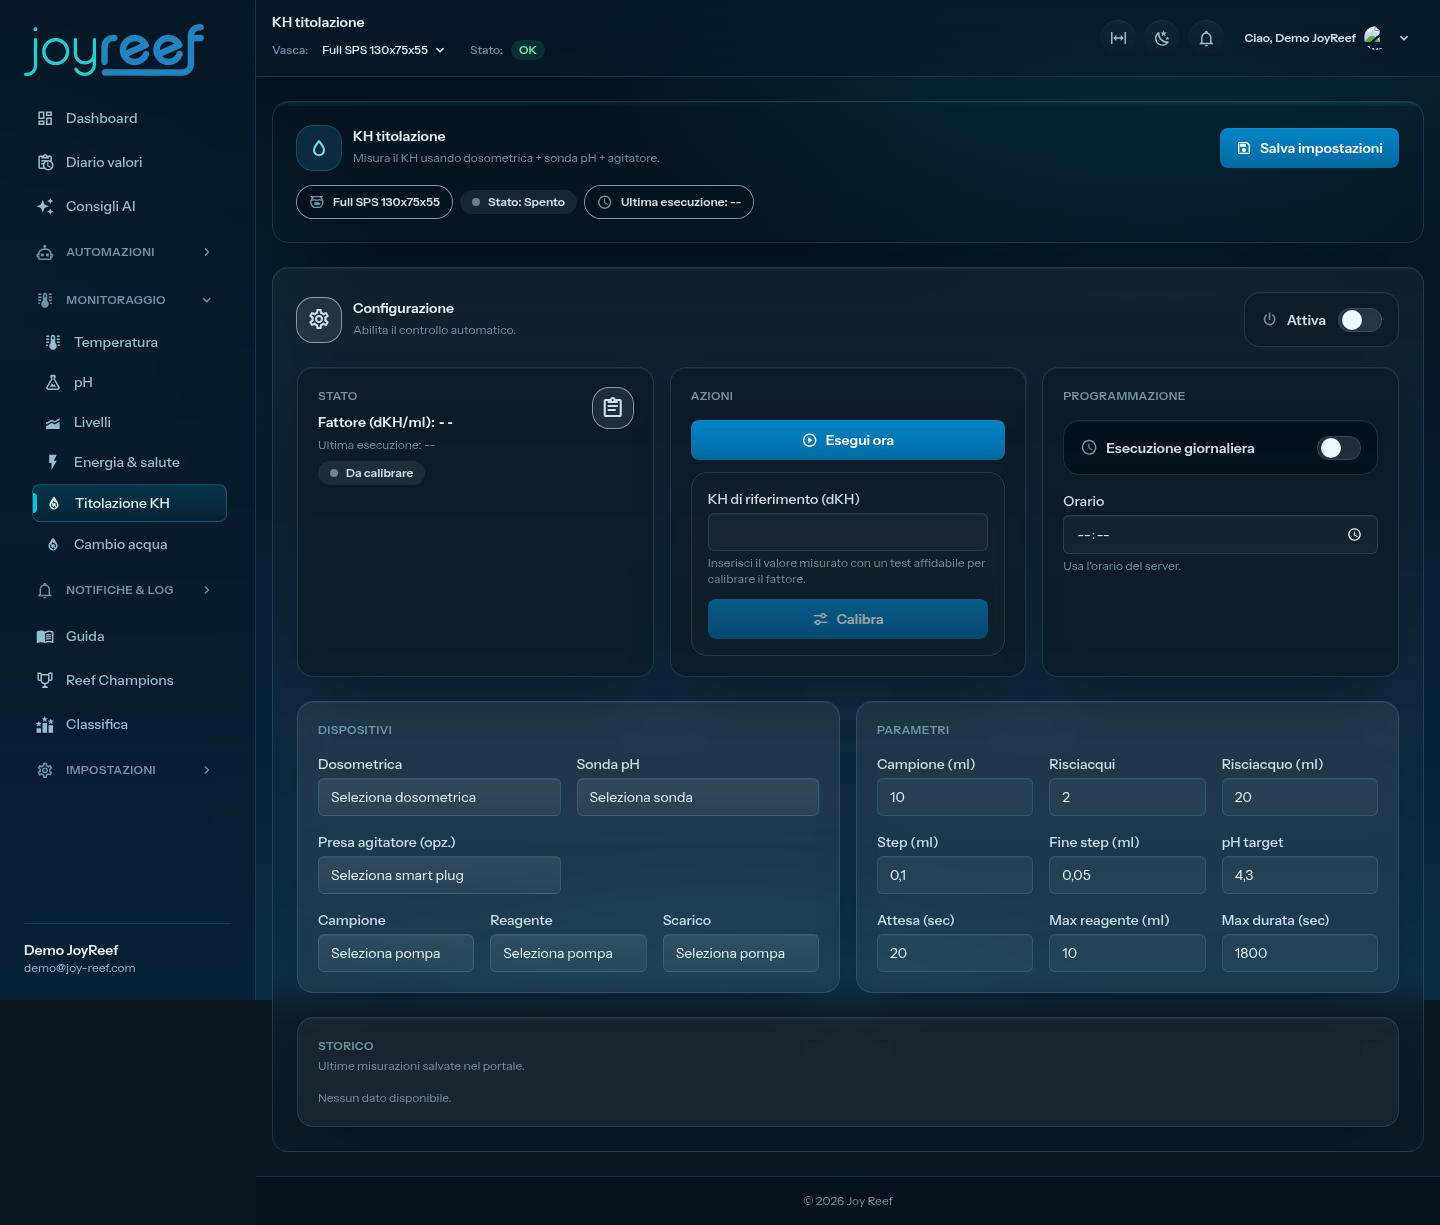
The "KH Titration" page opens with a header showing status (Active/Off) + "Last execution: --" and a "Save Settings" button.
You will see an orange banner "Incomplete Configuration" until you have selected a dosing pump + 3 pumps + pH probe. This is normal on first access.
6. Step 3 — Configure devices
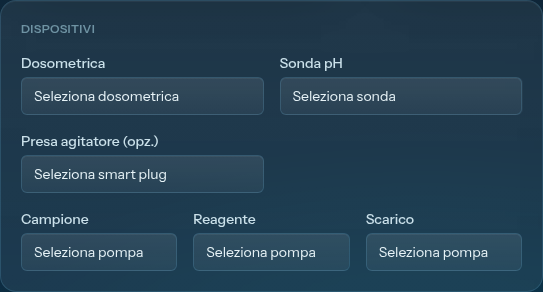
In the "Devices" section, you find 6 menus in 2 groups.
Main Group
- Dosing Pump: select the dosing pump you will use for titration (must already be configured, guide 11)
- pH Probe: select the titration chamber's pH device (see guide 18)
- Stirrer Plug (opt.): if you have a stirrer on a smart plug, select it. Otherwise leave "None".
Pump Assignment
Once the dosing pump is selected, 3 menus appear to assign roles:
- Sample: select the pump channel that pumps water from the tank to the chamber (e.g., "Pump 4")
- Reagent: the channel that pumps HCl reagent from the bottle to the chamber (e.g., "Pump 5")
- Drain: the channel that empties the chamber into the drain (e.g., "Pump 6")
⚠️ Important: the 3 channels assigned to titration cannot be used for other doses (Balling, trace elements, etc.). The system treats them as dedicated. If you need all 6 channels for other doses, you need a second dosing pump.
💡 If you see "(programmed)" next to a channel in the list, it means it already has scheduled doses from the dosing pump page: using it for titration would deactivate those doses. Choose a free channel.
7. Step 4 — Set measurement parameters
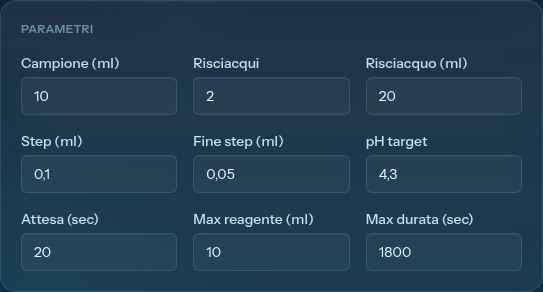
In the "Parameters" section, there are 9 fields. They seem like many, but most are left at default for the first measurement.
| Field | Recommended Value | What it means |
|---|---|---|
| Sample (ml) | 10 |
Volume of tank water taken for each measurement. Higher = more precise but uses more reagent |
| Rinses | 2 |
Number of chamber cleaning cycles after measurement |
| Rinse (ml) | 20 |
Volume of tank water for each rinse |
| Step (ml) | 0.1 |
How many ml of reagent to add in each "normal" iteration |
| Fine Step (ml) | 0.05 |
How many ml of reagent in each "fine" iteration (near target) |
| Target pH | 4.30 |
The pH below which the measurement is complete |
| Wait (sec) | 15 |
pH stabilization time after each reagent step |
| Max Reagent (ml) | 10 |
Safety: if more reagent than this is needed, fault (KH > 20, anomaly) |
| Max Duration (sec) | 1200 (20 min) |
Safety: if measurement lasts longer than this, fault |
💡 When to modify defaults: - Tank with KH > 14 (rare): increase
Max Reagentto15-20- More diluted reagent (e.g., 0.05 M instead of 0.1 M): increase bothStep ml(to0.2) andMax Reagent- Tank with KH < 5 (rare, unhealthy): reduceStep mlto0.05to not overshoot the target with a single step
8. Step 5 — Factor calibration (crucial)
Without calibration, the system knows how many ml of reagent were used but does not know how much 1 ml is worth in dKH. Calibration is done once (for each new batch of reagent or change in sample volume).
Procedure
- Measure the current tank KH with a reliable drop test kit (Salifert, Red Sea Pro, Hanna). Note the value with at least 1 decimal (e.g.,
8.2 dKH). - Go to the KH Titration page, "Actions" section
- Enter the measured value in the "Reference KH (dKH)" field (e.g.,
8.2) - Click "Calibrate"
- The system starts a full measurement, calculates how many ml of reagent were needed, and uses the reference KH to calculate the factor (dKH/ml), which it saves and will use from that moment on
Calibration takes 5-15 minutes. During execution, in the "Status" section, you'll see:
- "In progress" pill (animated)
- Current factor (empty until end)
- "Last execution: --" timestamp that will update
At the end of calibration, in the "Status" section, you see:
- Factor (dKH/ml): the newly calculated value (e.g.,
0.40 dKH/ml= 1 ml of reagent equals 0.4 dKH) - "Ready" pill (green)
- Last execution: recent timestamp
When to recalibrate
- After each new reagent batch/bottle (concentrations vary slightly between batches)
- If you change the sample volume (sample_ml)
- If measurement values systematically deviate from control drop test kits
- Every 6 months for safety
🖼️ Image to insert here (Calibration completed): screenshot of the Status + Actions section with factor = 0.40 dKH/ml, green "Ready" pill, and "Reference KH" field filled to 8.2.
9. Step 6 — Perform the first test measurement
After calibration, perform a verification measurement.
In the "Actions" section, click "Execute Now".
The system starts and does the same cycle as calibration (5-15 minutes). Status "In progress" → "Ready" at the end.
When finished:
- In the "History" section at the bottom of the page, you see a new "Measure" row with the calculated dKH value and timestamp
- In the "Status" section at the top, you see "Last execution" updated
Verification: compare the returned value with a parallel drop test. They should be within ±0.3 dKH of each other.
- If they are very different (> 0.5) → recalibrate
- If they are within ±0.3 → excellent, the system is calibrated
💡 For the first 3-5 measurements, always compare with the drop test to be sure the system is stable. Afterward, you can trust the titrator alone (with occasional drop test checks, e.g., monthly).
10. Step 7 — Schedule automatic measurement
Once the system works reliably, schedule it to measure on its own.
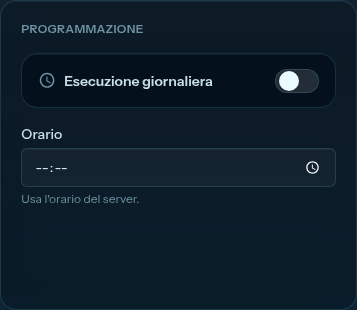
In the "Schedule" section:
Step 1: activate the schedule
Click the "Daily Execution" toggle → it turns green.
Step 2: choose the time
In the "Time" field, choose when to start the measurement. Recommended:
- 03:00-04:00: deep night, the skimmer doesn't disturb, you have the data upon waking
- Not during high tank activity hours (full light, feeding)
No day selection: the measurement executes once a day, every day.
Step 3: activate main toggle and save
At the top of the configuration section is the main "Activate" toggle (must be green) and at the top right the "Save Settings" button. Click save.
Green confirmation banner.
From this moment, every night at the set time, the system will:
- Execute titration (~10 min)
- Add the result to the history
- Update "Last execution" + current KH value
11. Reading the History
In the "History" section at the bottom of the page, you see the last N measurements with:
- Timestamp
- dKH value
- Tag "Measure" (normal execution) or "Calibration" (calibration execution)
Calibrations are highlighted differently because they are not "operating measurements" but factor parameter changes.
💡 KH trend over time: to see the full trend (not just the last N), go to the Sensors section or the tank Dashboard: KH is exposed as a metric with a historical graph, derived from titrator measurements.
12. If something goes wrong
"Incomplete Configuration" even after filling everything
- Selected the dosing pump but haven't assigned the 3 pumps yet? Verify all 3 menus (Sample/Reagent/Drain) are populated
- Forgotten the pH probe? It is mandatory (stirrer is not)
"Last Error: ..." in status
The device failed the last execution. Most common errors:
- "Max reagent reached" = used more than
max_reagent_ml(default 10ml) without reaching target pH. Causes: - Faulty or uncalibrated pH probe → recalibrate (sec. 4)
- Diluted or expired reagent → replace with new bottle, recalibrate factor
- Truly very high tank KH (>14): increase
max_reagent_ml - "Max duration reached" = measurement exceeded
max_duration_seconds(default 1200). Causes: - Blocked reagent pump → check tube
- Wait too high + many steps = very long measurement: reduce
Wait (sec)to 10 orStep mlto a higher value - "Pump offline" = the dosing pump does not respond
Measurements deviate by 0.5-1 dKH from drop test
- Obsolete calibration factor (changed reagent) → recalibrate
- Drifting pH probe → recalibrate
- "Contaminated" titration chamber from previous measurement → increase
Rinsesfrom 2 to 3-4 - Unreliable drop test kit (maybe it's the wrong one, not the titrator): compare with another drop test of a different brand to be sure
Sample/reagent pump not pumping
Same symptoms as guide 11: clogged tube, worn peristaltic tube, empty container. See sec. 11 of guide 11.
Titration chamber "overflows" or doesn't empty
- Drain pump too weak relative to total volume (sample_ml + max_reagent_ml + rinse_ml × cycles). Increase drain number/duration, or change pump
- Clogged drain tube → check it
- Chamber drain hole poorly positioned relative to operating level (residue remains after emptying): reposition or replace chamber
Schedule doesn't start
- Main "Activate" toggle off → at the top of the page, it must be green
- "Daily Execution" toggle off → in the Schedule section, it must be green
- Wrong time → verify 24h format
- Dosing pump offline during execution hours → check connectivity
- Previous measurement still in progress ("In progress" status for > 30 min) → there's a lockup, restart the doser
Suspected contamination (e.g., KH read increasingly higher than reality)
Reagent residues from a previous measurement "falsify" the next one. Symptoms: first measurement of the day correct, subsequent measurements increasingly higher.
- Increase Rinses from 2 to 3-4
- Increase Rinse (ml) from 20 to 50
13. Next step
You have automatic KH measurement operational. With this data under control:
- You can quickly identify when KH drops (= corals consuming, you must increase Balling or calcium reactor doses)
- You can reduce drop test frequency (monthly check instead of weekly)
- You have a permanent KH history visible in the dashboard
Natural extension: automating dosage based on KH reading. Example: "if KH < 7.5 → automatically increase daily Balling B dose by 5%". For now, this logic is done manually from the dosing pump page; when the automation refactor is complete (see guide 09, coming soon), you'll be able to create a rule that closes the loop automatically.
💡 Current limit: the titrator measures once a day, dose corrections are made manually by observing the trend. It's already a big step up from drop tests and usually sufficient for stable tanks.