Firmware Installation via USB
Reading time: ~8 minutes · Execution time: ~10 minutes (flash + verification) · Audience: anyone needing to install or update the firmware of a JoyReef device (Controller, Dosing Pump, pH, Feeder or EC probe)
🔵 Advanced (Technical) Guide — not part of the 01-08 onboarding path. Use this when: - You receive a new, blank controller/dosing pump to flash for the first time. - You are recovering a device that had firmware problems (recovery / re-flash). - You want to force the installation of a specific version (downgrade, test build).
⚠️ For normal periodic updates of a device already working and online on the portal, USB is NOT needed: use the more convenient OTA procedure from the portal described in guide 17. No cables, no PC required.
1. What you are about to do
JoyReef devices (Main Controller and Dosing Pump) are based on the ESP8266 and accept firmware loaded via the USB port. Traditionally, this requires a desktop tool (esptool, Arduino IDE, PlatformIO). JoyReef allows you to do it directly from your browser, without installing anything, using a standard technology called Web Serial.
The flow is:
- Open the
/usb-flashpage on the portal. - Choose which firmware you want (Controller, Dosing Pump, pH, Feeder or EC probe).
- Connect the device via USB cable to your PC.
- The browser "hooks" into the serial port.
- Flashing takes place in a few minutes.
- Restart the device → new firmware active.
No .bin files to download and manage manually, no tools to configure. It works even for users who have never opened a shell.
ℹ️ When NOT to use this guide: for the WiFi configuration of a newly flashed controller (= telling it which network to connect to), see guide 03. This guide stops at the firmware flash.
2. What you need
Hardware
- ✅ A desktop or laptop PC with an available USB port (or a Mac with a USB-A or USB-C cable/dongle).
- ✅ A USB data cable (USB-A ↔ USB-C, or USB-A ↔ Micro USB depending on the device). Important: it must be a "real" data cable, not just power. Many cheap charging cables do not transmit data, and this is the most common problem.
- ✅ The device to be flashed (Controller, Dosing Pump, pH, Feeder or EC probe), not powered externally (it will be powered via USB from the PC during flashing).
Software
- ✅ Chrome or Edge on your PC. Firefox, Safari, and Brave DO NOT work (Web Serial not supported).
- ✅ The browser updated to the latest version (Web Serial APIs are recent).
- ✅ USB-serial drivers installed on your PC. These drivers allow the PC to "see" the device's USB-serial chip:
- Typically, you need either CH340 or CP210x depending on your device's board.
- On Linux, they have been included in the kernel for years — no need to install anything.
- On Windows, they often need to be installed manually (Microsoft does not include them automatically).
- On Mac, it depends on the macOS version — recent versions include CH340, older ones require manual installation.
💡 How to tell which driver you need? Without a driver, the connected device will not appear in the browser's serial port list. If the list is empty, it's almost always a driver problem: - Visit the board manufacturer's site (CH340 → wch-ic.com, CP210x → silabs.com). - Search for the driver for your operating system. - Install, restart, and try again.
Portal Access
- ✅ A JoyReef account (even without configured tanks).
- ✅ A stable internet connection to download the firmware during flashing (~1-2 MB).
⚠️ HTTPS or localhost required: for security reasons, the browser only allows Web Serial on secure pages. If you access JoyReef via
https://portal.joy-reef.com, you are fine. If for some reason you are using a non-localhttp://URL, Web Serial will be blocked.
3. Open the USB Flash page
From the JoyReef portal:
- Left menu → "USB Flash" or "Firmware via USB" (may be under Config).
- Or go to
portal.joy-reef.com/usb-flash.
The "Install Firmware via USB" page opens with sections:
- Header with "Firmware" kicker + title.
- Requirements (what is needed, already explained above).
- Firmware Selection: Controller / Dosing Pump / pH / Feeder / EC probe.
- Flash Firmware: where the operation starts.
- Notes: important warnings.
- Troubleshooting: common errors.
If you see a red banner like "Web Serial is not available in this browser," you are using an unsupported browser. Open Chrome or Edge.
If you see "The browser blocks Web Serial on non-secure pages," you are on a non-localhost http://. Go to https://portal.joy-reef.com.
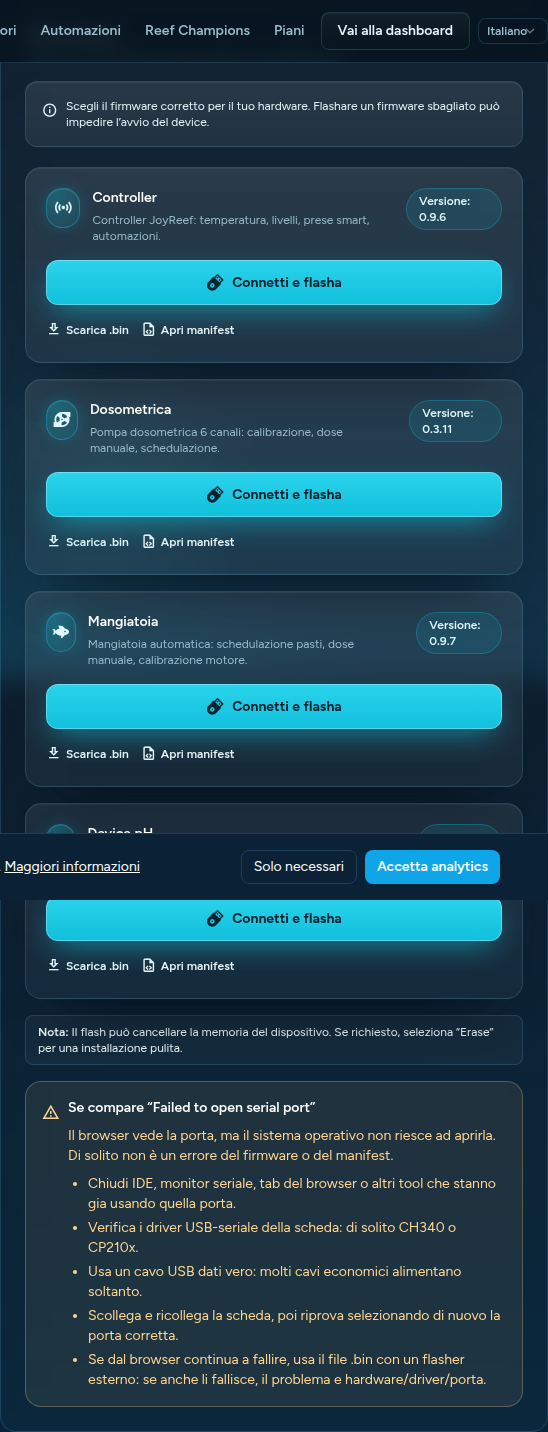
4. Step 1 — Choose the correct firmware
In the "Firmwares" section, you see one box per device type (Controller, Dosing Pump, pH, Feeder, EC probe):
Controller
The firmware for the JoyReef Main Controller. It manages:
- DS18B20 temperature probes.
- BNC pH probes.
- Level sensors (floats).
- MQTT commands to smart plugs.
- All automations (ATO, temperature, water change, calcium reactor, etc.).
Dosing Pump
The firmware for the JoyReef 6-channel Dosing Pump. It manages:
- 6 peristaltic pump channels.
- Calibration.
- Scheduled doses.
- MQTT confirmations.
⚠️ Flashing the wrong firmware onto the wrong device (e.g., Controller firmware on a Dosing Pump) does not permanently break the device, but leaves it in a non-functional state. You just need to re-flash the correct one. However, be careful not to get confused: the two firmwares are incompatible.
Below each box, you see 3 elements:
- Version: the latest available version.
- "Connect and flash" button (the main one — flash from browser).
- "Download .bin" button (to use an external tool like esptool, optional).
- "Open manifest" button (technical JSON file, optional).
In 99% of cases, just click "Connect and flash".
5. Step 2 — Connect the device via USB
Before clicking "Connect and flash":
- Turn off external power to the device (if connected): it will be powered by the USB cable during flashing.
- Connect the USB cable from the PC to the device. You should see an LED light up on the device → a sign it's receiving power from the cable.
- Wait 3-5 seconds to give the PC time to "recognize" the device and load the drivers.
💡 Verify the PC sees the device (optional but useful for pre-diagnosis): - Linux: open terminal, run
ls /dev/ttyUSB*(for CH340) orls /dev/ttyACM*(for other chips). You should see at least/dev/ttyUSB0or similar. - Windows: Device Manager → "Ports (COM & LPT)" section → you should see "USB Serial Device (COMx)" or "USB-SERIAL CH340 (COMx)". - Mac: terminal →ls /dev/cu.*→ you should see/dev/cu.usbserial-XXXXor/dev/cu.SLAB_USBtoUART.If you see nothing, it's a driver (sec. 2) or cable (is it charge-only?) problem.
6. Step 3 — Start Flashing
- In the correct firmware box, click "Connect and flash".
- The browser opens a popup: "joy-reef.com wants to connect to a serial port."
- In the list, you see all serial ports available on your PC. Choose the one corresponding to your device (usually it's the only one, or the last one connected).
- Click "Connect" in the browser popup.
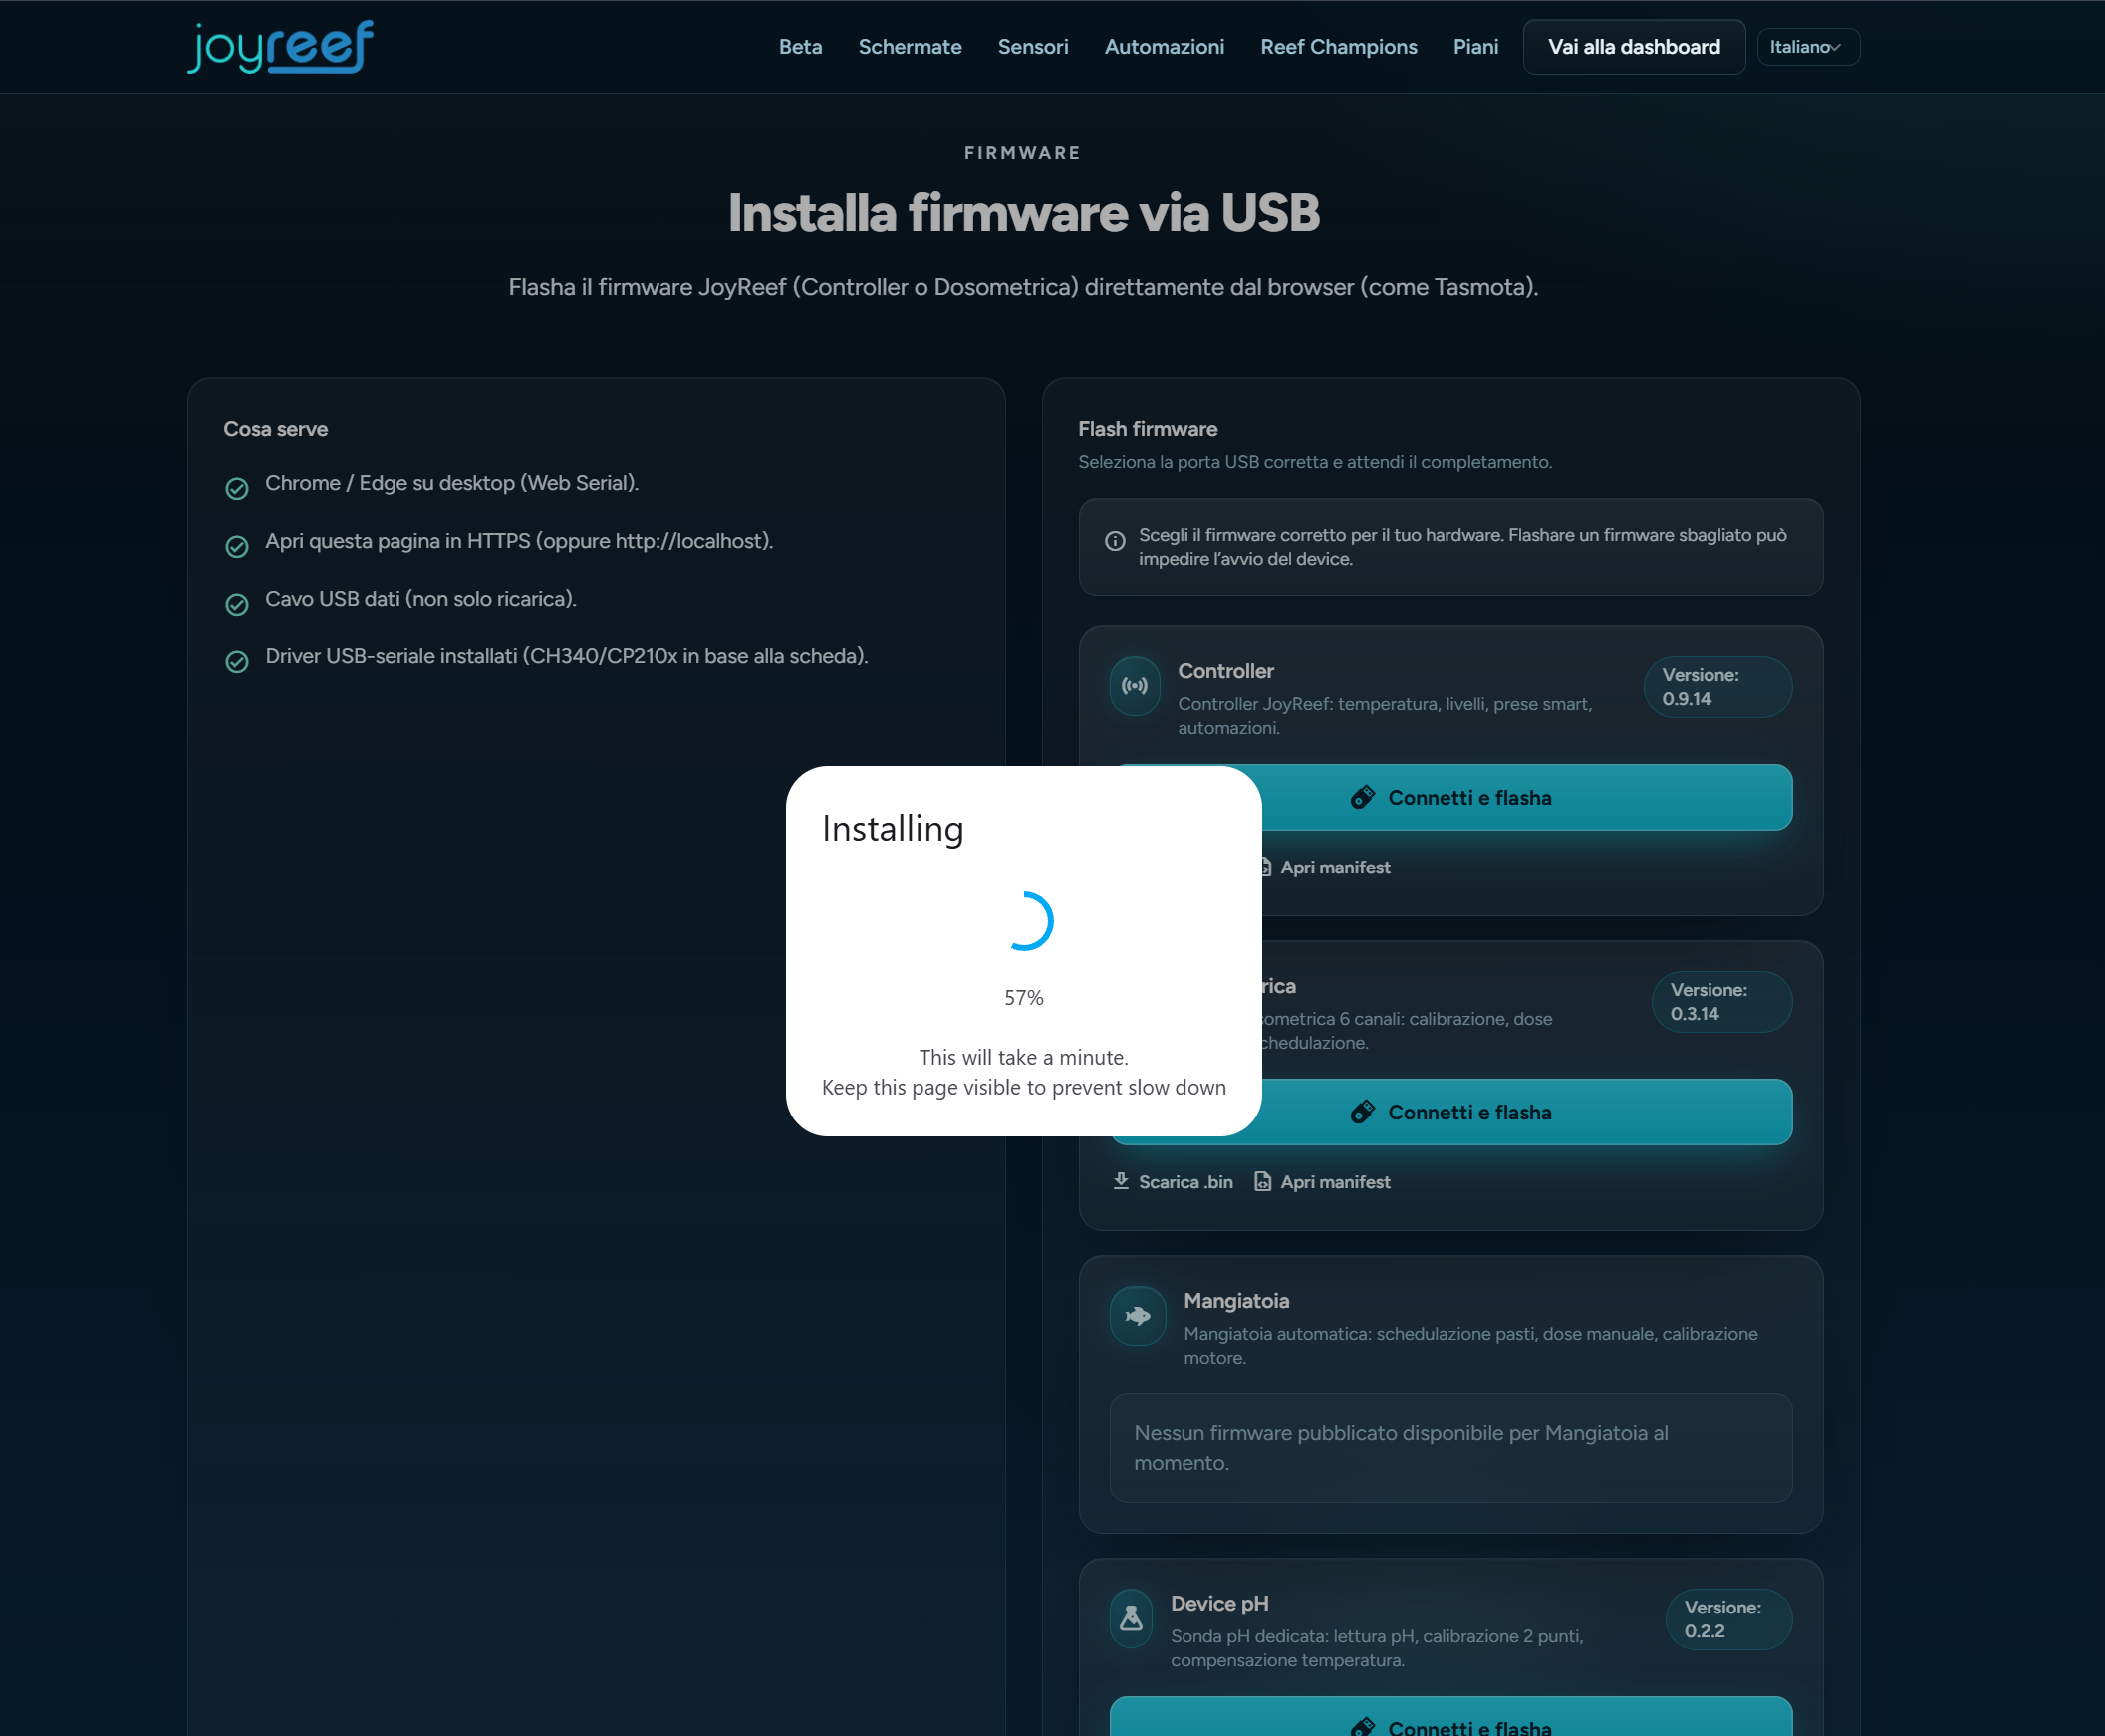
The flash tool activates. You will see a progress bar showing the stages:
- Connecting (1-2 sec) → the tool is talking to the board.
- Manifest fetched (1 sec) → the browser has downloaded the list of files to flash.
- Erasing (10-30 sec) → clears the device memory (optional, usually yes for the first installation).
- Writing (1-3 min) → writes the new firmware.
- Verifying (10-20 sec) → checks that everything was written correctly.
- Done! → flash completed.
During Writing, do not unplug the USB cable and do not close the browser tab. An interruption in the middle can ruin the flash (recoverable by redoing it from scratch, but annoying).
7. Step 4 — Restart the device
When you see "Done!" or "Flash completed":
- Unplug the USB cable from the device.
- Reconnect external power (5V or 12V power supply depending on the device).
- The device starts with the new firmware.
You will see:
- The device LED lights up.
- If it's the first time: the device goes into AP mode (creates a WiFi network
joyreef-XXXXXXordosometrica-XXXXXX). Go to guide 03 for WiFi configuration. - If it's an update of an already configured device: it automatically reconnects to the WiFi saved in memory and comes back online on the portal.
💡 Important tip for updates: flashing does not delete the saved WiFi configuration (unless you checked "Erase" before starting). So a firmware update simply "replaces the software" while keeping the WiFi credentials. If you want a full reset, you must force an "Erase" during flashing (some tools do this automatically).
8. If something goes wrong
The browser says "Web Serial is not available"
- You are using Firefox, Safari, Brave, or another non-Chromium-based browser → open Chrome or Edge.
- You are on a very old version of Chrome (< 89) → update it.
The port list is empty when I click "Connect and flash"
See sec. 2 on drivers. Most likely causes in order:
- Missing drivers (Windows / Mac) → install CH340 or CP210x.
- USB cable is charge-only → change the cable (quick test: try with a cable you normally use to swap files with your phone).
- PC USB port malfunction → try another USB port.
- Device externally powered but USB unstable → unplug external power, leave only USB.
- Defective hardware device (rare, but it happens) → contact support.
"Failed to open serial port"
The browser sees the port but cannot open it. Common causes:
- Port already occupied by another program → close IDE/Arduino/PlatformIO/serial monitor you have open, including from other browser tabs.
- Corrupt driver → reinstall USB-serial drivers.
- Bad USB cable → cable again.
- Device replug → unplug and reconnect the USB cable, then try again by selecting the port again.
Flashing stops in the middle (e.g., at 50% Writing)
Most likely causes:
- Cable moved → reconnect properly and start over.
- PC went to sleep → disable sleep during flashing.
- Browser tab lost focus → keep the flash tab visible, do not switch to other apps.
- Device lost power → defective USB cable or underpowered USB port. Try another port or a higher-quality cable.
In all cases: restart the flash from scratch. The device might be in an inconsistent state, but re-flashing always resolves it.
"Device not recognized" after flashing
The flash was successful, but the device doesn't start:
- You flashed the wrong firmware (e.g., Controller on a Dosing Pump) → re-flash the correct one.
- Erase not performed but necessary (moving from a very old version to a new one) → re-flash with "Erase" active (if the option is available).
- Physically broken device → if not even the LED lights up when powered, it's a hardware problem.
Does it only work from the browser? Can I use esptool?
Yes. Click "Download .bin" in the firmware box → you get the binary file. Then use esptool.py from the terminal:
esptool.py --port /dev/ttyUSB0 --baud 460800 write_flash 0x0 firmware.bin
Replace /dev/ttyUSB0 with your port. If esptool also fails, the problem is hardware/driver/port, not the browser tool.
9. When to update firmware
There is no obligation: if your tank is stable and everything works, no need to update just for the sake of updating. Update when:
- 🆕 A new version comes out adding features you are interested in (we announce this in the changelog/email).
- 🐛 A version comes out that fixes a bug you are experiencing.
- 🔒 A security release comes out (rare for local devices, but can happen).
⚠️ For routine updates, do not use USB: use OTA from the portal (guide 17). Much faster and doesn't require dismantling the device. USB in this guide is for: first installation, recovery, downgrade, custom versions.
💡 Distinct updates: the portal (Vue/Laravel) and firmware (Controller/Dosing Pump) are independent. The portal updates automatically (you are always on the latest version when you open the site). Firmwares do not update themselves: you must activate the update yourself, via OTA (guide 17) or via USB (this guide).
⚠️ Before an important update: take note of your automation settings (ATO, temperature, etc.) — they are usually maintained, but in case of a total reset (e.g., a new major version with a changed data schema), you might need to reconfigure.
10. Conclusion
You have the tools to manage your JoyReef device firmware independently. If it's the first installation, the device is now ready for WiFi configuration:
➡️ Return to Guide 03 — Firmware + WiFi to tell the device which WiFi network to connect to.
If it was an update of an already configured device, you're all set: as soon as the device restarts, you'll see it automatically reappear online on the /devices page.
💡 For anyone arriving here feeling insecure: flashing via USB is one of the most robust and reversible operations in the embedded world. If you make a mistake, you re-flash. You won't break anything. The worst "bad flash" you can experience is 10 minutes of "something isn't working, let's try again."