Temperature Control (Heater + Cooling)
Reading time: ~12 minutes · Execution time: ~15 minutes · Audience: anyone who has completed guide 05 and has at least one smart plug + one temperature probe configured
🟡 Important Guide — a feature that almost everyone will want to activate. Without it, the system works but is much less effective.
🗺️ Your JoyReef Path:
- Shopping list
- Controller assembly
- Firmware + WiFi
- Tank and sensor configuration
- Tasmota smart plugs
- Automatic Top-Off (ATO)
- Temperature control ← YOU ARE HERE
- Water change
- Advanced automations
1. What you are about to do
In this guide, you will configure JoyReef to maintain the tank water within a stable temperature range, automatically turning on the heater when it's too cold and (optionally) the fan or chiller when it's too hot.
Without automatic control, one of these two things happens in the tank:
- In winter: the commercial heater's thermostat is imprecise (fluctuates by ±1°C, sometimes gets stuck on). Result: unstable temperatures, risk of overheating if the thermostat fails.
- In summer: no control, the water rises by 2-3°C on hot days, the corals suffer.
With JoyReef control:
- The heater is managed by the portal (not by its internal thermostat, which you leave set to maximum as a "safety limit"). JoyReef probes are accurate to 0.1°C.
- Above a configurable threshold, a fan on the water surface (cools by evaporation) or a chiller (if you have one) starts automatically.
- You get email notifications if the temperature goes out of range for too long (= failed heater, disconnected probe, etc.).
In this guide, you will configure both protections: hot (high) and cold (low). These are two independent rules on the same page, and you can activate even just one if you don't have cooling.
2. What you need
For cold control (heater), which is the mandatory case:
- ✅ A DS18B20 temperature probe connected to the JoyReef controller and in the water (see guide 04)
- ✅ An aquarium heater (any standard model, typically 100-300W for tanks up to 250L)
- ✅ A Tasmota smart plug configured and assigned to the tank (see guide 05)
- ✅ The heater physically connected to the smart plug, with its own thermostat set to maximum (see note below)
For hot control (fan or chiller), optional:
- ✅ A second smart plug (separate from the heater one)
- ✅ A clip-on fan above the sump (5-10W, cheap, ~€20-30) or a chiller if you have large tanks or live in hot areas
⚠️ Important: the heater thermostat at maximum. When JoyReef controls the heater via smart plug, the heater must always heat when powered, and turn off when JoyReef cuts the power. If you leave its internal thermostat at 25°C, it may not heat even when JoyReef wants it to, because its thermostat says "we're already at temperature." So: set the heater regulator to full scale (32-34°C), and let JoyReef decide.
💡 Do you have more than one temperature probe? You can use more than one for different rules (e.g., one in the tank for the heater, one in the sump for the chiller). In this guide, we assume a single main probe, which is the typical configuration.
3. How temperature control works
Two minutes of concepts before touching the page, in particular a concept called hysteresis which is the only parameter that might be unfamiliar to you.
The basic principle
For each of the two rules (high/low), JoyReef runs a very simple loop on the physical controller:
every N seconds:
    read the temperature from the probe
    if it's below the low threshold: turn on the heater
    if it's above the high threshold: turn on the fan
    if it's within the range: turn everything off
The controller is the "brain": it reads the probes, decides, and sends commands to the smart plugs via MQTT. It works even if the internet goes down (rules are saved locally on the controller).
Hysteresis (important!)
Imagine this scenario: you set the heater to start below 25.0°C. The probe reads 24.9°C → the heater starts. In 10 seconds, the probe reads 25.0°C → it turns off. 30 seconds later it goes back to 24.9°C → it turns on again. And so on: thousands of on/off cycles per day, with three problems:
- The smart plug's relay wears out (mechanical relay → end of life)
- The heater consumes more current in ON cycles than at steady state
- The heater's thermostat may not like rapid cycles
The solution is hysteresis: a "tolerance band" between the activation and deactivation thresholds. Example:
- Low Threshold = 25.0°C, Hysteresis = 0.3°C
- The heater starts when T < 25.0°C ("cold" water)
- The heater turns off when T ≥ 25.0 + 0.3 = 25.3°C ("ok" water)
- Then it stays off until T drops below 25.0°C again
Result: the temperature oscillates in the 25.0-25.3°C band, and the cycles are much more spread out (1-2 per hour instead of 100).
The same applies to the high threshold (e.g., fan starts at 26.5°C, turns off when it drops below 26.5 - 0.3 = 26.2°C).
Double protection (hot + cold) on the same page
The page has two symmetrical and independent cards:
- Low Temperature → controls the heater (starts when too cold)
- High Temperature → controls the fan/chiller (starts when too hot)
You can activate only the low (classic case in winter, cooling not necessary), only the high (tropical zones), or both (recommended configuration 24/7).
Important: they must use 2 DIFFERENT smart plugs. You cannot put the heater and fan on the same plug, because the system must be able to turn them on/off independently.
4. Step 1 — Open the Temperature page
From the JoyReef portal:
- Open portal.joy-reef.com and log in
- In the left menu, click on "Temperature Control" (thermometer icon 🌡️)
- Or go directly to
portal.joy-reef.com/temperature-rules
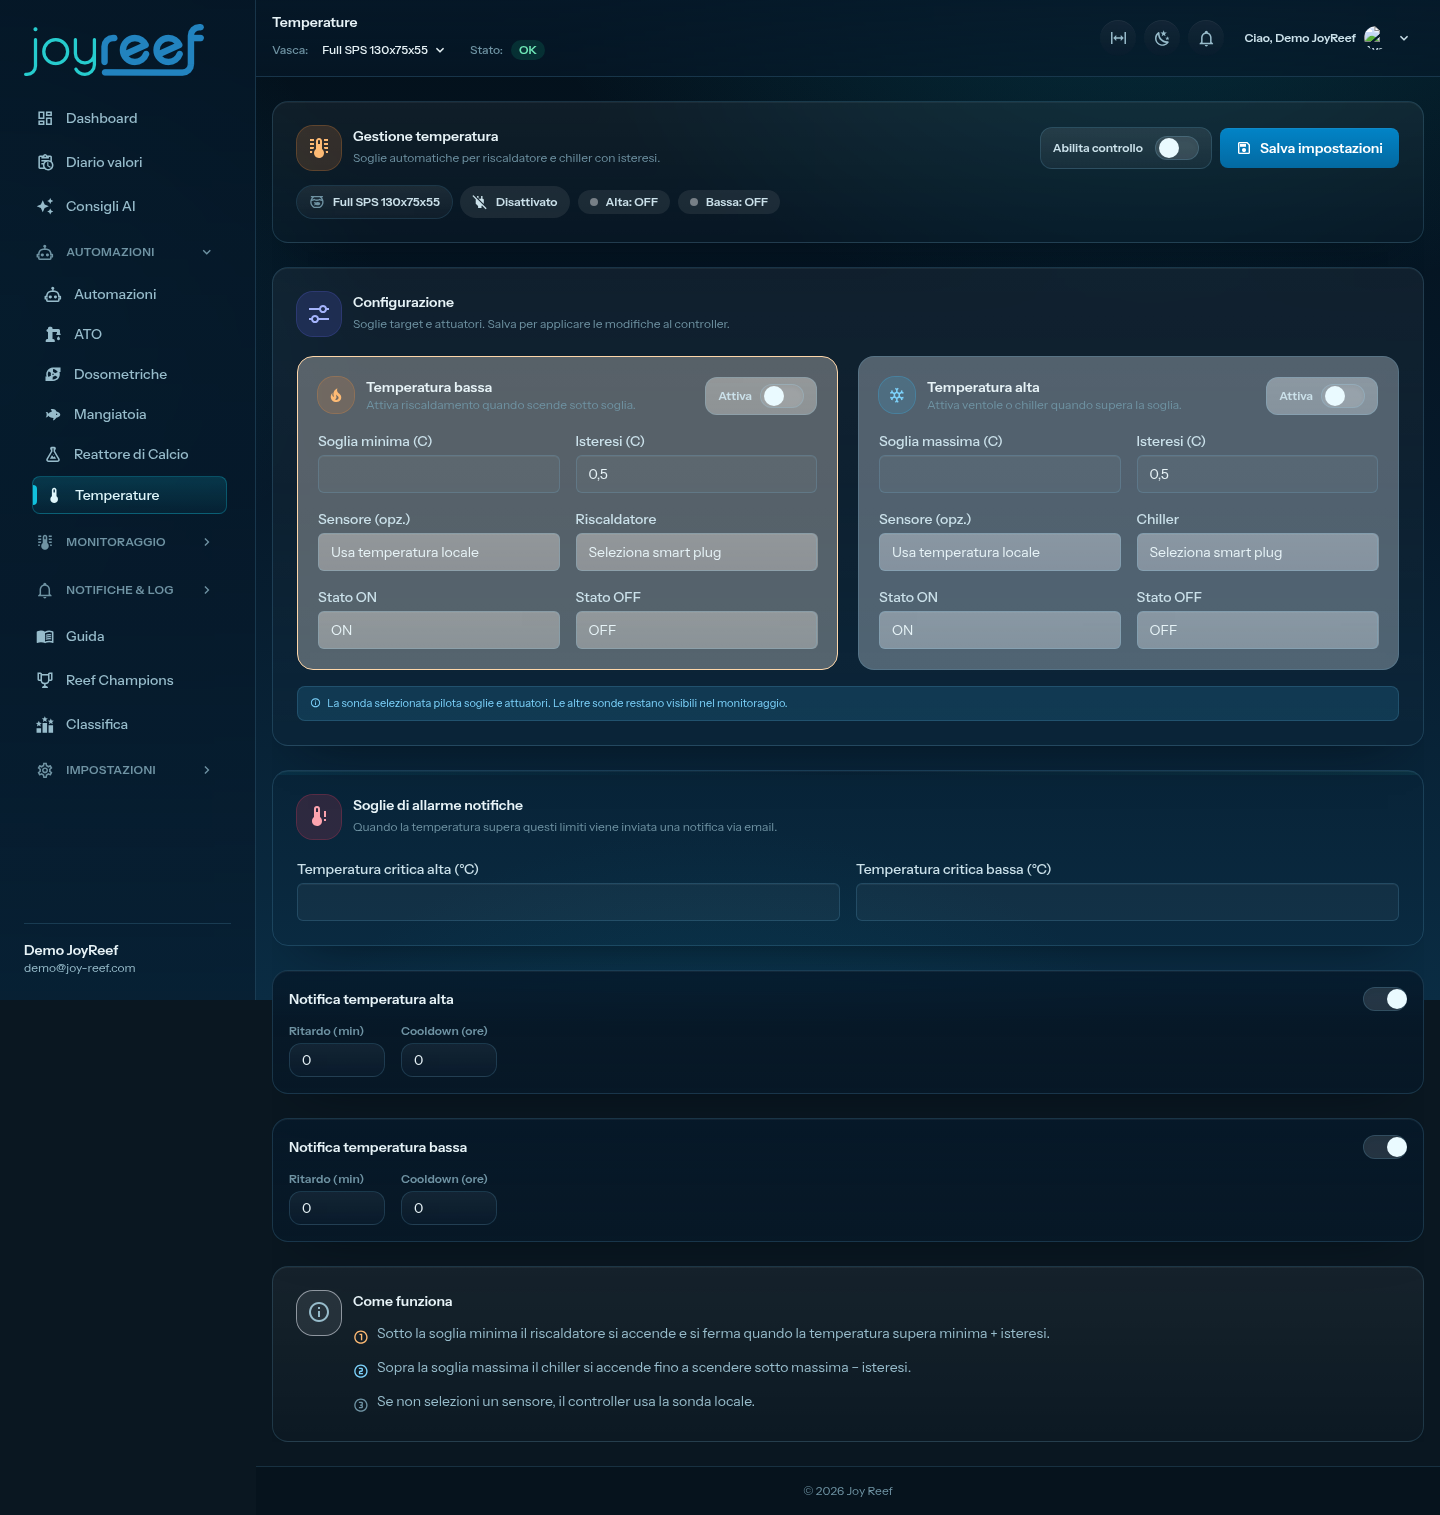
The "Temperature Protection" page opens. You see two large cards side by side (or stacked on mobile):
- Low Temperature (on the left) — heater
- High Temperature (on the right) — fan/chiller
Both start deactivated (gray "OFF" toggle). You will configure them one at a time.
If an orange banner "Tank not selected" appears → go back to guide 04 and set a primary tank.
5. Step 2 — Configure the heater (Low Temperature)
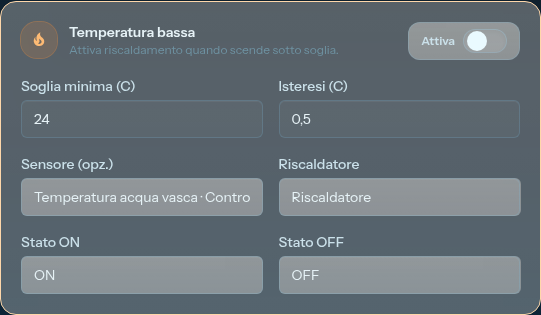
Let's work on the "Low Temperature" card on the left.
Step 1: activate the rule
Click the "Activate" toggle at the top right of the card. It turns green and the other fields "light up."
Step 2: choose the sensor (Trigger)
In the "Sensor" menu, choose the temperature probe you want to use as a reference for the heater. Typically:
- "Use local temperature" = DS18B20 probe connected directly to the controller (the most direct, no intermediate hops)
- "Tank water temperature · Main controller" = same probe but with an explicit name (if you assigned it to a role in guide 04)
For the tank heater, choose the main water probe (in the tank or sump, the temperature is practically identical if the pumps are running). If you have only one probe, you have only one possible choice.
Step 3: set the threshold
In the "Threshold" field, write the minimum temperature below which the heater should start.
Typical values for a tropical reef tank:
| Tank type | Recommended low threshold |
|---|---|
| Tropical reef (24.5-26°C target) | 25.0 |
| Cold reef (Mediterranean, 21-23°C) | 21.0 |
| Tropical freshwater | 24.5 |
💡 Set the threshold 0.5°C below your "ideal" temperature. If you want 25.5°C in the tank, low threshold = 25.0°C, high threshold = 26.0°C: the water oscillates in between.
Step 4: set the hysteresis
In the "Hysteresis" field, write how much the temperature must rise above the threshold before turning off the heater.
Typical values:
| Probe | Hysteresis |
|---|---|
| Standard DS18B20 (low noise) | 0.3 |
| Probe in a disturbed position (near the flow) | 0.5 |
Smaller = more precise control but more cycles. Larger = fewer cycles but wider oscillations. 0.3 is a good compromise for most cases.
Step 5: choose the smart plug (Actuator)
In the "Control Plug" menu, select the smart plug to which you connected the heater. Recognize it by name (e.g., "Heater," if you named it well in guide 05).
Leave the two menus below, "ON State" and "OFF State", at their defaults:
- ON State:
ON - OFF State:
OFF
That is: to turn on the heater, we send ON to the plug; to turn it off, OFF. Standard.
6. Step 3 (optional) — Configure fan or chiller (High Temperature)
Only if you have a smart plug dedicated to cooling. Otherwise, skip directly to section 7 and activate only the heater rule.
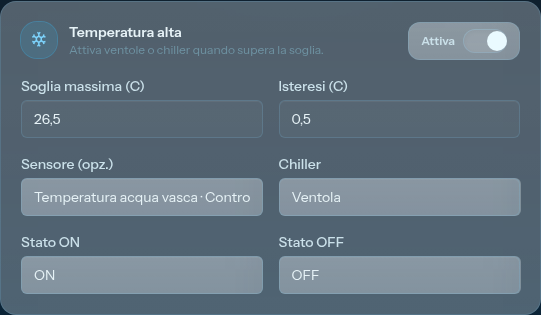
Let's work on the "High Temperature" card on the right. The logic is identical to the low one, just inverted:
Step 1: activate the rule
Click the "Activate" toggle on the "High Temperature" card.
Step 2: choose the sensor
Same reasoning as before. Use the same probe as the low rule if you have only one, or a dedicated probe in the sump if you have two.
Step 3: set the threshold
In the "Threshold" field, write the temperature above which the fan/chiller should start.
Typical values for a tropical reef tank (target ~25.5°C):
| Configuration | Recommended high threshold |
|---|---|
| Clip-on fan (cools by evaporation, mild) | 26.5 |
| Powerful chiller (cools effectively, rapid) | 26.0 |
💡 Leave at least 0.5-1°C of "buffer" above the ideal temperature. If you expect the tank at 25.5°C, a high threshold of 26.5°C is more than fine. Too aggressive thresholds (e.g., 26.0°C) cause the fan to run all day, unnecessarily increasing evaporation (and therefore top-off).
Step 4: set the hysteresis
Same value as the low one, 0.3. The fan turns off when the temperature drops 0.3°C below the threshold.
Step 5: choose the smart plug
In the "Control Plug" menu, select the smart plug to which you connected the fan (or chiller). It must be different from the heater one.
ON/OFF States: default (ON/OFF).
7. Step 4 — Save the settings
You have filled in the low card (and optionally the high card). Now:
At the top of the page, next to the "Temperature Protection" title, there is the "Save Settings" button. Click it.
A green banner appears: "Temperature settings saved and sent to controllers."
In a few seconds, the controller receives the new rules and starts applying them. From this moment, the heater (and fan) are automatically managed 24/7.
Verify that the controller has received
Above the cards, you see two status pills:
- High: ACTIVE or OFF
- Low: ACTIVE or OFF
They should reflect what you configured. If you see "OFF" even after activating the toggles, refresh the page (F5) and check again.

8. Step 5 — Verify that it actually works
The rules are saved. The real test is watching if the turning on/off actually happens when it should.
Passive test (wait and watch)
Go to the portal dashboard and keep an eye on it for 15-30 minutes:
- The real-time temperature value
- The status of the heater smart plug (must be
ONwhen T < threshold,OFFwhen T ≥ threshold + hysteresis)
In a normal tank, in winter, you should see the heater turn on 1-3 times per hour for 5-10 minutes each. In summer (or with little natural heating), much less frequent.
Active test (force an activation)
If you want to verify immediately without waiting:
- Raise the low threshold above the current temperature (e.g., if the tank is at 25.5°C and the threshold was 25.0, set it to 26.0)
- Save
- Within a few seconds, the heater must start (you hear it heating, and the plug on the devices page shows
ON) - Wait 30 seconds
- Bring the threshold back to the normal value (25.0) and save
- The heater turns off within 10-15 seconds
If both transitions occur, the system is working end-to-end. ✅
⚠️ Do not leave incorrect thresholds after the test. It's easy to forget: always put the correct values back and double-check.
Fan test (if active)
Same mechanism, inverted:
- Lower the high threshold below the current temperature (e.g., from 26.5 to 25.0)
- Save → the fan starts
- Hear the noise, see the plug in
ON - Bring it back to 26.5 and save → the fan turns off
9. Step 6 (optional) — Create advanced automations
Below the two cards, you find the "Advanced Automations" section with a "Create Automations" button.
What it does: it generates a series of ready-made routines in the Automations page that handle:
- Email notifications if the temperature goes out of range for more than N minutes (= suspected heater or probe failure)
- Timeline events for every on/off (useful for post-analysis)
- Cross-safety rules (e.g., if the temperature exceeds 28°C stop everything and notify immediately)
Should you do it? The basic rules (sec. 5 and 6) already work without them. Advanced automations are useful if:
- You want to be warned when something goes wrong (disconnected probe, broken heater)
- You want a historical record of the activations
- You have more than one probe and want consistency rules ("if the two probes differ by more than 1°C, alarm")
For now, you can skip this step and create them later when you are more familiar. You will always find them here.
10. If something goes wrong
The heater never starts
Possible causes, in order of probability:
- The "Low" rule is deactivated → double-check the "Activate" toggle of the low card
- The threshold is too low → if the threshold is 24.0 but the tank is at 25.5, it never starts because it's not needed. Raise the threshold or wait for it to cool down.
- Wrong or offline plug → go to Devices, check that the "Heater" plug is online. Try to command it manually: if it doesn't respond, the problem is the plug.
- Heater thermostat set too low → go to the physical heater, raise the regulator to full scale. The internal thermostat blocks heating before JoyReef can do anything.
The heater never turns off (stays on always)
- The probe is not measuring correctly → go to Sensors, see if the probe value updates in real time and has sensible values (24-27°C). If it's fixed at a strange value, the probe is faulty or disconnected.
- Hysteresis too high → with a hysteresis of
2.0, the temperature must rise by 2°C before turning off the heater: for large tanks, this takes HOURS. Lower to0.3-0.5. - Underpowered heater → if the heater cannot bring the water above the threshold + hysteresis (e.g., in winter with a cold room), it stays on always. You will need a more powerful one.
Too frequent on/off cycles
- Hysteresis too low (e.g.,
0.1) → raise to0.3-0.5 - Probe in a disturbed position (near the pump outlet, where the water changes quickly) → reposition in a more stable spot in the sump
The fan/chiller does not start when it's hot
- "High" rule deactivated → check the toggle of the high card
- Threshold too high → if the threshold is 28°C but the tank never passes 26°C, it never starts. Lower it.
- Wrong plug → check that it's the right plug (it must be different from the heater one)
The temperature fluctuates too much
Possible causes:
- High hysteresis + powerful heater → the combination creates wide swings. Reduce hysteresis or use a smaller heater.
- Probe exposed to air drafts (near the sump fan, for example) → reposition in a protected area
- Probe out of water occasionally (sump level dropping below the probe) → reposition lower or increase the sump level
The heater goes "tick tick tick" every few seconds
You are using a heater with a mechanical thermostat that clicks. The smart plug adds further clicks. Solution:
- Disable the heater thermostat (regulator at maximum, "locks" it)
- Or switch to a heater without a thermostat (pure "stick" cartridge)
11. Next step
You have the temperature under control: intelligent heater, optional cooling, tuned hysteresis. Your tank is now thermally stable even if you don't think about it anymore.
The next automation, if you are interested, is the automatic water change: two pumps (drain + fill) and some level sensors → weekly partial changes without manual buckets:
➡️ Guide 08 — Automatic Water Change
Or, if you want to understand how automations in general work (creating custom rules beyond the pre-packaged ATO/Temperature/Water Change ones):
➡️ Guide 09 — Advanced Automations
💡 Tip: keep an eye on the timeline for a few days. In the Events page, you should see the heater on/off regularly. If you see continuous activations (every minute) or no activations on cold days, go back to Temperature Control and recalibrate before moving on to something else.