WP8621 feeder: hardware mod, setup and feeding times
Reading time: ~15 minutes · Hands-on time: ~1 hour (soldering and flashing) + 15 minutes of setup · Audience: anyone who wants an automatic feeder wired into JoyReef and is willing to open it up and solder three wires
🔵 Advanced (technical) guide — not part of the 01-08 onboarding path. This is the most demanding guide in the set: it involves opening a device, soldering, and replacing its firmware. If you have never soldered before, this is not the guide to start with.
1. What you are about to do
The VSON WP8621 is an off-the-shelf automatic aquarium feeder, around €30. Out of the box it talks to the manufacturer's cloud through its own app: it works, but it is a closed world, it knows nothing about your tank, and it appears nowhere in JoyReef.
Inside there is a BK7231N chip, the same one found in a great many cheap WiFi devices. By replacing the original firmware with OpenBeken — a widely used free firmware built for exactly these chips — the feeder stops talking to the manufacturer's cloud and starts talking to your portal.
By the end of this guide you will have a feeder that:
- shows up in JoyReef like any other device, with its own page and status;
- dispenses counted portions, not seconds of motor (see below: this is the difference that matters);
- keeps its feeding times on board, so it keeps feeding even when the portal or your internet connection are unreachable;
- reports when the drum jams and when the food is running out.
⚠️ What you are accepting. Opening the device and replacing its firmware voids the warranty, and the manufacturer's app will never work again: the device becomes entirely yours, cloud included. The flash can also go wrong and leave the feeder temporarily silent — it is recoverable (see sec. 10), but plan for it. This is not something to rush the night before you leave on holiday.
💡 Why "portions" and not "seconds". Inside the drum there is a flap that opens and closes once per revolution. A portion is not "N seconds of motor" but "turn until the flap has completed one full cycle": that way the dose stays the same even if the motor slows down or the food resists. It is also a practical matter — stopping with the flap open would let food keep falling into the tank. This logic lives on the device, not in the portal.
2. What you need
Hardware
- ✅ A VSON WP8621 feeder (board
WP8621_V12). It is also sold under other brands: what matters is that it contains theWiFi001_V20module, which you will see as soon as you open it. - ✅ A CP2102 USB-to-serial adapter at 3.3 V — the same one used in guide 16b, ~€5. If you already have one for the dosing pump, it will do.
- ✅ A fine-tip soldering iron and a little solder.
- ✅ Three thin wires (dupont female leads cut in half work well).
- ✅ A PC with Python. The instructions here are for Linux; on Windows and macOS the commands are the same, only the serial port name changes.
Software
pipx install ltchiptool bk7231tools
pipx inject bk7231tools pycryptodome
⚠️ Never use the adapter's
+5V. Many CP2102 boards have two power pins,3V3and+5V. Here you need neither — but if you touch the wrong one, 5 V will damage the module. If your adapter has a voltage jumper, check it is set to 3.3 V before connecting anything.
3. Opening the feeder
Unplug the power, remove the food hopper and open the shell: the two halves come apart and stay joined by the motor wires. The board you want is the narrow green one, with the power jack at one end and the WiFi module — the part with the zigzag printed antenna — at the other.
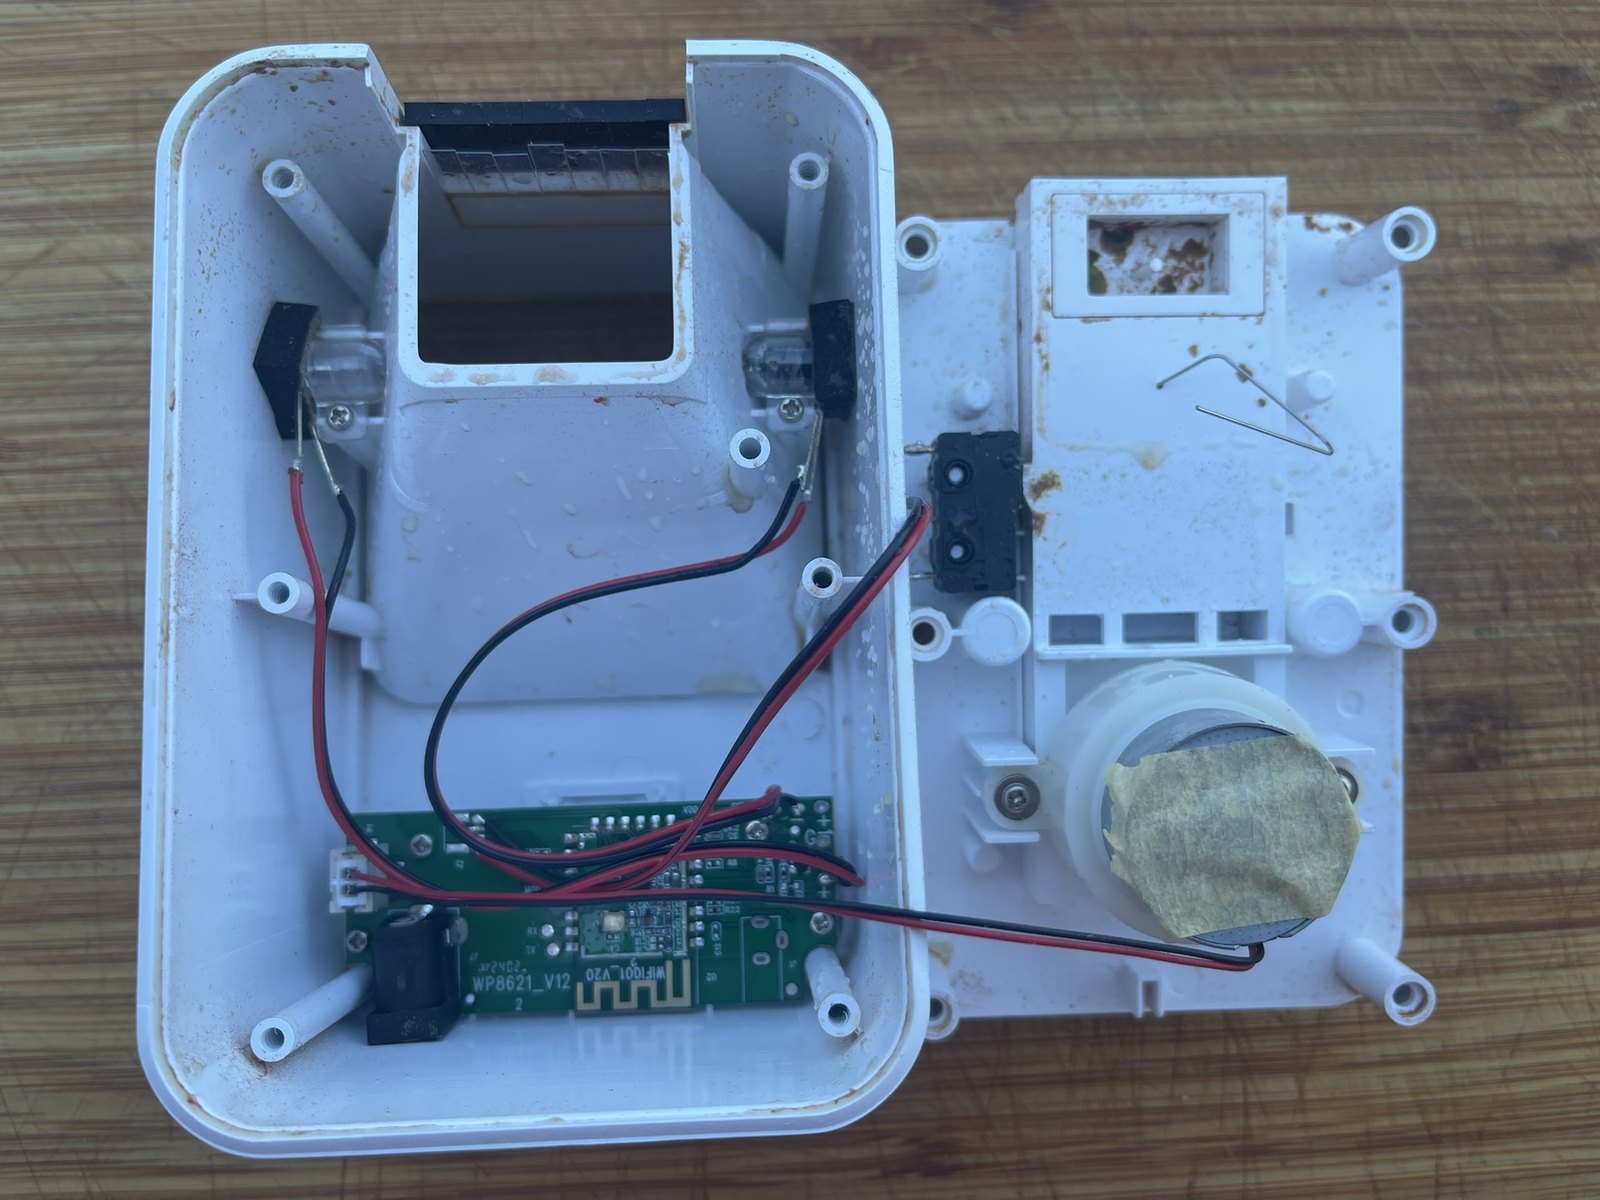
The test pads are silkscreened on the green board, next to the module — not on the module itself. We will use three of them:
| Pad | Where it is | What it is |
|---|---|---|
| TX | in the column to the left of the module | serial transmit (pin P11 of the chip) |
| RX | just above TX |
serial receive (P10) |
| GND | at the top, next to VDD |
ground |
💡
GNDis not with the other two.MOD,RXandTXsit in a column to the left of the module, whileVDDandGNDare at the top, on the other side of the row of pins. Looking for it belowTXis wasted time.
VDD and MOD are not needed and must not be connected.
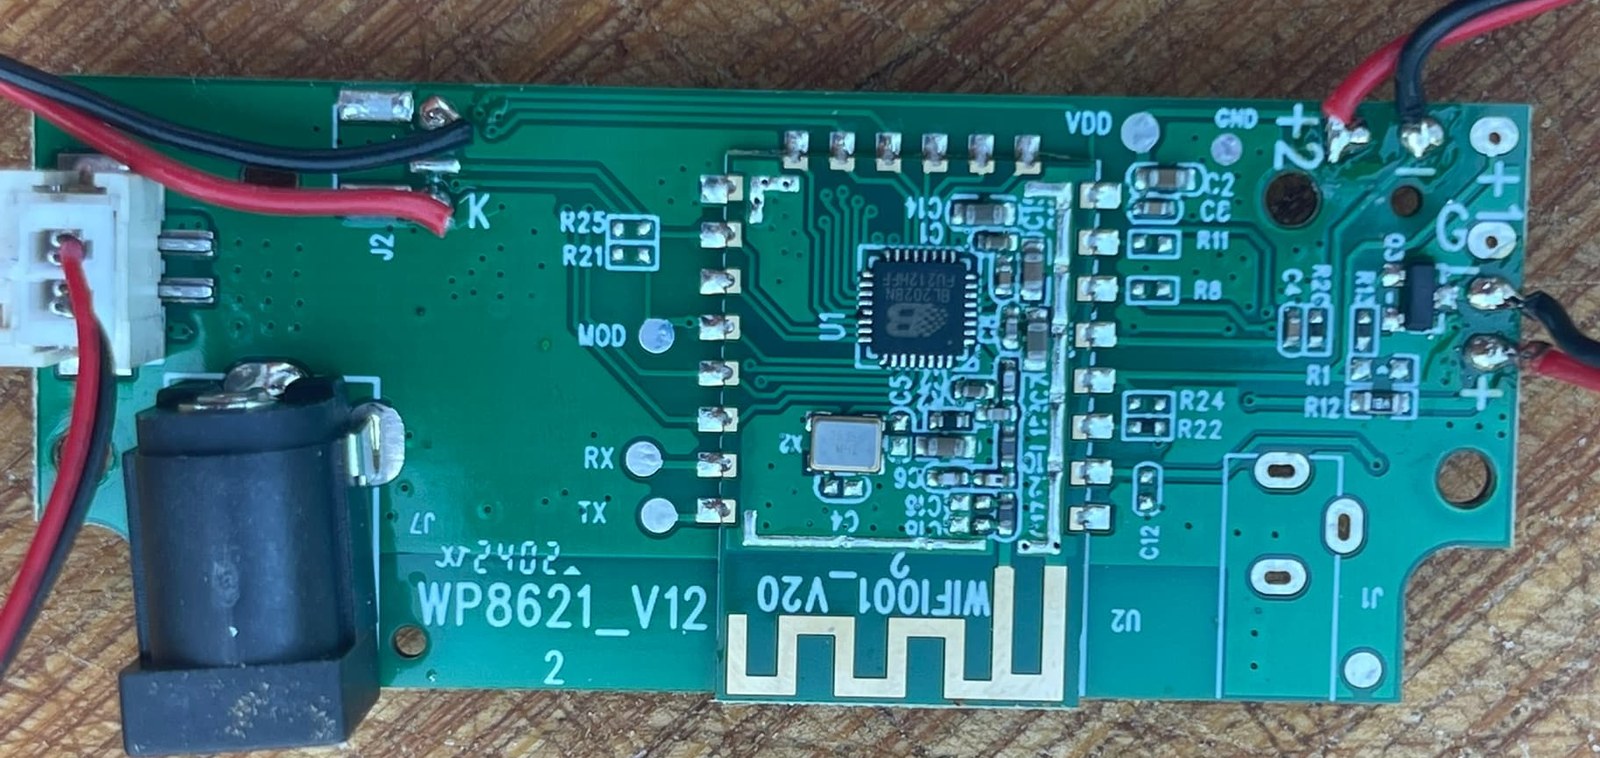
💡 The chip says
BL2028N, and that is fine. It is the same thing as a BK7231N: the marking changes with the module supplier, the silicon does not. If yours readsBL2028Nyou are in the right place — and what is said later about which build to use still applies.
4. Soldering the three wires
Solder one wire to each of the three pads. They are small: fine tip, little solder, and check with a magnifier that there are no bridges between pads.
Then connect to the adapter, crossing TX and RX:
| CP2102 adapter | WP8621 module | |
|---|---|---|
TXD |
RX |
crossed |
RXD |
TX |
crossed |
GND |
GND |
straight |
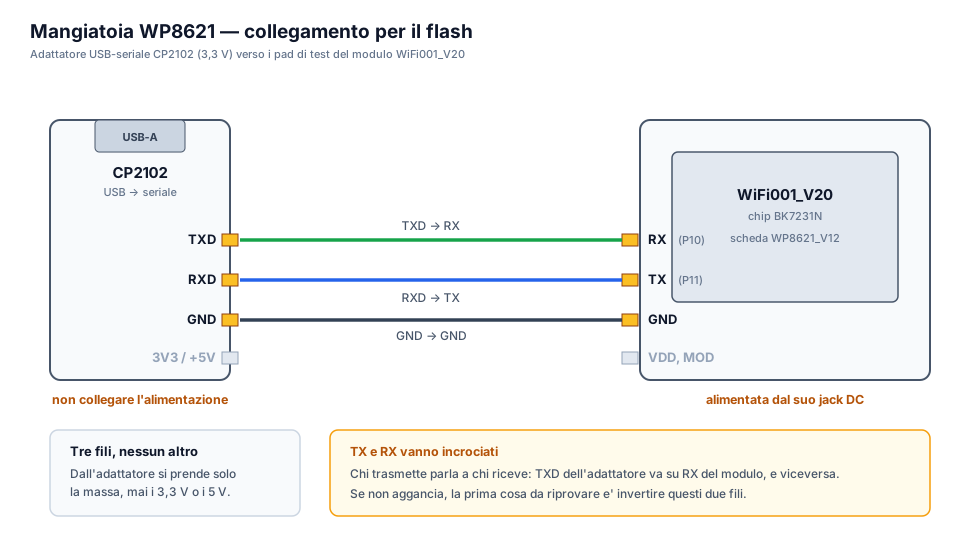
⚠️ Never two power sources at once. During flashing the feeder stays powered from its own DC jack, and from the adapter you take only GND. Do not connect the adapter's
3V3while the DC jack is plugged in: those are two conflicting sources.
Route the three wires out of the shell without pinching them, and rest the feeder somewhere stable: it must not move during flashing.
5. Flashing OpenBeken
5.1 First of all, the backup
Do not skip this step. The backup is what turns a mistake into an inconvenience.
ltchiptool flash read bk7231n stock-original.bin -d /dev/ttyUSB0 -t 300
The command waits for the chip to enter download mode, and to get it there you have to reset it while the tool is listening (see 5.2). When it finishes you have a 2 MB file: keep it off the PC, together with the date.
⚠️ The backup contains the WiFi credentials and the device key. Do not publish it, do not put it in a repository, do not send it over chat.
Verify it by reading a second time and comparing: if both files have the same sha256sum, the read is good.
5.2 The reset has to be a real one
This is where almost everyone gets stuck, so read it before you try.
When the board is powered from the DC jack, the internal power supply capacitors hold the voltage up for a few seconds after you unplug. A quick unplug-replug does not reset the chip: the download window never opens, and you can keep trying forever without understanding why.
Unplug, count to fifteen, plug back in. A full ten to fifteen seconds. If you want to speed it up, press the feeder's button while it is off: that drains the capacitors.
The right sequence is:
- start the
ltchiptoolcommand (read or write) and leave it waiting; - only then unplug the power, wait 15 seconds, plug back in;
- the command latches on and starts.
5.3 Writing OpenBeken
Download the release from github.com/openshwprojects/OpenBK7231T_App and take the OpenBK7231M_QIO_*.bin file.
⚠️
BK7231M, notBK7231N. It looks like the opposite of what you should pick, and yet it is correct: in OpenBeken's naming,BK7231Mmeans a BK7231N with zero encryption keys, which is exactly the WP8621 case. With theBK7231Nbuild the device will not boot.
ltchiptool flash write OpenBK7231M_QIO_1.18.309.bin \
  -f bk7231n -s 0x0 -d /dev/ttyUSB0 -b 115200 -t 400
The -f and -s parameters are mandatory: the QIO file is not recognised on its own. The speed has to be forced to 115200.
⚠️ Hands off for at least a minute. This is the worst trap in the whole guide. After plugging the power back in you cannot see straight away whether it latched on, and the temptation is to unplug and retry — but if writing has already started, interrupting it corrupts the flash halfway and the feeder will not boot. Keep the terminal in sight and wait until you read the
Erasing and writing at 0x...lines: from that moment on, touch nothing until it finishes.
When it is done (233 sectors, a couple of minutes) disconnect the adapter. You can leave the three wires soldered — they are harmless, and you will want them if one day you decide to go back to the original firmware.
5.4 First boot
Plug the power back in. The feeder creates an open WiFi network called OpenBK7231M_XXXXXX. Connect with a phone or PC, open the browser at 192.168.4.1, go to Config → Configure WiFi and enter your home network name and password.
After the restart the feeder joins your network. Find its IP address in your router's panel and open it in the browser: if you see the OpenBeken page, the hard part is done.
6. Adding the feeder to the portal
From here on everything happens in the browser.
In the portal go to Devices → Add feeder (you can also reach it from Feeders, even when the list is empty).
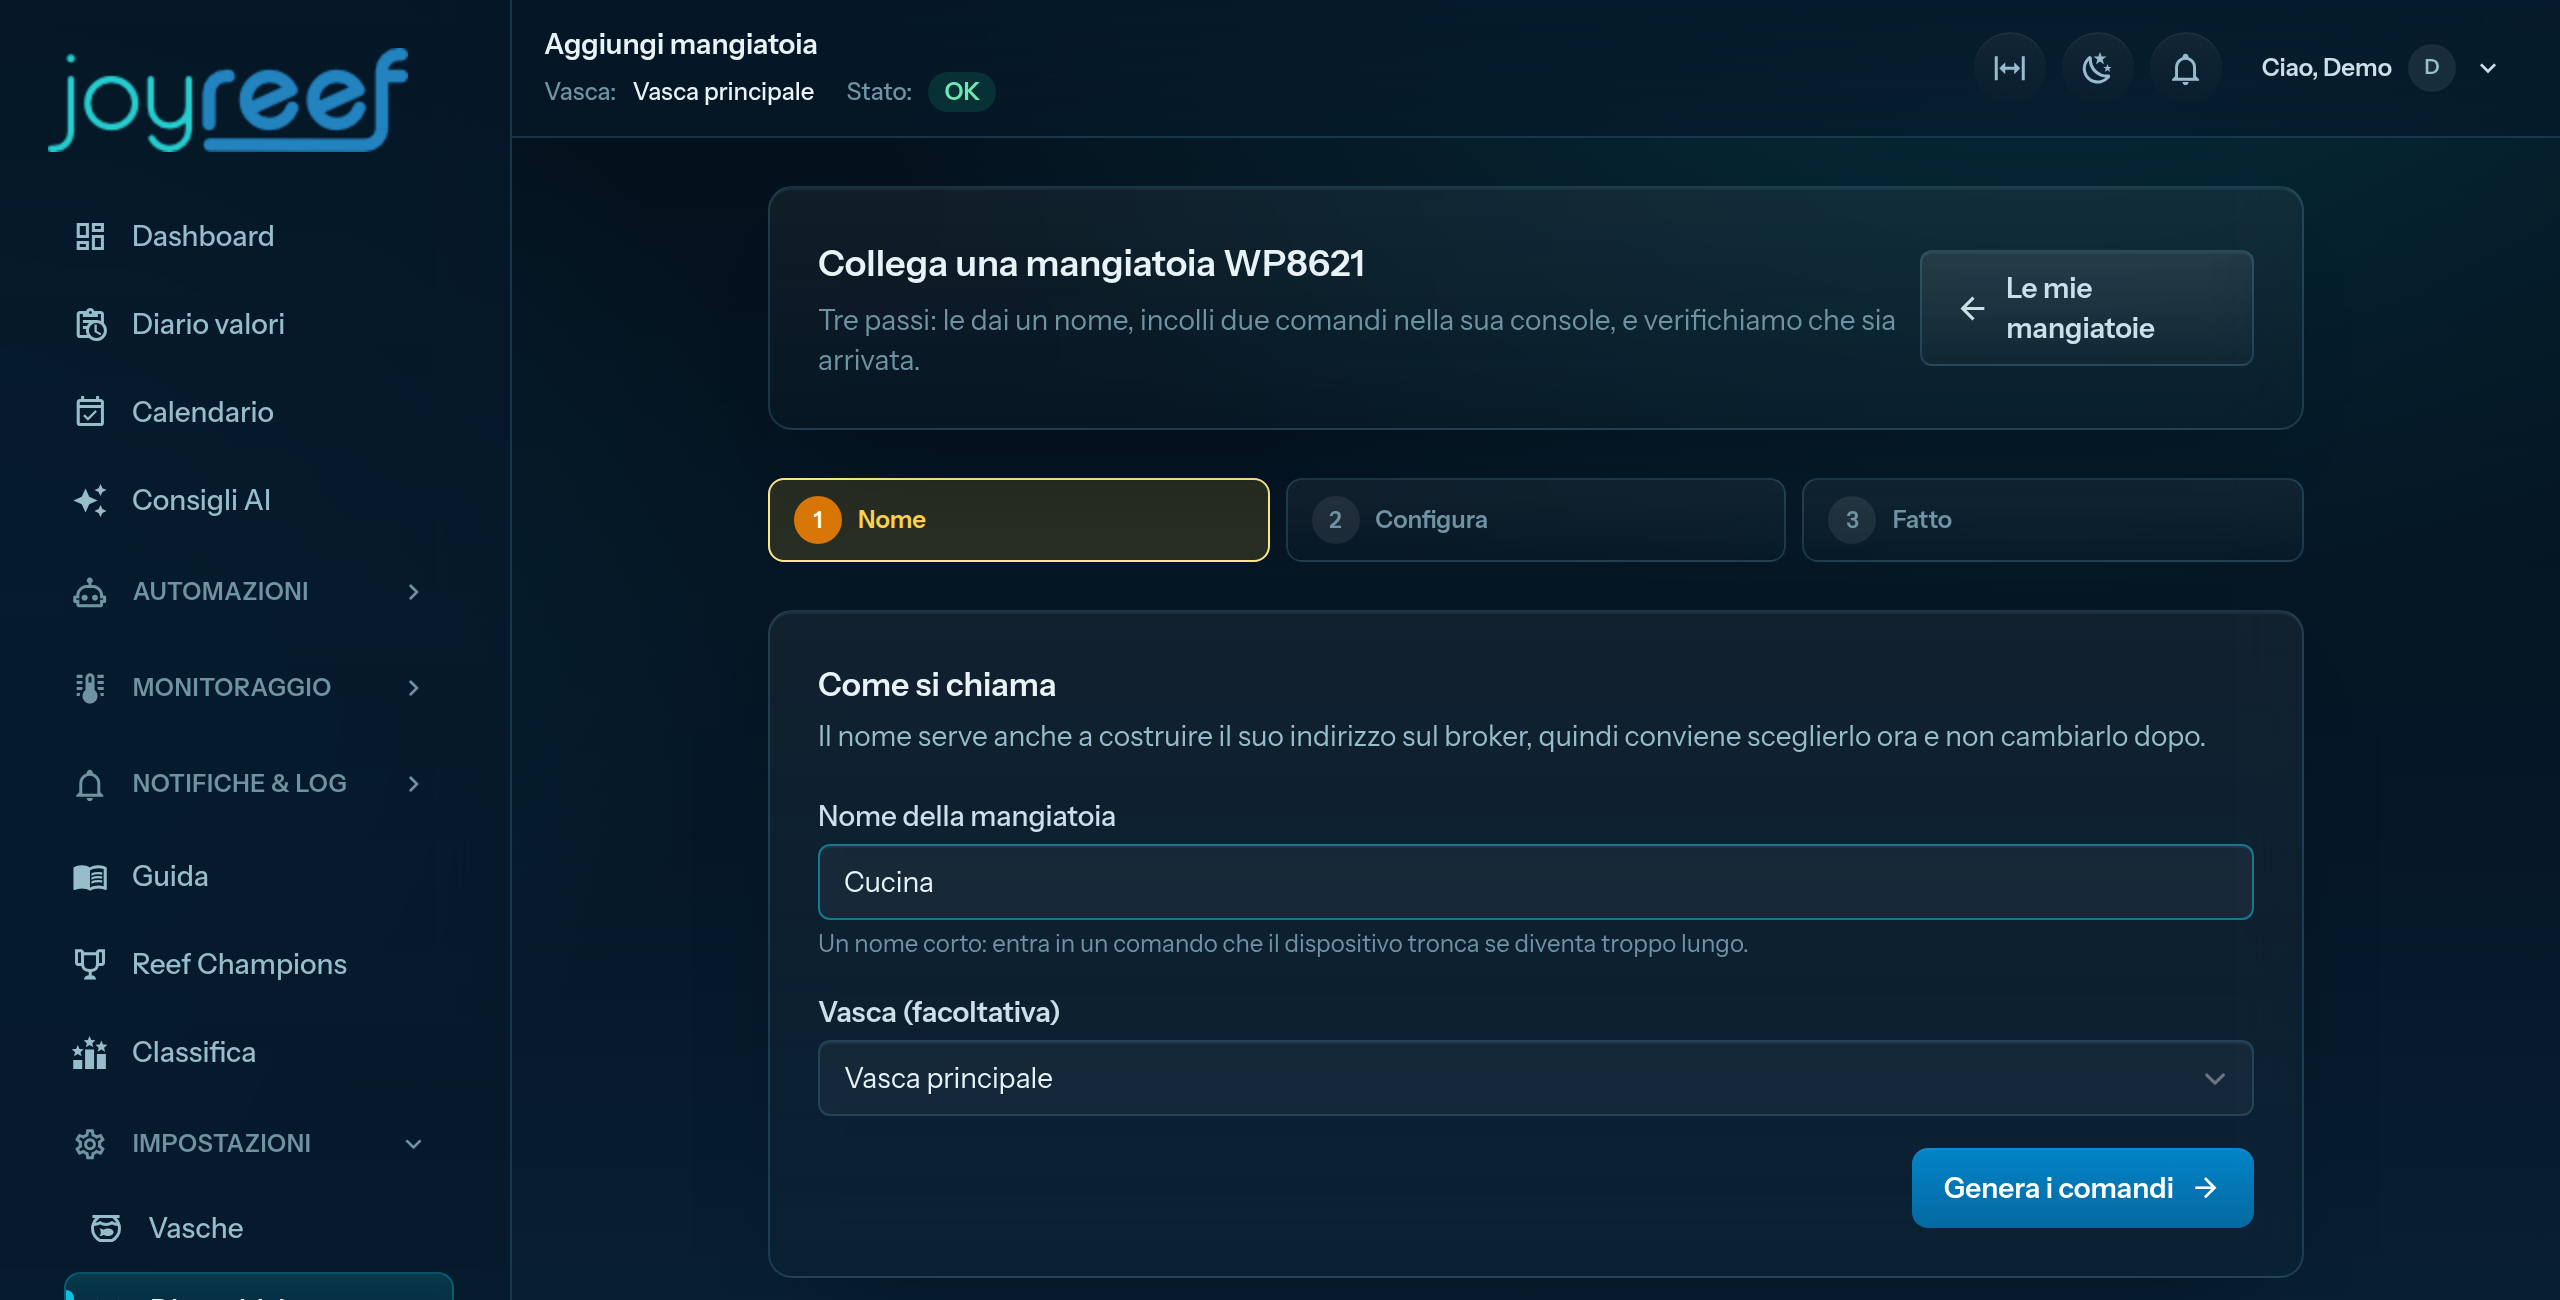
Step 1 — Its name. Choose a name and, if you like, the tank.
⚠️ Pick a short name and never change it. The name is not just a label: it becomes part of the address the feeder uses to introduce itself to the portal. A long name overflows the configuration command, which the device truncates without telling you. "Kitchen" is fine, "Main living room tank feeder" is not.
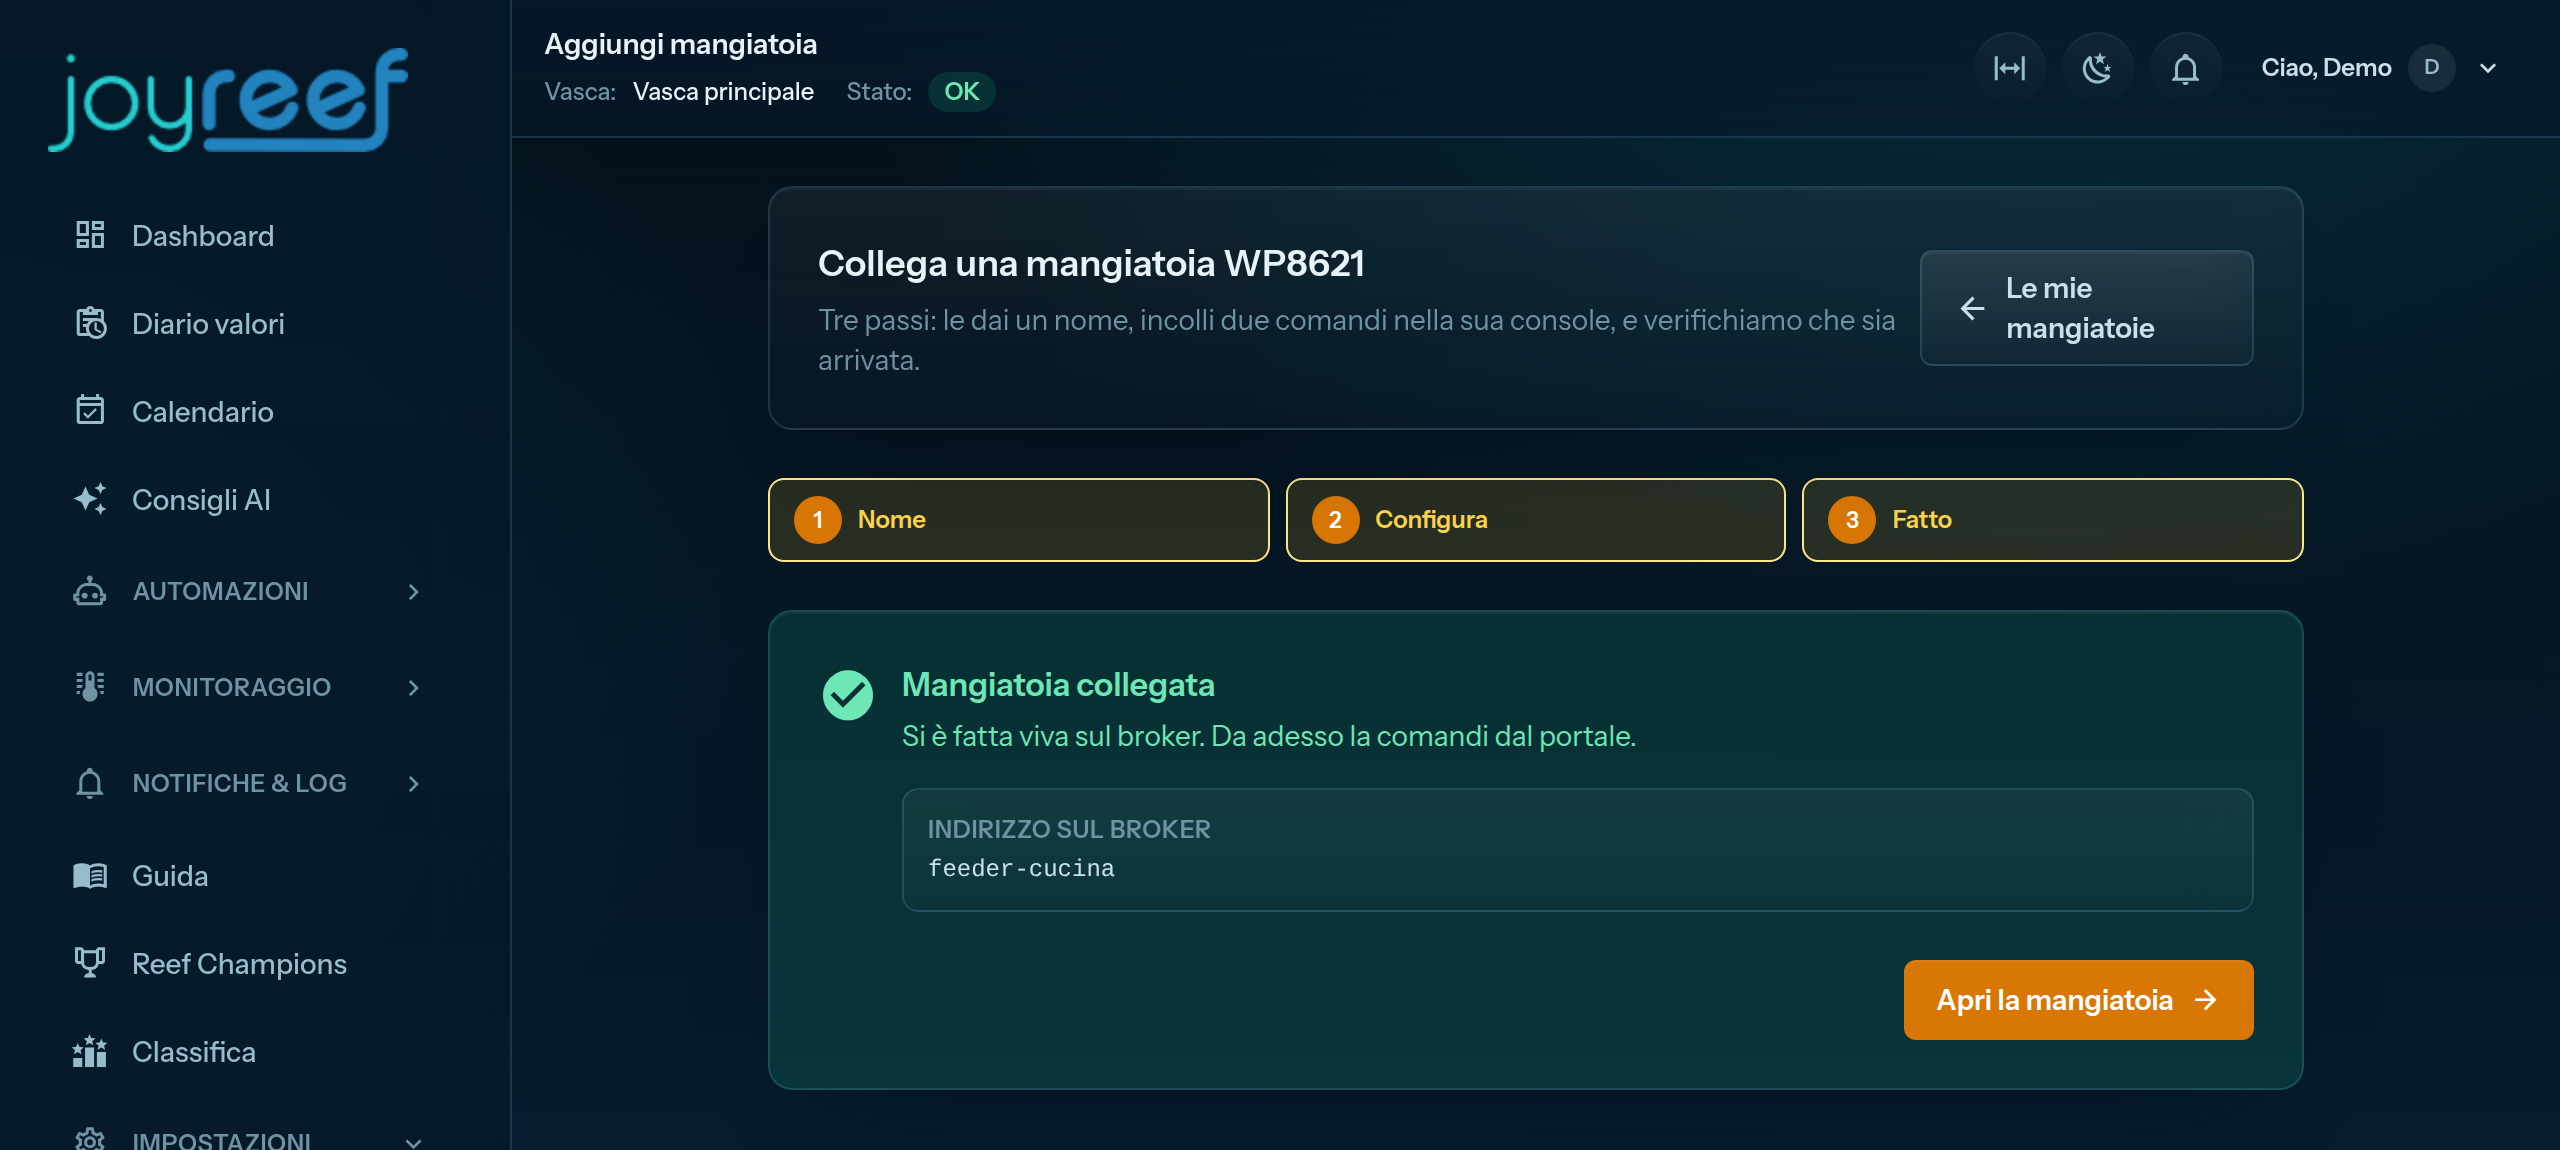
Press Generate the commands: the portal creates the credentials and shows you two commands to paste.
7. Pasting the commands and connecting it
There are two commands and they must be pasted separately: together they do not work. Between them there is a step that cannot be done from the command line.
7.1 Open the feeder's IP address in your browser.
7.2 Press Config, then Execute Custom Command.
💡 Do not look for a "Console" entry. OpenBeken does not have one: the place where you paste commands is called Execute Custom Command, inside Config.
7.3 Paste the first command (connection and inputs) and press Submit.
7.4 If the portal shows you a step about the port, do it now: Config → Configure MQTT, type the port into the Port field and press Submit.
⚠️ The port can only be set from that form. The
MqttPortcommand does not exist in this firmware: if you send it, the device answers without errors and carries on leaving the port as it was. Fill in all the fields of the form, not just the port: the ones you leave blank get wiped.
7.5 Go back to Execute Custom Command, paste the second command (dispensing rules) and press Submit.
7.6 Return to the home page and press Restart.
⚠️ The restart is not advice, it is a required step. The second command stores the rules, it does not run them: they come into effect at the next boot. A feeder you have pasted everything into but never restarted shows as connected in the portal and does not dispense, which is the most annoying way to get this wrong — everything looks fine.
7.7 In the portal press Verify the connection. After the restart the feeder takes about ten seconds to reconnect.
8. Testing a dispense
Open the feeder's page. You can see the live status — flap, motor, food level, jam — and the on-board clock.
Choose 1 portion and press the dispense button. This is what should happen, over about fifteen seconds:
| immediately | the motor starts |
| after ~2 s | the flap shows as open |
| after ~13 s | the flap is closed again and the motor stops |
| the jam indicator stays off |
⚠️ Three portions per dispense, maximum. The on-board jam watchdog is armed for a time that covers three drum revolutions: asking for a fourth would trigger a false alarm that cuts the dose short. If you need larger doses, set two feeding times close together instead of one extra portion.
💡 Check again a minute later. On this device a false jam alarm, when it happens, arrives late. Looking only at the immediate status is not enough to conclude it went well.
The on-board clock
The page shows the time the feeder believes it is. Look at it. The feeding times are counted by the feeder, not by the portal: if its clock is off, meals come out at the wrong time and there is nowhere else you would notice.
If the portal flags a drift, the typical cause is the daylight saving change, which has to be pushed back to the device. The button next to the time asks for it again: the feeder answers within about ten seconds.
The food level
The level indicator is an optical barrier: it says "I can see food" or "I cannot see food", not how much is left.
💡 Calibrate it with your own food. The fill level at which the barrier clears depends on the pellet size: let it run down once while watching when the indicator flips, and you will know how much time you have left when it trips.
9. Setting the feeding times
In the Feeding times section add a time, pick the days of the week and the number of portions (1 to 3). You can set up to eight.
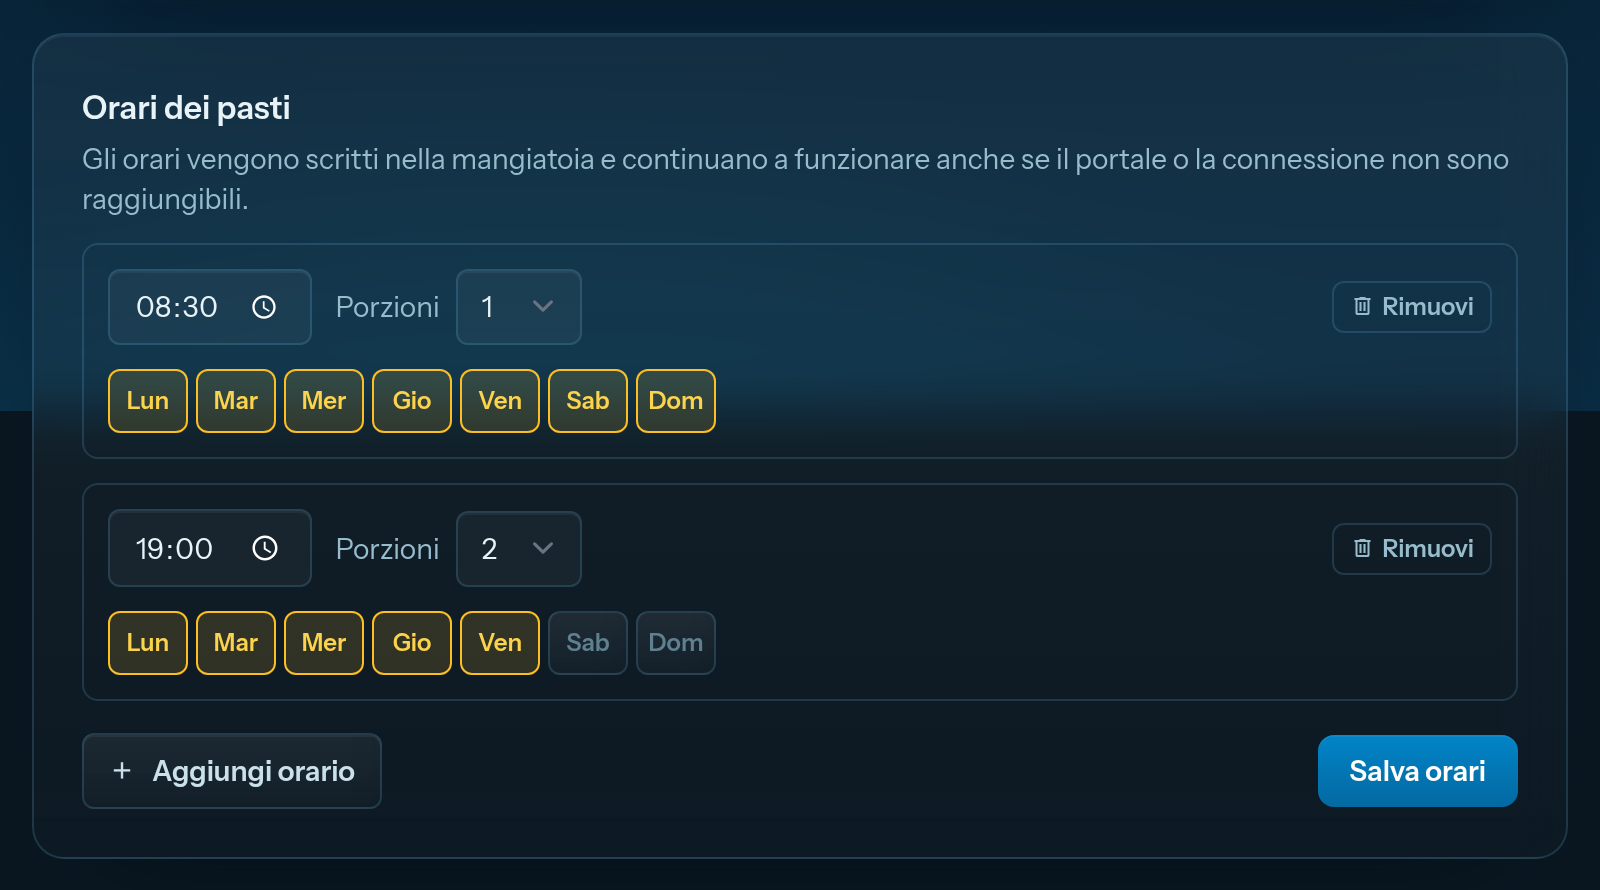
On save, the portal writes the times inside the feeder and activates them immediately, without waiting for a restart.
💡 The times do not depend on the portal. Once saved they live in the device: if the portal is down for maintenance, if your line drops or if you unplug the router, the meals keep coming out. That is why the feeder holds the schedule on board instead of receiving it at the moment it is due.
If on save the portal warns you the times have not arrived yet, the feeder was unreachable: they stay pending and are pushed again by themselves as soon as it reconnects. The warning clears once they get through.
Checking they are really there
If you want proof, open in your browser:
http://<feeder-ip>/api/lfs/autoexec.bat
You should see one line per feeding time, plus a first line which is the heartbeat the feeder uses to check in every two minutes:
addRepeatingEventUID 120 -1 92 PublishChannels
addClockEvent 17:42 0x7f 40 SetChannel 30 1
💡 This is the check that counts. This file is what the feeder re-reads at every boot: if the times are in there, they survive a blackout.
10. When something goes wrong
ltchiptool keeps waiting and never latches on.
The reset was not a real one: the capacitors were holding the voltage up. Unplug, wait a full fifteen seconds, plug back in (see sec. 5.2). Also check that TX and RX are crossed.
After flashing, the feeder shows no sign of life. Almost always this is a write interrupted halfway. It is not permanently broken: the chip has download mode in ROM and always latches on again — in fact, with a broken boot it is even easier, because it does not even try to start. Repeat the write, this time without touching anything. If you have the backup, you can also go back to the original firmware.
I used the BK7231N build and it will not start.
That is the case described in sec. 5.3: you need OpenBK7231M_QIO. Rewrite with the right file.
The portal says it is connected, but it does not dispense. The restart in step 7.6 is missing. The rules were only stored.
The connection check fails.
Nine times out of ten it is the port. Reopen Config → Configure MQTT and check that the Port field contains the value the portal gave you: the pasted command cannot set it, and if the form was never filled in the port is still the old one.
Meals come out at the wrong time. Look at the on-board clock on the feeder's page (sec. 8). It is the one deciding, not the portal.
Food keeps falling after the dispense. The drum stopped with the flap open, which means it jammed. Empty and refill the hopper: it is usually food that is too coarse or damp and bridges over.
Where to go next
- Guide 14 — Events: every dispense lands in the tank diary.
- Guide 15 — Notifications: get told when the food is running out.
- Guide 16b — Flashing with a CP2102 serial adapter: the same soldering technique, applied to the dosing pump.